All posts by Kelly

Beef Lombardi

You all know I love make ahead meals (remember this and this and this). And I have a soft spot for casseroles. Well, here’s the recipe that is now both my favorite make ahead meal and my favorite casserole. I’ve kept a batch of this on hand in my freezer continually since I discovered the recipe this fall. It hails from the new What’s for Supper cookbook from Southern Living. While not overly impressed by some of the recipes in the book (too many prepared processed foods for my taste), I knew I would try this recipe for the name alone. Green Bay Packer coach Vince Lombardi holds a special place in the hearts of most Wisconsinites and if the casserole performed even half as well as the coach, it was worth a try. Touchdown!
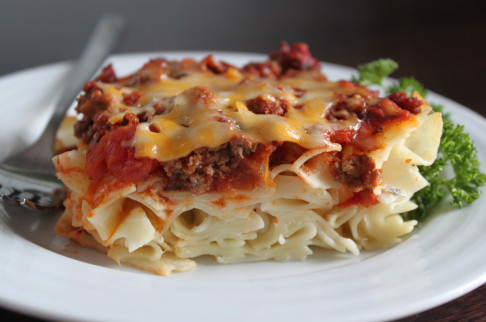
Beef Lombardi
adapted from Southern Living What’s for Supper

This is an easily adaptable recipe. I usually use more egg noodles than called for and then add an extra tablespoons of cream cheese. Since my daughter is currently green onion adverse, I cut back on those or use only the white parts so she doesn’t notice them as much. Feel free to experiment according to your own tastes.

Serves 8

10–12 oz (280–340 g) medium egg noodles
1 lb (450 g) lean ground beef
1½ teaspoons salt, divided
½ teaspoon dried Italian seasoning or dried oregano
1 x 6‑oz (170 g) can tomato paste
1 x 14-oz (400 g) can diced tomatoes
4 oz (110 g) cream cheese, softened
½ cup (120 ml) sour cream
4 green onions, chopped
1 cup (4 oz/110 g) shredded Italian six-cheese blend or mozzarella cheese

Preheat the oven to 350°F (180°C). Prepare the egg noodles according to package directions.

Meanwhile, sprinkle the ground beef with 1 tsp. salt and the Italian seasoning. Cook the beef in a large skillet over medium heat, stirring often, 5 to 6 minutes or until meat crumbles and is no longer pink.

Stir in the tomato paste, and cook 2 minutes; stir in the tomatoes, 1/2 cup water, and remaining 1/2 tsp. salt; reduce the heat to medium-low, and simmer 8–10 minutes until thickened a bit.

Microwave the cream cheese in a microwave-safe bowl at HIGH 20 seconds. Stir in the sour cream and green onions into the warm cream cheese, then gently stir the cream cheese mixture into the hot cooked noodles.

Spread the noodle mixture in the bottom of a lightly greased 11- x 7‑inch baking dish. Top the noodles with the beef mixture then sprinkle the shredded  cheese evenly over the mixture.

Bake the casserole at 350° for 25 minutes or until hot and bubbly.

To make ahead: Freeze the unbaked casserole, tightly covered, for up to 1 month. Thaw in the refrigerator overnight, then bake at 350°F (180°C), loosely covered in aluminum foil for 25 minutes. Remove the foil and continue baking about 15 minutes more until the cheese is melted and the casserole is hot.

Chicken Cakes with Teriyaki Sauce

I vowed to post more recipes in 2013 and, like so many other New Year’s resolutions, find myself failing miserably by the end of January. Despite my blog negligence, I have been cooking up a storm. I now realize that the prospect of free time on the weekends thrills me because I know I will have time to spend a few hours on my feet in front of the stove, my desire to stand around and stir pots all afternoon the result of working a desk job, I guess!

Though these delicious chicken cakes aren’t the best thing I’ve made this month, they were cooked during our sunniest (most photo friendly) weather. I love the rich umami taste of these succulent little meat cakes and the fact that the homemade teriyaki glaze cooks in the pan along with the chicken, requiring no separate sticky pot to wash later. Though we all enjoyed them, Anabelle scarfed hers down fastest with a nod of approval and an it-tastes-like-sausage compliment. If you know my kids, no bigger praise can they bestow on food.

Chicken Cakes with Teriyaki Sauce
adapted from The Cookbook Junkie’s adaption from Around The World in 450 Recipes by Sarah Ainley (editor)

I paired this Japanese inspired dish with a cucumber salad and string beans. A side of rice would also be nice, but don’t expect to have extra sauce to flavor it. The teriyaki “sauce” is really a glaze. These would make awesome appetizers.

makes 1 dozen

For the chicken cakes:
1 lb (450 g) ground chicken
1 large egg [optional, I forgot to add the egg and my cakes turned out just fine]
1/2 small onion, grated
1 ½ teaspoons sugar
1 ½ teaspoons soy sauce
Cornstarch or tapioca starch, for coating
2–3 scallions, cut in half, white/light green ends shredded and green parts chopped
2 tablespoons vegetable, canola, or sunflower oil

For the teriyaki sauce:
2 tablespoons sake or dry white wine
2 tablespoons sugar
2 tablespoons mirin
2 tablespoons soy sauce

Mix the ground chicken with the egg, grated onion, sugar and soy sauce until the ingredients are thoroughly combined and well bound, about 2 minutes. The mixture will be quite sticky, which makes for good texture. Shape the mixture into 12 small, flat, round cakes and dust them lightly all over with cornstarch. Since the mixture is very sticky, I found it easiest to coat my fingers in cornstarch then drop the semi-formed cake into the cornstarch. Once it was covered in cornstarch I was able to properly form it.

Soak the white/light green part of the scallions in ice water for 5 minutes and drain well.  The ends should curl slightly.

Heat the oil in a frying pan. Place the chicken cakes in a single layer, and cook over medium heat for 3 minutes. Turn the cakes over and cook for 3 minutes longer, until cooked through.

Mix the ingredients for the sauce and pour it into the pan. Turn the chicken cakes occasionally until they are evenly glazed. Move or gently shake the pan  to prevent the sauce from burning.

Arrange the chicken cakes on a plate and top with the scallions. Serve immediately.


All Purpose Spice Rub & Rainbow Bean Soup Mix

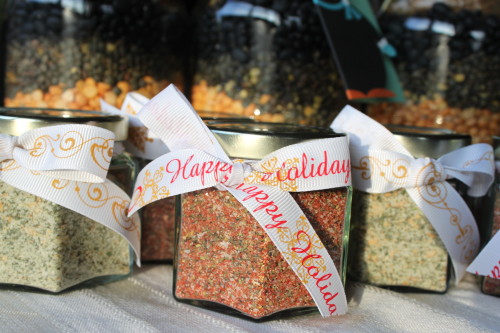
This year, I decided to forgo the store-bought, China-manufactured, last-minute purchased gifts that I usually give out at holidays. I had the bright idea (insert sarcasm here) to make homemade food gifts this year. I figured, why not? I like to hang out in the kitchen. I like buying ingredients. I like one-of-a-kind treats. Well, readers, here is why not. I have about 30 people who need gifts this year (my kids attend schools with lots of teachers in each room). Christmas is less than a week away and I’m still searching for packaging materials, running out of ingredients, and trying out new recipes with limited success.  On the upside, this weekend the kids and I made up a few batches of spice rub and a half dozen quart jars of soup mix and they turned out amazingly cute. I tried out a couple other gift ideas (salted caramel sauce and hand-chopped garlic herb salt) but the end products, though tasty, didn’t justify the the work involved in making them. So, if you are looking for a unique gift that you can make with minimal fuss, I highly recommend one of these instead.

All-purpose Spice Rub
from Everyday Food, July/August 2006

I found lovely little jars at a reasonable price at specialtybottle.com. This recipe easily double or triples so you can mix up a big batch and fill a dozen small jars at one go.

Makes about 1 1/4 cups

1/3 cup (75 g) coarse salt
1/4 cup (40 g) packed light-brown sugar
1/4 cup (30 g) paprika
2 tablespoons ground black pepper
2 tablespoons dried oregano
2 tablespoons dried thyme leaves
1 tablespoon cayenne pepper (optional, I used 1/2 teaspoon per batch)

In a small bowl, combine all the ingredients, using your hands to break up the sugar. Store in an airtight container, away from heat and light, up to 6 months.

***

Rainbow Bean Soup Mix
adapted from food.com

Makes 1 quart jar

3/4 cup (150 g) dried red beans
3/4 cup (150 g) dried great northern beans
2/3 cup (125 g) dried split peas (yellow or green)
2/3 cup (115 g) lentils (brown, green, or red)
2/3 cup (130 g) dried black beans

Seasoning bag:
2 tablespoons dried onion flakes
2 tablespoons beef or chicken bouillon granules (sold in soup section)
2 tablespoons dried parsley flakes
2 teaspoons dried basil
2 teaspoons sweetened lemonade drink mix
1 1/2 teaspoons chili powder
1/2 teaspoon garlic powder
1/2 teaspoon pepper
1 teaspoon dried oregano

Use a quart jar that has a wide mouth, but if you can’t find one any quart jar will work. Place each type of bean in jar in the order listed above.

Mix the seasoning ingredients and seal in a small baggie. Place the seasoning bag on top of the beans, gently flattened so it can be seen from all sides.

Seal the jar, decorate, and attach the soup directions (below).

DIRECTIONS TO MAKE RAINBOW BEAN SOUP:.

Remove seasoning packet from the jar and set to the side. Rinse beans and place beans in large microwave-safe dish. Cover with water 1″ to 2″ over top of beans. Cover dish loosely with plastic wrap. Microwave on high for 15 minutes, rotating after 7 minutes. Drain and rinse beans very well; place in a large pot. Add 8 cups water, one 15 ounce can crushed tomatoes and seasonings from packet. Cover, bring to boil. Lower heat, cover pan and simmer 1 1/2 hours or until beans are tender. Stir occasionally.

Toast with Avocado and Mustard

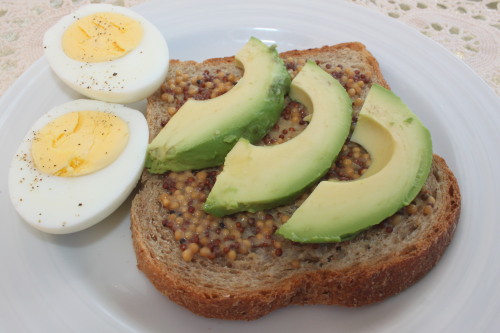
As we gear up for the holiday season, here’s my gift to you: a healthy recipe with three ingredients and five minutes of prep time. New York Mouth sent me some freebies last month and in preparation for their package, I spent some time scouring (more like falling in love with) their website. They distribute handcrafted, small batch, “indie” food fare. The site’s Tin Mustard description contained this open faced sandwich idea. I originally tried the “recipe” because I couldn’t imagine it would be edible much less delicious. But it is. I swear! Make sure to use ripe avocado, hearty bread, and good quality mustard. Tin Mustard’s whole grain mustard was amazing. Actually, all the products sent were delicious. For those looking for gift ideas for your favorite foodie (or food blogger, hint, hint),  it’s worth a look.

Toast with Avocado and Mustard
from New York Mouth

In my book, open faced sandwiches alone constitute more of a snack than a dinner so I rounded out the meal with hard boiled eggs and steamed green beans, making a kind of deconstructed salad nicoise. I think it would also taste great with some simply dressed greens or sharp cheddar on the side.

whole grain bread
avocado
whole grain mustard

Toast the bread to your taste. While the bread toasts, slice the avocado.Spread a tablespoon or so of mustard on the toasted bread. Place the sliced avocado on top of the mustard. Eat.

White Chicken Chili with Bacon Corn Muffins

The birth of a new child is usually heralded by the delivery of clothes, bibs, and other soft pastel things. In my experience, what most moms really need during those early weeks is a hot meal and long shower, not another outfit to wash and put away. It’s not that I didn’t love getting adorable clothes and blankets for my kids, but I wasn’t able to appreciate them for a couple months. I had to wait for life to settle back into a routine and for sleep lasting longer than two hours at a stretch. Since I can’t help out with the long shower, I try to deliver a home-cooked meal for my friends with new babies.

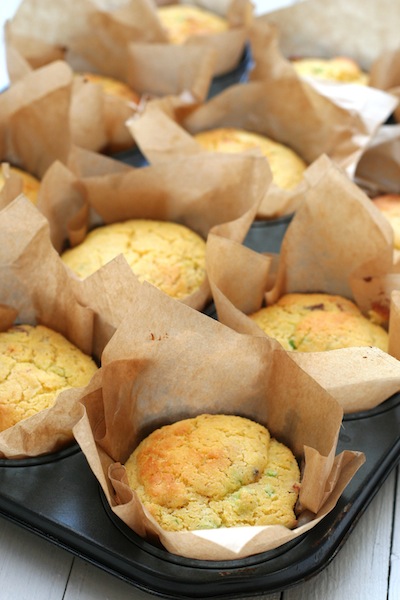
I especially like this menu for gifting. You can easily double the chili and split the batch of muffins — an easy way to make a meal for your family and theirs at the same time. I recommend adding a tossed salad. This week, a salad was out of the question as the meal was traveling too far (a three-hour ride to Chicago due to construction). Instead, I included a ziploc bag of fresh corn, already cooked but still on the cob. As mentioned in previous posts, the corn can be cut off the cob and used in a salad or reheated in a pan with butter and salt and pepper.

White Chicken Chili
adapted from my cousin Bridget’s recipe

Serves 4

3 boneless, skinless chicken breasts (about 1 1/2 lb/680 g), diced into 1/4‑inch cubes
1 onion, diced
2 tablespoons vegetable oil
2 cloves garlic, minced (or 1 teaspoon garlic powder)
1 x 14 oz (400 g) can great northern beans, drained and rinsed
1 x 4 oz (110 g) can diced green chilies
14 oz (400 ml) chicken broth
1 teaspoon cumin
1 teaspoon salt
1/2 teaspoon freshly ground black pepper
1/4 teaspoon cayenne
8 oz (225 g) sour cream
1/2 cup (120 ml) half and half (or whipping cream)

Brown the chicken and onion in the oil over a medium-high heat, stirring frequently. Add the garlic and cook for 1 to 2 minutes, until fragrant. Add the beans, chilies, broth, and seasonings and simmer for 30 minutes. Stir in the sour cream and half and half. Heat through, but do not boil.

***

Bacon Corn Muffins
adapted from Gourmet, January 2005

Makes 12 muffins

1 1/4 cups (300 ml) whole milk
1 large egg
6 tablespoons (90 g) unsalted butter, melted and cooled
1 cup (155 g) yellow cornmeal
3/4 cup (90 g) all-purpose flour
1 cup (75 g) chopped scallions
8 bacon slices (1/2 lb/225 g), cooked and crumbled
2 tablespoons sugar
1 tablespoon baking powder
3/4 teaspoon salt

Put the oven rack in the middle position and preheat the oven to 400°F (200°C).

Whisk together the milk, egg, and butter in a small bowl. Whisk together the remaining ingredients in a large bowl, then add the milk mixture to the dry ingredients. Stir until just combined. Divide the mixture among 12 greased (1/2 cup) muffin cups. Bake for about 20 minutes, until the muffins are golden and a tester comes out clean. Cool in the pan on a rack for 5 to 10 minutes before turning out.

Pistachio-crusted Pork Tenderloin, Lemon-Basil Orzotto, and Seven Layer Bars

We moved into a new house three weeks ago. Exciting to be sure, but as much as I’m relieved to be done with selling my old house and moving 8+ years of life into a new one, I feel a homelessness of sorts. The new house has the right space and modern amenities (a master bathroom!) but it also has odd paint color, lower ceilings, and some kind of smell that is not bad but definitely not good. Paint and ceilings are tough to fix so I’ve been cooking like crazy trying to get this place to feel (and smell) more like mine. And despite the house not feeling quite like home yet, at least the dining room table feels the same with my family and friends gathered around it enjoying dinners together. This was my recent favorite.

Pistachio-crusted Pork Tenderloin

Serves 4

1 cup (150 g) shelled, salted pistachios
2 pieces pork tenderloin (about 2 lbs/900 g), cut into 1/2 inch thick medallions
freshly ground black pepper
olive oil

Preheat the oven to 375°F (190°C).

Pulse the pistachios in a food processor about 10 times until coarsely ground (like bread crumbs) but not pasty. Place the ground nuts in a shallow bowl.

Season the pork medallions to taste with pepper. Dredge the peppered pork in the ground pistachios, pressing gently so the nuts adhere to the pork. Place the medallions on a plate until they are all coated.

Heat a thin layer of olive oil in a large oven safe skillet over medium-high heat. Fry the pork medallions in a single layer in the heated oil, 2–3 minutes on each side until golden. Adjust the heat if necessary so the pistachios do not burn. Place the skillet in the preheated oven, baking 5–10 minutes until the pork is fully cooked.

***

Lemon-Basil Orzotto
adapted from the Cooking Channel (Kelsey Nixon)

Serves 4

2 tablespoons extra-virgin olive oil
1 small onion, minced
1 1/2 cups (300 g) orzo or pearl barley
1/2 cup (120 ml) dry white wine
3 cups (700 ml) chicken stock or broth
1/2 cup (70 g) frozen petite green peas, thawed
1/3 cup (35 g) grated Parmesan cheese
2 tablespoons chiffonade fresh basil
1 teaspoon lemon zest
1/4 cup (60 ml) heavy cream or half and half
Juice of 1/2 lemon
Salt and freshly ground black pepper

In a heavy-bottomed medium saucepan, heat the olive oil over medium-high heat. Add the onion and saute until fragrant and translucent. Add the orzo and toast for 2 minutes, stirring occasionally. Add the wine and cook until absorbed.

Gradually add the chicken stock, stirring frequently. Bring to a simmer, lower the heat, and cover. Cook for 8 to 10 minutes, until the liquid is almost absorbed and orzo is tender. Remove from the heat.

Stir in the peas, Parmesan, fresh basil, lemon zest, heavy cream, and lemon juice. Season the orzo with salt and pepper, to taste, and serve.

***

Seven Layer Bars
from allrecipes.com

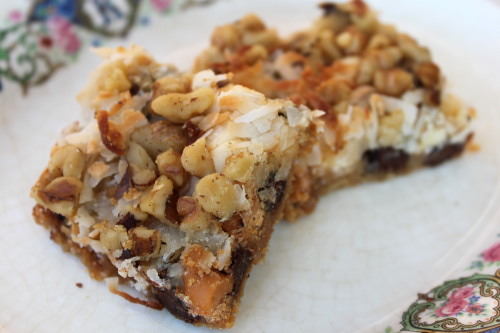
I make these candy-like bars in the morning so they are cool and ready to eat after dinner. They travel well and can be cut into small pieces, making them perfect picnic, pot luck or bake sale fare.

Makes about 2 dozen bars

1/2 cup (110 g) butter
1 1/2 cups (150 g) graham cracker crumbs
1 cup (200 g) semisweet chocolate chips
1 cup (200 g) butterscotch chips
1 cup (100 g) chopped walnuts
14 oz (400 ml) sweetened condensed milk
1 1/3 cups (110 g) shredded coconut

Preheat oven to 350°F (180°C).

Place the butter in 13 x 9 inch pan and melt in the oven. Swirl to coat bottom and sides with butter.

Spread the crumbs evenly over the bottom of the butter, pressing to form a thin even crust on the bottom of the pan.

Layer the chocolate chips, butterscotch chips, and nuts over the crumbs. Pour the condensed milk over nuts. Sprinkle the coconut over the condensed milk. Press the toppings together lightly with a fork.

Bake until the edges are golden brown, about 25 minutes. Let cool and cut into small bars. Store in an air tight container.

Vegetable Biryani

When I dine out, I almost always order the dish that I can’t make (think soufflé) or one that is too labor intensive to make at home. Invariably, that means a mole sauce at a Mexican restaurant, sushi at our favorite Japanese place, or biryani when we’re eating Indian. For those not familiar with biryani, it’s a fragrant rice-based dish popular in Pakistan, India, and beyond. I’ve tried several biryani recipes at home over the years, with mixed results. Traditional recipes involve several steps and multiple pans. This version is easier and less fattening than other recipes. The taste is just as good, if not better, than many restaurant versions that I’ve had. Great for vegetarians and meat-eaters alike, don’t be afraid of the long ingredient list and feel free to swap in whatever vegetables you have handy. The original recipe calls for a small head of cauliflower and small red potatoes instead of zucchini. My fridge was pretty bare, but it didn’t stop me from getting a decent meal on the table.

Although substitute vegetables will work in this dish, the basmati rice is essential. If you don’t normally buy basmati, consider adding it to your shopping list. It can elevate the most humble of rice dishes and I find it more forgiving to cook than other rices and grains. I recently bought a 20 pound bag from Costco. My husband thought I was crazy but my fellow Costco afficiandos can appreciate a good deal when they see it. Speaking of Costco, check out my friend Outlaw Mama’s funny posts on the subject.

Vegetable Biryani
adapted from foodnetwork.com

I think biryani tastes best served with raita. Here is an easy raita recipe or, if you are out of cucumbers, just serve some plain yogurt alongside.

serves 4–6 as main course

For the rice:
1 cup (180 g) basmati rice
1 tablespoon unsalted butter
2 tablespoons raisins
2 tablespoons sliced almonds (blanched or toasted)
1/2 teaspoon turmeric
1/4 teaspoon whole cumin seeds
1/4 teaspoon whole coriander seeds
3 whole cardamom pods
1 cinnamon stick, broken in half
1 3/4 cups (400 ml) water
1 teaspoon kosher salt

For the vegetables:
2 tablespoons unsalted butter
1 small yellow onion, thinly sliced
1 tablespoon peeled, minced fresh ginger
2 cloves garlic, minced
2 tablespoons  raisins
2 tablespoons sliced almonds (blanched or toasted)
1 1/2 teaspoons ground coriander seeds
1/2 teaspoon ground cumin
5 whole cardamom pods
1 large or 2 small zucchini, diced
6 ounces green beans, cut into 1‑inch pieces
1 medium carrot, diced
1 teaspoon kosher salt
2/3 cup (160 ml) water
2 tablespoons toasted sliced almonds

Make the rice: Place the rice in a sieve and rinse under cold running water until the water runs clear. Set aside.

Melt the butter in a medium saucepan with a tight-fitting lid, over medium-high heat. Add the golden raisins, almonds, turmeric, cumin seed, coriander seed, cardamom pods, and cinnamon stick and cook, stirring, until toasted and fragrant, about 2 minutes. Add the rice and cook, stirring, until toasted, about 1 minute more. Add the water and salt and bring to a boil. Lower the heat and simmer, (wrap the lid tightly with a kitchen towel), cover, and steam until the rice is tender, 20 minutes. Remove from the heat and let rest, covered, for 10 minutes. Fluff with a fork and set aside.

Meanwhile, make the vegetables. Melt the butter in a medium straight-sided skillet with a tight-fitting lid, over medium-high heat. Add the onion and cook, stirring, until lightly browned, about 1 minute. Add the garlic and ginger and cook, stirring, until fragrant, about 1 minute. Add the golden raisins, almonds, coriander seed, cumin seed, and cardamom and cook, stirring, until toasted and fragrant, about 2 minutes. Stir in the zucchini, green beans, carrots, and salt. Raise the heat to high, pour in the water, and cook, covered, for 4 minutes. Uncover and cook, stirring, until the vegetables are tender and most of the water has evaporated, about 1 1/2 minutes more.

Add the rice to the vegetable mixture and, using a rubber spatula, gently stir to combine. Season with salt to taste. Divide the vegetable-rice mixture among plates and top with some of the almonds. Serve immediately.

Canning Tomatoes and Pickled Green Beans

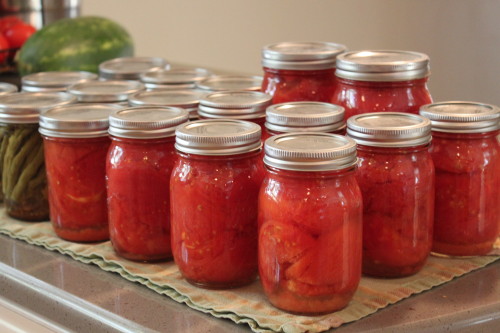
In celebration of our three year blogging anniversary (congratulations to us!) I’m making an exception to our normal dinner menu/recipe format in order to encourage you all to try canning or preserving during this produce-abundant time of year. Over the last few years, really since having kids, I’ve been trying to move towards more local, sustainable, organic and less processed foods. Canning and preserving makes this goal more attainable, especially in Wisconsin, which has easy access to farms but a short growing season. After reading Barbara Kingsolver’s Animal, Vegetable, Miracle and having Kristin walk me through canning a batch of homemade pickles, I am now a canning addict. Home preserved food is cheaper and better tasting than store bought and nothing beats the feeling of opening your pantry and seeing rows of gorgeous food lined up and ready for the long winter ahead. Food that you made!

If you think canning is difficult and time consuming, think again. Putting up a batch of pickles takes less than 2 hours and hardly any prep, especially after you’ve done it a few times and figure out little tricks like putting up the canning water to boil before doing anything else. I put on a good album and do my canning after my children go to bed. I find it relaxing and fun. Last week, my friends and I tried canning tomatoes for the first time, throwing a little canning party complete with hired babysitter. Although novices with tomatoes, we cranked out 15 jars in three hours at cost of about $1 per jar.  We also did a quick double batch (8 jars) of dilly beans. Not too bad for a Sunday morning’s work.


Canned Tomatoes (Packed in Water)

from Ball Complete Book of Home Preserving, recipe available here

There are many wonderful canning websites with detailed instructions and pictures on how to prepare your jars, lids and other canning set up information. I like the canning tips at pickyourown.org and the photos and instructions for tomato canning at Food in Jars. Beginners should also check out the videos and instructions here.

2–1/2 to 3–1/2 lb (1 to 1.5 kg) ripe tomatoes (about 7 to 10 medium) per quart
Water
Citric acid or bottled lemon juice
Salt, optional
Glass preserving jars with lids and bands

Prepare boiling water canner. Heat jars and lids in simmering water until ready for use. Do not boil. Set bands aside. [NOTE: I sometimes do this step in my dishwasher, running the washer on “high temp” and then keeping the jars inside and hot until ready to fill.]

Wash the tomatoes. Dip them in boiling water 30 to 60 seconds. Immediately dip in ice water. Slip off the skins. Trim away any green areas and cut out the core. Leave the tomatoes whole or cut into halves or quarters.

Prepare the tomatoes according to raw or hot pack recipe below.

Add ½ teaspoon citric acid or 2 tablespoons bottled lemon juice to each hot quart jar. Add ¼ teaspoon citric acid or 1 tablespoon bottled lemon juice to each hot pint jar.

Pack tomatoes into hot jars according to raw or hot pack recipe. Add 1 teaspoon salt to each quart jar, 1/2 teaspoon to each pint jar, if desired. Remove air bubbles in the jars with a spoon or, my preference, a large chopstick. Wipe each rim. Center a hot lid on each jar. Apply a band to each jar and adjust until the fit is fingertip tight.

Process the filled jars in a boiling water canner 40 minutes for pints and 45 minutes for quarts, adjusting for altitude. Remove the jars and cool. Check lids for seal after 24 hours [NOTE: we heard the beautiful “pop” of the seal in about 3 hours]. The lid should not flex up and down when the center is pressed.

Raw Pack –
1.) Pack the tomatoes into hot jars leaving 1/2 inch headspace.
2.) Ladle hot water over tomatoes leaving 1/2 inch headspace. Add 1 teaspoon salt to each quart jar, 1/2 teaspoon to each pint jar, if desired.

Hot Pack –
1.) Place the tomatoes in a large saucepot. Add water to cover. Bring to a boil and boil gently 5 minutes, stirring to prevent sticking.
2.) Pack the hot tomatoes into hot jars leaving 1/2 inch headspace.
3.) Ladle hot cooking liquid over tomatoes leaving 1/2 inch headspace. Add 1 teaspoon salt to each quart jar, 1/2 teaspoon to each pint jar, if desired.

***

Pickled Green Beans (aka Dilly Beans)

from Food in Jars

2 lbs (900 g) green beans, trimmed to fit your jars
1 teaspoon cayenne pepper (more or less depending on your spice preference)
4 teaspoons dill seed (not dill weed)
4 cloves garlic
2 1/2 cups (600 ml) white vinegar (5%)
2 1/2 cups (600 ml) water
1/4 cup (50 g) pickling salt (use a bit more if you’ve only got kosher)

Prep your canning pot by inserting a rack to keep your jars off the bottom of the pot, place pint jars in (wide-mouth pints work best here. A 12 ounce jelly jar is also nice, as it’s a bit taller than a standard pint and makes for less trimming) and fill it with water. Bring to a boil to sterilize while you prepare the rest of your ingredients.

Wash and trim your beans so that they fit in your jar. If you have particularly long beans, your best bet is to cut them in half, although by doing so, you do lose the visual appeal of having all the beans standing at attending.

Combine vinegar, water and salt in a medium saucepan and bring to a boil. While it’s heating up, pack your beans into the jars, leaving 1/2 inch headspace (distance between the tops of the beans and the rim of the jar). To each jar, add 1/4 teaspoon cayenne pepper, 1 clove of garlic and 1 teaspoon dill seeds.

Pour the boiling brine over the beans, making sure to leave that 1/2 inch headspace. Use a plastic knife to remove air bubbles from jar by running it around the interior of the jar. Wipe the rims and apply the lids (which have been sitting in a small saucepan of water at a mere simmer for at least ten minutes in order to soften the sealing compound) and rings.

Process for 5 minutes in a boiling water bath (remember that you don’t start timing until the pot has come to a roiling boil).