Category Archives: Miscellaneous

Whole Wheat Belgian Waffles with Raspberry Puree

Ask my husband, ask my mom, ask my coworkers: I am not a morning person. Despite my middle age, I still have to set an alarm clock every day, even weekends, or risk sleeping until lunchtime. Most days the only reason I want to drag myself out of bed is the promise of strong coffee and kid cuddles.  Not surprisingly, I usually skip breakfast. With that being said, I adore this recipe and wanted to share it. It is one of my tried and true, never fails me dishes. If you spend the night at my house, this is one of three things I will serve you when you wake up. And if you are questioning why a dinner blog might post a waffle recipe, consider it your next “breakfast for dinner” meal idea.

I was skeptical of 100% whole wheat waffles but these are incredibly light and almost crisp. I promise! Serve with fresh raspberries, maple syrup, whipped cream, and raspberry puree or your favorite waffle toppings.

Whole Wheat Belgian Waffles

from King Arthur Flour

This recipe makes about 4 large waffles. I always double it, cook up the extra waffles then freeze them wrapped in wax paper inside freezer bags. Homemade freezer waffles! Much healthier and cheaper than Eggos.

  • 1 1/2 cups (170g) King Arthur White Whole Wheat Flour
  • 2 teaspoons baking powder
  • 1/2 teaspoon salt
  • 2 tablespoons (25g) granulated sugar
  • 1 large egg
  • 1 1/2 cups (340g) lukewarm milk
  • 5 tablespoons (71g) melted butter or 1/3 cup (67g) vegetable oil

Preheat your iron while you make the waffle batter. Whisk together the flour, baking powder, salt, and sugar.

In a separate bowl, whisk together the egg, milk, and butter or oil.

Mix together the wet and dry ingredients, stirring just until combined. The batter will be a bit lumpy. Cook the waffles as directed in the instructions that came with your waffle iron.

Raspberry Puree

Makes about 1 1/2 cups

  • 1 pint fresh raspberries or 10 ounces frozen raspberries defrosted
  • 1/4 — 1/2 cup sugar, honey, or maple syrup (to taste)

Blend ingredients in blender or food processor until smooth.

Rhubarb Ginger Syrup

Apologies to you all for the unexpected posting hiatus. I had to take a trimester off if you know what I mean…

Like all my other pregnancies, this one announced itself with 24/7 nausea and an aversion to nearly all food. Luckily, my second trimester started this week and I am feeling better already. Though not quite ready to eat with abandon, at least I’ve found a few things to get me excited about being in the kitchen, namely rhubarb and ginger. For those not familiar with this leafy perennial, rhubarb stalks look like rose-hued celery and it’s leaves are large and broad. It really needs to be cooked to be edible and even then, due to its tartness, usually relies on a fair amount of sugar or other sweetener to make it palatable. The house we purchased last fall came with two ancient rhubarb plants, with leaves about the size of an overweight cat. Big! Apparently, the neighbors (the plant borders the alley and our neighbors are free to take as many stalks as they want) tried to transplant part of it a few years ago. After several hours of work they gave up, unable to hack apart the thick old roots holding it, and probably my house’s foundation, in place.

Though I still adore the Lemon Buttermilk Rhubarb Cake posted years ago, I’ve been experimenting with other rhubarb recipes. This syrup, combining rhubarb with my anti-nausea weapon (aka ginger), is delightfully tart yet sweet enough for even the kids to enjoy. Paired with soda water, it is perfect summer refreshment. I’d imagine it might also be fantastic paired with ice cold vodka or a crisp sparkling wine and would love to hear the results if anyone is willing to test these combos out for me.

rhubarb ginger spritzer


Rhubarb Ginger Spritzer
adapted from Knit & Nosh

Makes 2 to 3 cups

4 lbs (1.8 kg) rhubarb, ends trimmed
1 to 2 inches fresh ginger, peeled roughly
1 cup (240 ml) water
Sugar

Wash the rhubarb and cut the stalks into one inch pieces. No need to measure, they are going to break down completely.

Peel the ginger, but do not be too concerned about getting every bit of peel off. Cut the ginger into slices. You want to maximize the ginger’s surface area for flavor, but do not worry about peel in the final product.

Place the rhubarb, ginger, and water in a large non-reactive pan and bring to a boil. Do not cover. Once the mixture is boiling, reduce heat and simmer 30 minutes or until the rhubarb is very soft and broken down. Let the mixture cool slightly.

Pour the mixture into a fine mesh strainer held over a large bowl and let it drain for at least one hour.

Measure the drained liquid and pour it into a medium non-reactive pan. Add half as much sugar as you have liquid. I had 2 cups rhubarb liquid so I added 1 cup of sugar.

Heat the liquid and sugar, stirring to dissolve and bring it to a boil. Boil for two minutes and then pour into a clean glass jar (or two). Let cool then store, covered, in the fridge.

To make spritzer: Mix 1 cup (240 ml) of soda (sparkling) water with 1 to 3 tablespoons of cooled syrup (to taste). Add ice and enjoy.

Quick Pickled Chillies

My mom and stepdad live in Florida and have a pepper plant on their patio that produces so many jalapenos that my stepdad, at a loss for what to do with them all, used to bring them in by the bagful for a colleague who sat at his desk and ate them whole and raw. “Don’t give them away,” I said. “Pickle them!”


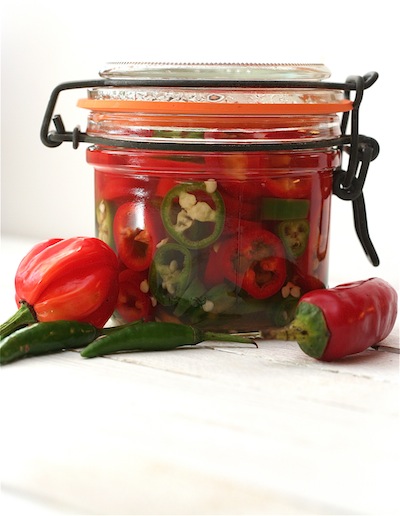
Quick Pickled Chillies // Dinner du Jour

In An Everlasting Meal by Tamar Adler, I came across her method of simply pouring hot vinegar over sliced chillies, and voilà — an instant pickle pick-me-up. I like the fact that there’s no salt or sugar, like in a true brine; it keeps the flavor bright and clean. Plus they also take all of 5 minutes to make, from start to finish.

This quick little recipe — if you’d go so far as to even call it a recipe — will change your meals. If you’re anything like me, you’ll find yourself adding them to just about everything: eggs, pasta, stews, Mexican food, anything crying out for a little kick.

Quick Pickled Chillies

Wash a glass jar well with hot soapy water. I use a small 250 ml (1 cup) jar and it holds enough chillies to last me a few weeks.

If you want less heat in your chillies, slice off the top, then hold the chilli upside down over a bowl and roll it between your hands — the seeds will tumble right out. If you don’t mind the seeds, then just slice the chillies into thin rounds and pack them tightly into the jar. You can add all sorts of extras at this point: whole peeled garlic cloves, peppercorns, coriander or cumin seeds, bay leaves, fresh herbs. If you want to add any of these (or anything else), just add it to the jar along with the chillies.

To figure out how much vinegar you’ll need, pour water over the chillies until they’re covered and the jar is full. Pour the water out into a measuring jug and see how much there is — that’s how much vinegar to use. Pour that amount of white wine vinegar into a small saucepan. Bring to the boil, then reduce the heat and simmer for 1 minute. Pour the hot vinegar over the chillies, clamp on the lid and stash in the fridge front and center at eye level, where you’ll find yourself constantly reaching for them. They’ll last for a couple months in the fridge, but I doubt they’ll hang around that long.

If you love chillies, do yourself a favor and order a jar of Gran Luchito Smoked Chilli Paste — in Ireland, you can get it at My Mexican Shop. I got a jar last week and mixed a spoonful with some mayonnaise to make an addictive dip. 


All Purpose Spice Rub & Rainbow Bean Soup Mix

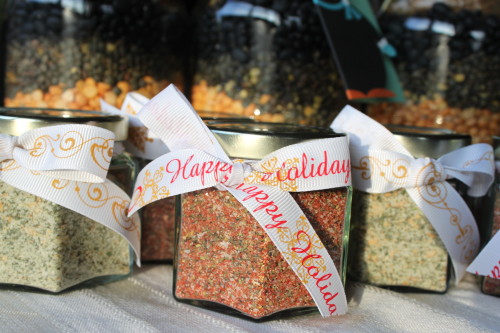
This year, I decided to forgo the store-bought, China-manufactured, last-minute purchased gifts that I usually give out at holidays. I had the bright idea (insert sarcasm here) to make homemade food gifts this year. I figured, why not? I like to hang out in the kitchen. I like buying ingredients. I like one-of-a-kind treats. Well, readers, here is why not. I have about 30 people who need gifts this year (my kids attend schools with lots of teachers in each room). Christmas is less than a week away and I’m still searching for packaging materials, running out of ingredients, and trying out new recipes with limited success.  On the upside, this weekend the kids and I made up a few batches of spice rub and a half dozen quart jars of soup mix and they turned out amazingly cute. I tried out a couple other gift ideas (salted caramel sauce and hand-chopped garlic herb salt) but the end products, though tasty, didn’t justify the the work involved in making them. So, if you are looking for a unique gift that you can make with minimal fuss, I highly recommend one of these instead.

All-purpose Spice Rub
from Everyday Food, July/August 2006

I found lovely little jars at a reasonable price at specialtybottle.com. This recipe easily double or triples so you can mix up a big batch and fill a dozen small jars at one go.

Makes about 1 1/4 cups

1/3 cup (75 g) coarse salt
1/4 cup (40 g) packed light-brown sugar
1/4 cup (30 g) paprika
2 tablespoons ground black pepper
2 tablespoons dried oregano
2 tablespoons dried thyme leaves
1 tablespoon cayenne pepper (optional, I used 1/2 teaspoon per batch)

In a small bowl, combine all the ingredients, using your hands to break up the sugar. Store in an airtight container, away from heat and light, up to 6 months.

***

Rainbow Bean Soup Mix
adapted from food.com

Makes 1 quart jar

3/4 cup (150 g) dried red beans
3/4 cup (150 g) dried great northern beans
2/3 cup (125 g) dried split peas (yellow or green)
2/3 cup (115 g) lentils (brown, green, or red)
2/3 cup (130 g) dried black beans

Seasoning bag:
2 tablespoons dried onion flakes
2 tablespoons beef or chicken bouillon granules (sold in soup section)
2 tablespoons dried parsley flakes
2 teaspoons dried basil
2 teaspoons sweetened lemonade drink mix
1 1/2 teaspoons chili powder
1/2 teaspoon garlic powder
1/2 teaspoon pepper
1 teaspoon dried oregano

Use a quart jar that has a wide mouth, but if you can’t find one any quart jar will work. Place each type of bean in jar in the order listed above.

Mix the seasoning ingredients and seal in a small baggie. Place the seasoning bag on top of the beans, gently flattened so it can be seen from all sides.

Seal the jar, decorate, and attach the soup directions (below).

DIRECTIONS TO MAKE RAINBOW BEAN SOUP:.

Remove seasoning packet from the jar and set to the side. Rinse beans and place beans in large microwave-safe dish. Cover with water 1″ to 2″ over top of beans. Cover dish loosely with plastic wrap. Microwave on high for 15 minutes, rotating after 7 minutes. Drain and rinse beans very well; place in a large pot. Add 8 cups water, one 15 ounce can crushed tomatoes and seasonings from packet. Cover, bring to boil. Lower heat, cover pan and simmer 1 1/2 hours or until beans are tender. Stir occasionally.

Canning Tomatoes and Pickled Green Beans

In celebration of our three year blogging anniversary (congratulations to us!) I’m making an exception to our normal dinner menu/recipe format in order to encourage you all to try canning or preserving during this produce-abundant time of year. Over the last few years, really since having kids, I’ve been trying to move towards more local, sustainable, organic and less processed foods. Canning and preserving makes this goal more attainable, especially in Wisconsin, which has easy access to farms but a short growing season. After reading Barbara Kingsolver’s Animal, Vegetable, Miracle and having Kristin walk me through canning a batch of homemade pickles, I am now a canning addict. Home preserved food is cheaper and better tasting than store bought and nothing beats the feeling of opening your pantry and seeing rows of gorgeous food lined up and ready for the long winter ahead. Food that you made!

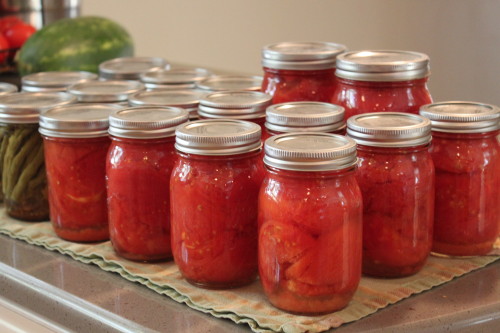
If you think canning is difficult and time consuming, think again. Putting up a batch of pickles takes less than 2 hours and hardly any prep, especially after you’ve done it a few times and figure out little tricks like putting up the canning water to boil before doing anything else. I put on a good album and do my canning after my children go to bed. I find it relaxing and fun. Last week, my friends and I tried canning tomatoes for the first time, throwing a little canning party complete with hired babysitter. Although novices with tomatoes, we cranked out 15 jars in three hours at cost of about $1 per jar.  We also did a quick double batch (8 jars) of dilly beans. Not too bad for a Sunday morning’s work.


Canned Tomatoes (Packed in Water)

from Ball Complete Book of Home Preserving, recipe available here

There are many wonderful canning websites with detailed instructions and pictures on how to prepare your jars, lids and other canning set up information. I like the canning tips at pickyourown.org and the photos and instructions for tomato canning at Food in Jars. Beginners should also check out the videos and instructions here.

2–1/2 to 3–1/2 lb (1 to 1.5 kg) ripe tomatoes (about 7 to 10 medium) per quart
Water
Citric acid or bottled lemon juice
Salt, optional
Glass preserving jars with lids and bands

Prepare boiling water canner. Heat jars and lids in simmering water until ready for use. Do not boil. Set bands aside. [NOTE: I sometimes do this step in my dishwasher, running the washer on “high temp” and then keeping the jars inside and hot until ready to fill.]

Wash the tomatoes. Dip them in boiling water 30 to 60 seconds. Immediately dip in ice water. Slip off the skins. Trim away any green areas and cut out the core. Leave the tomatoes whole or cut into halves or quarters.

Prepare the tomatoes according to raw or hot pack recipe below.

Add ½ teaspoon citric acid or 2 tablespoons bottled lemon juice to each hot quart jar. Add ¼ teaspoon citric acid or 1 tablespoon bottled lemon juice to each hot pint jar.

Pack tomatoes into hot jars according to raw or hot pack recipe. Add 1 teaspoon salt to each quart jar, 1/2 teaspoon to each pint jar, if desired. Remove air bubbles in the jars with a spoon or, my preference, a large chopstick. Wipe each rim. Center a hot lid on each jar. Apply a band to each jar and adjust until the fit is fingertip tight.

Process the filled jars in a boiling water canner 40 minutes for pints and 45 minutes for quarts, adjusting for altitude. Remove the jars and cool. Check lids for seal after 24 hours [NOTE: we heard the beautiful “pop” of the seal in about 3 hours]. The lid should not flex up and down when the center is pressed.

Raw Pack –
1.) Pack the tomatoes into hot jars leaving 1/2 inch headspace.
2.) Ladle hot water over tomatoes leaving 1/2 inch headspace. Add 1 teaspoon salt to each quart jar, 1/2 teaspoon to each pint jar, if desired.

Hot Pack –
1.) Place the tomatoes in a large saucepot. Add water to cover. Bring to a boil and boil gently 5 minutes, stirring to prevent sticking.
2.) Pack the hot tomatoes into hot jars leaving 1/2 inch headspace.
3.) Ladle hot cooking liquid over tomatoes leaving 1/2 inch headspace. Add 1 teaspoon salt to each quart jar, 1/2 teaspoon to each pint jar, if desired.

***

Pickled Green Beans (aka Dilly Beans)

from Food in Jars

2 lbs (900 g) green beans, trimmed to fit your jars
1 teaspoon cayenne pepper (more or less depending on your spice preference)
4 teaspoons dill seed (not dill weed)
4 cloves garlic
2 1/2 cups (600 ml) white vinegar (5%)
2 1/2 cups (600 ml) water
1/4 cup (50 g) pickling salt (use a bit more if you’ve only got kosher)

Prep your canning pot by inserting a rack to keep your jars off the bottom of the pot, place pint jars in (wide-mouth pints work best here. A 12 ounce jelly jar is also nice, as it’s a bit taller than a standard pint and makes for less trimming) and fill it with water. Bring to a boil to sterilize while you prepare the rest of your ingredients.

Wash and trim your beans so that they fit in your jar. If you have particularly long beans, your best bet is to cut them in half, although by doing so, you do lose the visual appeal of having all the beans standing at attending.

Combine vinegar, water and salt in a medium saucepan and bring to a boil. While it’s heating up, pack your beans into the jars, leaving 1/2 inch headspace (distance between the tops of the beans and the rim of the jar). To each jar, add 1/4 teaspoon cayenne pepper, 1 clove of garlic and 1 teaspoon dill seeds.

Pour the boiling brine over the beans, making sure to leave that 1/2 inch headspace. Use a plastic knife to remove air bubbles from jar by running it around the interior of the jar. Wipe the rims and apply the lids (which have been sitting in a small saucepan of water at a mere simmer for at least ten minutes in order to soften the sealing compound) and rings.

Process for 5 minutes in a boiling water bath (remember that you don’t start timing until the pot has come to a roiling boil).


Old South Jelly Roll Cake (and my favorite canning recipes)

As odd as this is to admit, I’ve developed an addiction to canning. It all started quite innocently with a batch of strawberry lemonade concentrate a couple years ago. Then last year Kristin helped me put up a batch of garlic dill pickles. Now I’ve worked my way up to pickled peppers, spicy dilly beans, green tomato relish, and, finally this year, jam. Strawberry jam, though not the easiest thing I’ve ever cooked, may be one of the best things to come off my stove top. Even the extra emergency trip to the store to buy more Sure Jell (Anabelle had hidden mine in the microwave) didn’t bother me after tasting the final product.

But what can you do with such a treasure? Surely it could not live up to its potential merely spread on wheat toast. Leave it to Sam to come up with a solution — a jelly roll. How a four-year-old even knows about this old-fashioned dessert is beyond me, but I’m glad he does. The light sponge cake highlights the sweet, ruby red jam beautifully, a tasty and lovely looking treat, perfect for a picnic.

Old South Jelly Roll Cake
From Paula Deen, Food Network

4 eggs, separated
3/4 cup (150 g) sugar
1 tablespoon vanilla
3/4 cup (75 g) cake flour, sifted
3/4 teaspoon baking powder
1/4 teaspoon salt
1 cup (250 ml) jam, stirred well
confectioners’ sugar (a.k.a. icing sugar), for dusting, sifted
whipped cream, to serve (optional)

Preheat the oven to 400°F (200°C).

In a small bowl, beat the egg whites until stiff but not dry and set aside. In another bowl, beat the egg yolks until light. Gradually add the sugar and vanilla, and mix well. Sift together the flour, baking powder, and salt. Add the sifted flour mixture to the egg yolk mixture. Fold the egg whites into the egg mixture and pour the batter into a 15 x 10 x 1‑inch jelly roll (Swiss roll) pan lined with waxed paper. Bake for 8 to 10 minutes, or until the cake is golden.

Loosen the edges of cake and invert the cake onto a dish towel dusted with confectioners’ sugar. Gently and slowly peel the wax paper off the cake. Trim 1/4 inch of hard crust off each long side of the jelly roll cake. Begin with the narrow side and roll the cake and towel up together. Cool the cake on a rack, seam side down, for 10 to 15 minutes.

Once the cake has cooled, gently unroll and spread the cake with jam and re-roll. Sprinkle with confectioners’ sugar. Serve with whipped cream, if desired.

Pan-grilled Steak with Béarnaise Sauce

I’m turning into the kind of person who will go to great lengths for a good meal. Last month I drove 3 hours north to Inishowen just to eat at Harrys Restaurant in Co. Donegal, and 2 weeks ago I drove 3 hours south to Dungarvan to go to the Waterford Festival of Food. I was only there for 24 hours, lured down by plans for dinner at the O’Brien Chop House and a bus tour to a microbrewery and oyster farm, but I managed to fit in a lot of good food.

I arrived late to Food Camp on the Friday, but still in time to sample some of Brock’s coffee from his boutique artisan coffee roasting business, Badger & Dodo, followed by lunch, where Niamh couldn’t resist making a classic Irish sandwich — Tayto crisps on a buttered Waterford blaa (don’t knock it till you’ve tried it!). After a lively panel discussion on routes to market for artisan Irish food, a group of about 20 people made their way to nearby Lismore for dinner at the O’Brien Chop House, where the rhubarb and apple Bellini was worth the 3‑hour drive alone.
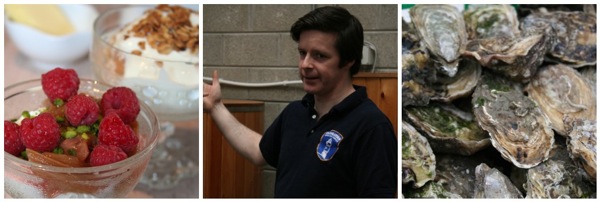
After a gourmet breakfast at Powersfield House B&B (the owner, Eunice Power, is a caterer), it was an early start after a late night the next day for a bus tour to Dungarvan Brewing Company to hear about how their microbrew beers are made and have a sample (at 10:30 in the morning? why not!). After that we went across the bay to Dungarvan Shellfish, where Jim Harty proudly told us about his thriving family-run oyster farm, with yet more samples, this time of fresh Irish oysters, brown bread and a glass of white wine at the slightly more respectable hour of 11 a.m. The last stop on the Bus Bia tour was a fish cooking demo in a parish hall in the Gaeltacht (Irish-speaking region), which finished with tea, coffee and cakes made by the local Irish Countrywomen’s Association. When we arrived back in Dungarvan, a group of 9 of us bloggers headed straight for the best restaurant in town for lunch — The Tannery — not really expecting to get a table but delighted when we did, where almost all of us ordered their signature starter, the crab creme brulée. By then I was starting to regret not staying for the second night (which I definitely did regret the next day when reading everyone’s tweets about the fantastic farmers’ market on the Sunday), but I was happy to have The Daily Spud for company this time on the long drive back, talking about food all the way.
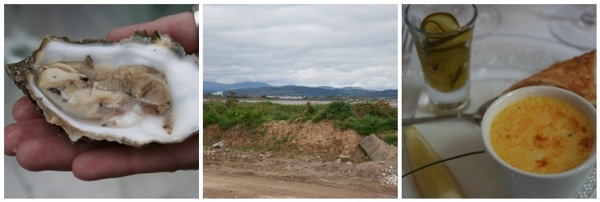
When I go to a restaurant, I always like to order something from the menu that I don’t or can’t make at home, and when I saw that O’Brien’s hanger steak was being served with a side of bone marrow, not to mention Béarnaise sauce, which I’m a sucker for, I practically stopped reading the menu right there. Justin and Richard were fantastic hosts for our group of 20, and if you’re in County Waterford, this restaurant is not to be missed. I’m already planning on bringing the whole family to the festival next year, but in the meantime, I can recreate the meal from O’Brien’s at home with Darina Allen’s recipes.

Pan-grilled Steak
adapted from Forgotten Skills of Cooking by Darina Allen

Serves 4

Darina Allen recommends using a heavy-ridged cast iron grill pan for cooking steaks. She also says that rubbing the steaks with a clove of garlic intensifies their beefy flavor. It goes without saying to serve this with chips/wedges. For a blow-out dinner like this that’s all about the meat, I’d say a vegetable is pretty much optional. Get your five a day at breakfast and lunch instead.

4 x 6 oz (175 g) sirloin or fillet steaks
1 garlic clove
salt and freshly ground black pepper
olive oil

About 1 hour before you want to cook your steaks, remove them from the fridge. Cut the garlic clove in half and rub it on both sides of each steak. Grind over some black pepper and sprinkle with a few drops of olive oil (don’t put salt on the steaks at this point, since it will leach out moisture and make the steaks dry and tough). Turn the steaks in the oil and set aside to allow them to come to room temperature. If using sirloin steaks, score the fat at 1‑inch intervals.

Heat the grill pan, season the steaks with a little salt and put them into the hot pan. Cook to your liking (if using sirloin steak, cook the fatty side as well for 3 or 4 minutes until it’s nice and crispy). For rare, cook a sirloin for 2 minutes and a fillet for 5 minutes; for medium-rare, cook a sirloin for 3 minutes and a fillet for 6 minutes; for medium, cook a sirloin for 4 minutes and a fillet for 7 minutes; and for well done (but please don’t ruin a good steak by cooking it well done!), cook a sirloin for 5 minutes and a fillet for 8 or 9 minutes. Make sure you allow the steaks to rest before you serve them. Serve with Béarnaise sauce, oven-roast wedges and a green salad or vegetable of your choice.

***

Béarnaise Sauce
adapted from Forgotten Skills of Cooking by Darina Allen

Serves 8 to 10

If the sauce is slow to thicken, it might be because the heat is too low. When making the sauce, you should be able to put your hand on the side of the saucepan at any stage — if it’s too hot for your hand, it’s too hot for the sauce! Keep a bowl of cold water close by that you can plunge the bottom of the saucepan into if it becomes too hot.

4 tablespoons tarragon vinegar (or white wine vinegar plus extra fresh chopped tarragon)
4 tablespoons dry white wine
2 teaspoons finely chopped shallots
pinch of freshly ground black pepper
1 tablespoon cold water
2 egg yolks
1/2 cup (110 g) butter, cubed
1 tablespoon chopped fresh tarragon

Boil the vinegar, wine, shallots and a pinch of pepper in a heavy-bottomed stainless steel saucepan until completely reduced and the pan is almost dry but not browned. Immediately add the 1 tablespoon of cold water. Remove the pan from the heat and leave to cool for 1 or 2 minutes.

Whisk in the egg yolks and add the butter bit by bit over a very low heat, whisking all the time. As soon as one piece of butter melts, add the next piece and the sauce will gradually thicken. If it looks like it’s getting too thick or might scramble, remove the pan from the heat immediately and add a little cold water. Don’t leave the pan or stop whisking until the sauce is made and has reached a thick coating consistency — this isn’t the time to see what’s happening on Facebook. Finally, add the chopped fresh tarragon and taste for seasoning. You can keep the sauce warm in a heatproof bowl over a saucepan of hot (but not simmering!) water until you’re ready to serve it.

 

The Barefoot Contessa’s Turkey Meatloaf with Caramelized Onion Gravy

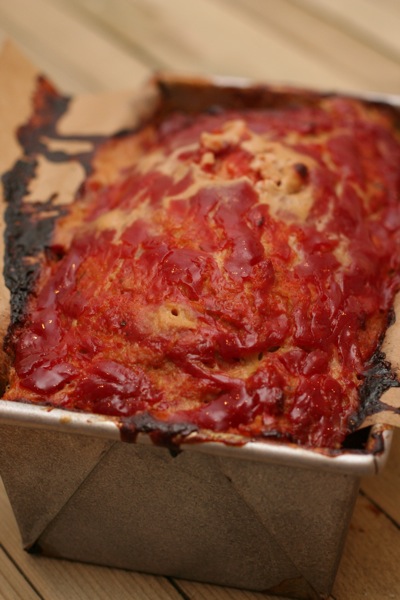
When I was growing up, my mom would cook us whatever we wanted for dinner on our birthday. The only thing I remember asking for a few years in a row when I was a kid was pineapple ham. This was in the days before it became a derided pizza topping combo, and I’m sure I thought it was something fancy and special — at any rate, I loved it. Carrying on the tradition, I now cook special requests for my family on their birthdays too, and almost every year for the past 13 years that I’ve known him, my husband has requested an even more unglamorous dinner — meatloaf. Is there an uglier dish than meatloaf? Once or twice he’s gone more upmarket and asked for steak au poivre, but the humble meatloaf with mashed potatoes and gravy will always be his favorite. Kelly has already shared Mark Bittman’s basic meatloaf recipe, but I like this one because it’s made with turkey mince instead, which makes it a little lighter than meatloaf made with beef. It might not win any beauty pageants (which doesn’t stop Nigella Lawson from waxing poetic about it), but I have to admit it’s really good and the kids love it too, so everyone wins.


Turkey Meatloaf
adapted from The Barefoot Contessa Cookbook by Ina Garten

Serves 4

I’ve modified this a bit to decrease the amount of meatloaf made. I also prefer to cook it in a loaf tin instead of free forming it on a baking sheet. Meatloaf and mashed potatoes go together like bread and butter — just add your favorite veg dish to round out the supper.

olive oil
2 onions, chopped
salt and freshly ground black pepper
1/2 teaspoon dried thyme
1/4 cup (50 ml) Worcestershire sauce
1/2 cup (125 ml) chicken stock
1 1/2 teaspoons tomato paste (or you could just use ketchup)
2 lb (1 kg) ground turkey breast
1 to 1 1/2 cups (100 to 150 g) plain dry breadcrumbs
2 large eggs, beaten
1/2 cup (125 ml) ketchup

Preheat the oven to 325° F (160°C). Line a loaf tin with parchment paper or foil so that it hangs over the sides, which will make it easy to remove the meatloaf from the tin after it’s cooked.

Heat a splash of olive oil in a medium saute pan over a medium-low heat. Cook the onions with a generous amount of salt and pepper and the thyme for about 15 minutes, until translucent but not browned. Add the Worcestershire sauce, chicken stock, and tomato paste and mix well. Allow to cool to room temperature.

Combine the ground turkey, 1 cup (100 g) bread crumbs, eggs, and onion mixture in a large bowl. Add in the extra 1/2 cup (50 g) of breadcrumbs if you think the mixture looks too wet (alternatively, if you think it looks too dry, add another splash of stock). Mix well and place into the lined loaf tin. Spread the ketchup evenly on top. Bake for 1 1/2 hours, until the internal temperature is 160°F (70°C) and the meatloaf is cooked through. (A pan of hot water in the oven under the meatloaf will keep the top from cracking.) Serve hot, at room temperature, or cold in a sandwich.

***

Caramelized Onion Gravy
adapted from How to Cook: Book One by Delia Smith

Delia’s original recipe is for a roasted onion gravy, but since I was making this at the same time as the meatloaf, which needs a low temperature, I couldn’t roast the onions and decided to caramelize them instead. You can caramelize the onions ahead of time and store them in an airtight container in the fridge for a few days.

2 teaspoons groundnut or other flavorless oil
a knob of butter (optional)
2 large onions, thinly sliced
a generous pinch of sugar (optional)
1 tablespoon Worcestershire sauce
1 level teaspoon mustard powder, such as Colman’s
15 fl oz (425 ml) vegetable stock
1 rounded tablespoon plain flour
salt and freshly ground black pepper

Coat the bottom of a wide pan with olive oil, or a mixture of olive oil and butter (about 1 teaspoon per onion). Heat the pan on medium high heat until the oil is shimmering. Add the onion slices and stir to coat the onions with the oil. Spread the onions out evenly over the pan and allow them to cook, stirring occasionally, for 10 minutes. Sprinkle some salt over the onions and add a pinch of sugar to give the carmelization process a boost (optional). Cook for around 30 minutes, stirring every few minutes. Keep an eye on the temperature — you may need to lower it if the onions look like they’re on the verge of burning, not browning — and add a little more oil if they’re sticking to the pan too much. As the onions cook down, you may find you need to scrape the pan every minute instead of every few minutes. As the sugar in the onions caramelizes, they’ll go from light tan to golden to deep brown. Don’t cook past a mahogany color, because then they might burn.

When the onions are ready, add the Worcestershire sauce and mustard powder to the stock. Add the flour to the onions, stir them together and cook for 1 minute. Gradually add the stock mixture to the pan, whisking all the time, until it’s all incorporated. Bring it up to a simmer and let it gently bubble away for 5 minutes. Taste to check the seasoning, then pour into a warmed serving jug.