Category Archives: Desserts

Flag Cake with Berries and Cream Cheese Frosting

Between this year’s COVID-19, Presidential antics, and a national (long overdue) reckoning with racism, I find myself falling back on the comfort of baking. 2020 feels like a perfect time to bake more cakes and restart the blog. I spent many hours cooking for my family during our shelter-at-home quarantine and suspect that many of you have done the same. 

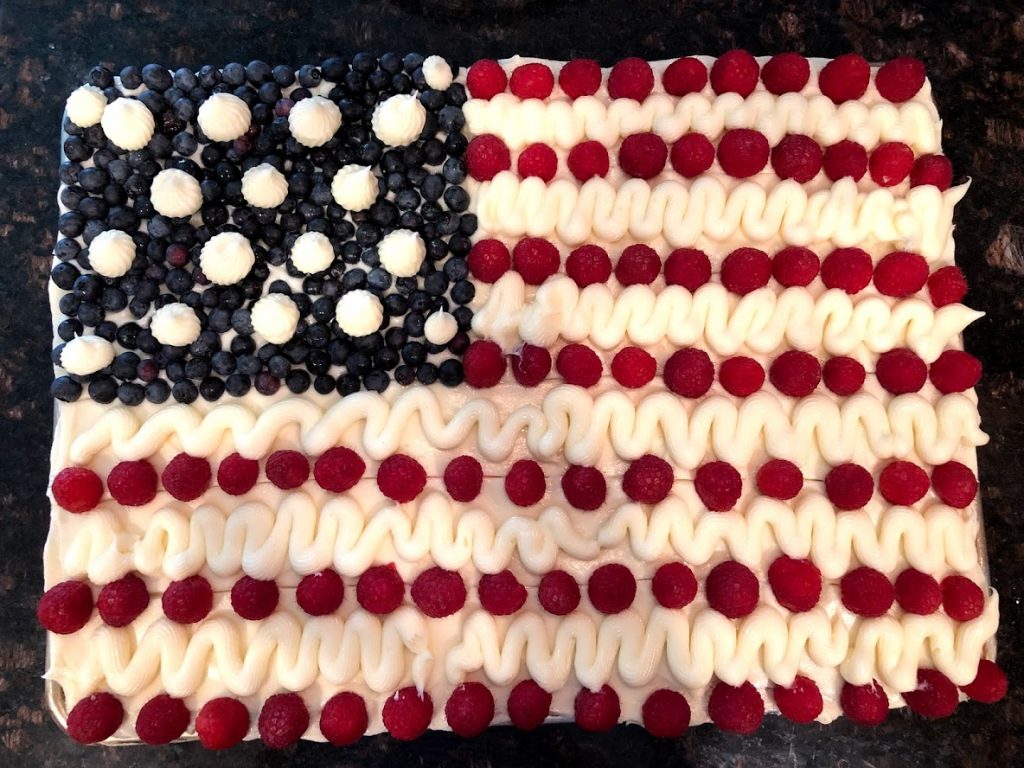
I only make this flag cake once per year although it is one of my favorites. This year I don’t really feel like celebrating the state of America so I may rearrange the berries into a less controversial pattern. Suggestions welcome.


American Flag Cake

adapted from Barefoot Contessa

  • 18 tablespoons (2–1/4 sticks) unsalted butter, at room temperature
  • 3 cups sugar
  • 6 large eggs, room temperature
  • 1 cup sour cream, room temperature
  • 1 1/2 teaspoons vanilla extract
  • 3 cups all-purpose flour
  • 1/3 cup cornstarch
  • 1 teaspoon kosher salt
  • 1 teaspoon baking soda

For the Icing:

  • 3/4 pound (3 sticks) unsalted butter, at room temperature
  • 1 pound cream cheese, at room temperature
  • 4 cups (about 3/4 pound) confectioners’ sugar, sifted
  • 1 teaspoon vanilla extract

To Assemble:

  • 1 pint blueberries
  • 2 pints raspberries

Heat the oven to 350 degrees Fahrenheit. Butter and flour an 18 x 12 x 1–1/2‑inch sheet pan (a “half sheet” pan). Alternatively, you can line the pan with parchment paper.

Cream the butter and sugar in the bowl of an electric mixer fitted with the paddle attachment for 3 minutes on medium speed, until light and fluffy. On medium-low speed, add the eggs, 2 at a time, then add the sour cream and vanilla. Scrape down the sides and stir until smooth.

Sift together the flour, cornstarch, salt, and baking soda in a bowl. With the mixer on low, add the flour mixture and mix until just combined. Stir the batter with a rubber spatula and pour into the prepared pan. Smooth the top and bake in the center of the oven for 20 to 30 minutes, until a toothpick comes out clean. Cool to room temperature.

For the icing, combine the butter, cream cheese, and vanilla in the bowl of an electric mixer fitted with the paddle attachment and mix on medium speed until very smooth. Add the confectioners’ sugar and mix on low speed. Stir with a rubber spatula to be sure the icing is well mixed.

Spread half of the icing on the cake. Using a toothpick, outline a flag on the cake. Fill in the upper left corner with blueberries. Place 2 rows of raspberries across the top of the cake like the red stripes. Put the remaining icing in a pastry bag fitted with a star tip and pipe two rows of white stripes below the raspberries. Alternately add 2 rows of raspberries and 2 rows of icing until the flag is completed. Pipe stars on top of the blueberries.

Keep refrigerated until ready to serve.

Pecan Pie Rugelach

Last week we celebrated my favorite two food festivities on the same day: Thanksgiving and Hanukkah. This once in a lifetime event (the next occurrence won’t happen for about 70,000 years) was a perfect chance to try a bit of Thanksgivukkah fusion cooking. Since I usually make our Thanksgiving dessert, I picked out this pecan pie rugelach recipe weeks ago.  These sweet, buttery pastries were well worth the wait. You have a couple days left of Hanukkah to try them for yourself.

Speaking of long waits, after 9 months of anticipation, we are especially thankful this year for the arrival of baby boy Benjamin two weeks ago.  I’m looking forward to a leisurely holiday season ahead with my new little one, with not much to do except baking and baby snuggling. What could be better!

pecan pie rugelach


Pecan Pie Rugelach
adapted from BuzzFeed

I love that half of this recipe–the dough–can be made the day before baking. If you can spare a half hour, two days in a row, you can whip up these fabulous pastry-type cookies.

makes 32 cookies

Dough:
1 cup (120 g) all-purpose flour
1/4 teaspoon salt
1/2 cup unsalted butter (110 g), cut into 8 pieces
1/2 cup cream cheese (110 g), cut into 4 pieces

Filling:
1 1/2 cups (225 g) finely chopped pecans (toasted if possible)
1/4 cup unsalted butter (55 g), cut into 4 pieces
1 teaspoon vanilla extract
1/3 cup (80 ml) corn syrup
1/2 cup (85 g) brown sugar
pinch of sea salt

Egg wash:
1 egg
1 tablespoon water

Let butter and cream cheese sit out at room temperature for 15 minutes, so that they are still cool but slightly soft. Combine flour and salt in a medium mixing bowl. Using a hand mixer, mix on a low speed just until combined. Scatter butter and cream cheese pieces over the top of the flour mixture, and beat on medium speed until dough is the texture of cottage cheese, still slightly crumbly. Use your hands to divide the dough into 2 equal pieces, then roll each piece into a ball. Flatten each ball into a disk about 1 inch thick and 4 inches in diameter, then wrap each one separately in plastic wrap, and refrigerate at least 2 hours, up to 1 day.

Place chopped pecans in a small bowl. In a small saucepan over medium heat, brown the butter by adding all 4 pieces at once and constantly stirring with a heatproof spatula until completely melted. Continue to stir or swirl the pan as butter starts to bubble and foam. When the foam subsides slightly and butter turns a light brown color, take it off the heat immediately and add the it to the chopped pecans. Add vanilla extract, corn syrup, and brown sugar, and mix with a rubber spatula just until combined.

Preheat oven to 350°F. Line two cookie sheets with parchment paper. Beat egg yolk with the tablespoon of water and set aside.

When the dough is chilled, unwrap one disk onto a lightly floured surface, and roll with a rolling pin into a 12-inch circle. It is important to have an even, symmetrical circle, so trim any excess. If dough gets too soft during rolling, lay it on one of the lined baking sheets and put it in the freezer for 5 minutes, until slightly chilled. Once the dough is rolled out, sprinkle half of the pecan mixture on top of the dough, all the way to the edges of the circle, making sure the mixture is evenly distributed. With a pizza cutter (or a knife), cut dough into 16 equal slices. Roll each slice from the outside in (starting the wide end and rolling towards the point), placing each roll onto the cookie sheet as you go. Repeat this process with the other disk of dough.

Use a pastry brush to coat the top of each cookie with the egg-water mixture. Bake rugelach for 20 minutes until golden, turning the cookie sheet halfway through baking. Cool completely before serving. Store in a covered (but not airtight) container for up to 3 days.

Pistachio-crusted Pork Tenderloin, Lemon-Basil Orzotto, and Seven Layer Bars

We moved into a new house three weeks ago. Exciting to be sure, but as much as I’m relieved to be done with selling my old house and moving 8+ years of life into a new one, I feel a homelessness of sorts. The new house has the right space and modern amenities (a master bathroom!) but it also has odd paint color, lower ceilings, and some kind of smell that is not bad but definitely not good. Paint and ceilings are tough to fix so I’ve been cooking like crazy trying to get this place to feel (and smell) more like mine. And despite the house not feeling quite like home yet, at least the dining room table feels the same with my family and friends gathered around it enjoying dinners together. This was my recent favorite.

Pistachio-crusted Pork Tenderloin

Serves 4

1 cup (150 g) shelled, salted pistachios
2 pieces pork tenderloin (about 2 lbs/900 g), cut into 1/2 inch thick medallions
freshly ground black pepper
olive oil

Preheat the oven to 375°F (190°C).

Pulse the pistachios in a food processor about 10 times until coarsely ground (like bread crumbs) but not pasty. Place the ground nuts in a shallow bowl.

Season the pork medallions to taste with pepper. Dredge the peppered pork in the ground pistachios, pressing gently so the nuts adhere to the pork. Place the medallions on a plate until they are all coated.

Heat a thin layer of olive oil in a large oven safe skillet over medium-high heat. Fry the pork medallions in a single layer in the heated oil, 2–3 minutes on each side until golden. Adjust the heat if necessary so the pistachios do not burn. Place the skillet in the preheated oven, baking 5–10 minutes until the pork is fully cooked.

***

Lemon-Basil Orzotto
adapted from the Cooking Channel (Kelsey Nixon)

Serves 4

2 tablespoons extra-virgin olive oil
1 small onion, minced
1 1/2 cups (300 g) orzo or pearl barley
1/2 cup (120 ml) dry white wine
3 cups (700 ml) chicken stock or broth
1/2 cup (70 g) frozen petite green peas, thawed
1/3 cup (35 g) grated Parmesan cheese
2 tablespoons chiffonade fresh basil
1 teaspoon lemon zest
1/4 cup (60 ml) heavy cream or half and half
Juice of 1/2 lemon
Salt and freshly ground black pepper

In a heavy-bottomed medium saucepan, heat the olive oil over medium-high heat. Add the onion and saute until fragrant and translucent. Add the orzo and toast for 2 minutes, stirring occasionally. Add the wine and cook until absorbed.

Gradually add the chicken stock, stirring frequently. Bring to a simmer, lower the heat, and cover. Cook for 8 to 10 minutes, until the liquid is almost absorbed and orzo is tender. Remove from the heat.

Stir in the peas, Parmesan, fresh basil, lemon zest, heavy cream, and lemon juice. Season the orzo with salt and pepper, to taste, and serve.

***

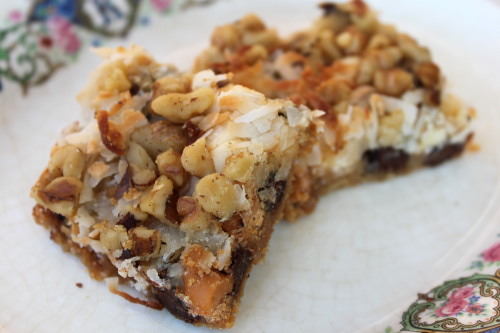
Seven Layer Bars
from allrecipes.com

I make these candy-like bars in the morning so they are cool and ready to eat after dinner. They travel well and can be cut into small pieces, making them perfect picnic, pot luck or bake sale fare.

Makes about 2 dozen bars

1/2 cup (110 g) butter
1 1/2 cups (150 g) graham cracker crumbs
1 cup (200 g) semisweet chocolate chips
1 cup (200 g) butterscotch chips
1 cup (100 g) chopped walnuts
14 oz (400 ml) sweetened condensed milk
1 1/3 cups (110 g) shredded coconut

Preheat oven to 350°F (180°C).

Place the butter in 13 x 9 inch pan and melt in the oven. Swirl to coat bottom and sides with butter.

Spread the crumbs evenly over the bottom of the butter, pressing to form a thin even crust on the bottom of the pan.

Layer the chocolate chips, butterscotch chips, and nuts over the crumbs. Pour the condensed milk over nuts. Sprinkle the coconut over the condensed milk. Press the toppings together lightly with a fork.

Bake until the edges are golden brown, about 25 minutes. Let cool and cut into small bars. Store in an air tight container.

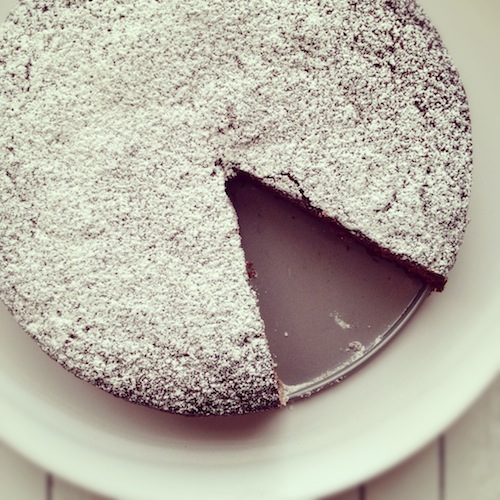
Nigella Lawson’s Store Cupboard Chocolate Raspberry Cake

Cookbook writers and TV chefs are always talking about dishes to serve when unexpected guests pop in or if you’re having friends round for a midweek dinner party. Seriously? Who on earth has a dinner party in the middle of the week? And who calls in unannounced and expects to have some little treat fresh out of the oven set down in front of them? I’m a third generation Virgo and consider myself to be fairly well organised, but I would be hard pressed to rustle up much more than some stale crackers unearthed from the back of the pantry if someone dropped by out of the blue.

Until, that is, I discovered this cake. It’s my favorite kind of cake recipe — the kind where the butter is melted and then everything gets stirred together in one pot, meaning you don’t even have to plan ahead to let the butter soften first. I always have the baking basics on hand (flour, butter, sugar, eggs), and if you just add a jar of raspberry jam and a bar of dark chocolate to that list, then this is truly a store cupboard cake, one you can breezily whip together at a moment’s notice if a craving for cake suddenly strikes — or if, like Nigella, you just so happen to be throwing an effortless-looking dinner party on a school night.

Store Cupboard Chocolate Raspberry Cake
adapted from How to Be a Domestic Goddess by Nigella Lawson

The original recipe is actually called Store Cupboard Chocolate Orange Cake, since it calls for marmalade instead of raspberry jam. I’ve made it that way too but as much as I love marmalade, I like the raspberry jam version even better.

1/2 cup (125 g) unsalted butter
4 oz (100 g) dark chocolate, broken into pieces
3/4 cup (300 g) good-quality raspberry jam (or apricot jam or marmalade)
3/4 (150 g) sugar
pinch of salt
2 large eggs, beaten
1 1/4 cups (150 g) self-raising flour
confectioners’ sugar (icing sugar), to decorate (optional)

Preheat the oven to 350°F (180°C). Butter and flour an 8 inch (20 cm) Springform pan and set aside.

Put the butter in a heavy-bottomed saucepan and set over a low heat to melt. When it’s almost melted, stir in the chocolate and allow it to melt a little. Take the pan off the heat and stir until the butter and chocolate are smooth and melted. Add in the jam, sugar, salt and eggs and stir well until everything is combined. Sift in the flour and stir again (taking care not to overmix), then pour the batter into the prepared Springform pan. Bake in the oven for 45 to 50 minutes, until a tester inserted into the centre comes out clean. Set the pan on a wire rack and allow the cake to cool in the pan for at least 10 minutes before you turn it out. Once it’s completely cooled, sift over some confectioners’ (icing) sugar to decorate.

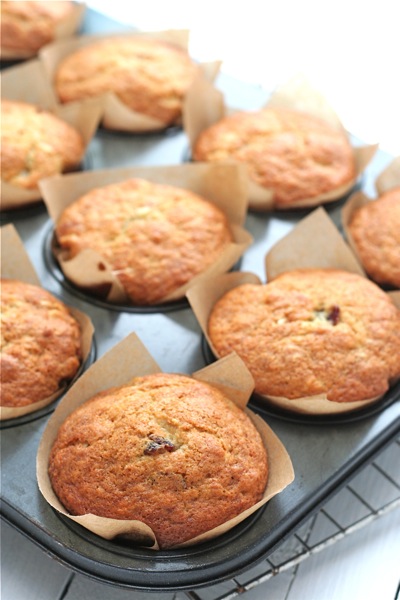
Banana, Cherry and White Chocolate Cupcakes

I’ve hit on the perfect play date treat with these banana, cherry and white chocolate cupcakes. Unusually for a cupcake these days, they’re not smothered with any frosting, so they’re not messy to eat and don’t make for sticky fingers. Plus they don’t have too much sugar in them, relying on the bananas for sweetness instead, and I always feel like any treat with fruit keeps it on the right side of indulgence. Friends, you’ve had fair warning now — next time you invite me and my kids over, I’ll be bringing a batch of these.

Banana, Cherry and White Chocolate Cupcakes
adapted from How to Be a Domestic Goddess by Nigella Lawson

Makes 12 cupcakes

1/2 cup + 1 tablespoon (125 g) unsalted butter
1 cup (200 g) sugar
1 teaspoon vanilla extract
3 ripe bananas, mashed
1/4 cup (60 ml) sour cream or natural yogurt
2 large eggs, beaten
2 1/2 cups (300 g) plain flour
1 teaspoon baking soda
1/2 teaspoon baking powder
1/3 cup (40 g) dried cherries, chopped (you could substitute dried cranberries or even raisins)
1/4 cup (50 g) white chocolate, chopped, or use chips or buttons

Preheat the oven to 350°F (180°C). Line a muffin tin with paper or silicone cases.

Melt the butter in a saucepan big enough to eventually hold all the batter. Off the heat, add the sugar, vanilla and mashed bananas. Stir in the sour cream or yogurt and the eggs and beat to mix with a wooden spoon. Sift in the flour, baking soda and baking powder, then fold in the cherries and chocolate. Mix until everything is just blended (don’t overmix!), then divide the mixture between the 12 muffin cases. Cook for 20 minutes, until golden and springy on top and a tester comes out clean. Remove the cupcakes in their papers to a wire rack and leave till cool.

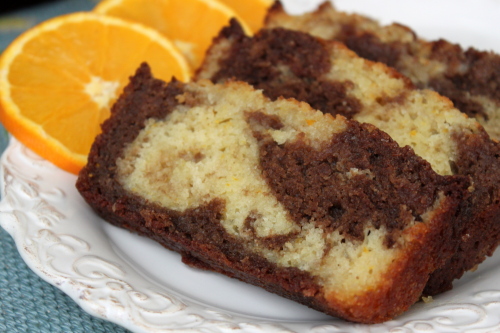
Chocolate Orange Marble Cake

We’re eating citrus in our house like it’s going out of style–or at least out of season. Although February food can be rather bleak notwithstanding the plethora of root vegetables you can scrounge up, at least we can still find great oranges and grapefruit. I love the combination of chocolate and orange, especially in cake form. And of course I’m a sucker for a cake that is moist tender and without frosting (see for example maple yogurt pound cake, raspberry buttermilk cake, and lemon yogurt cake). This marble cake, which I usually bake as a loaf, maintains its moistness for days thanks to a post-bake drizzle of orange juice and sugar syrup. Make it now, before April rolls around and oranges become pithy and expensive.


Chocolate Orange Marble Cake
adapted from allrecipes.com

Serves 10

1 cup (225 g) butter, softened
1 1/4 cups (250 g) white sugar
3 eggs
2 teaspoons vanilla extract
1 cup (240 ml) plain or vanilla yogurt
1 3/4 cups (210 g) all-purpose flour
3/4 teaspoon baking soda
3/4 teaspoon baking powder
1/4 teaspoon salt
2 tablespoons grated orange zest
2 ounces (60 g) semisweet or bittersweet chocolate, melted [Note: I use a microwave for melting]
4 tablespoons orange juice

Preheat the oven to 350°F (180°C). Grease and flour a loaf pan or 10 inch tube pan.

In a large bowl, cream the butter with 1 cup (200 g) of the white sugar. Beat in the eggs, then the vanilla and the yogurt.

In another bowl, stir together the flour, baking soda, baking powder, and salt. Beat the flour mixture into the creamed ingredients. Turn 2/3 of the batter into another bowl. Add the orange zest to that bowl and the melted chocolate to the remaining batter. Alternately spoon the orange and chocolate batters into the greased and floured pan. Gently swirl through the two batters with a knife to create a marbled effect.

Bake for 45–50 minutes, until toothpick inserted in the center of the cake comes out clean. While the cake bakes, stir together the remaining 1/4 cup (50 g) sugar and the orange juice, making sure the sugar dissolves completely. As soon as the done cake is removed from the oven, pour the juice/sugar mixture over the still hot cake. Let the cake finish cooling on a rack before serving.

Nigella Lawson’s Clementine Cake

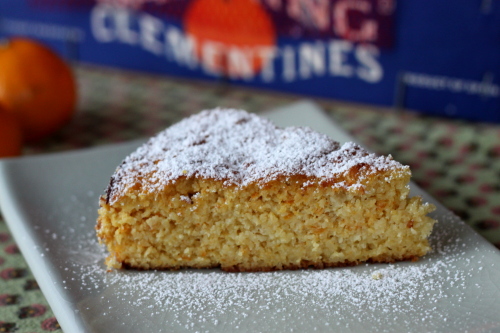
I wasn’t planning to post this week (birthdays, holidays, children, my excuses could go on forever), but this cake is so quick, easy, and different, I had to share. In case any of you need a holiday dessert you can make the ahead of time, this is the cake for you. It’s texture and flavor become more complex on day two, though eating it warm out of the oven might be delicious also. This cake alone might save my sanity this season. I made it last weekend for lunch with my cousin. It’s not too sweet so I’m taking another one to work for my birthday breakfast treat tomorrow. And then I’ll make it again on Friday night to serve with Christmas dinner on Saturday. Speaking of which, I’m cutting this post short  so I can get back to figuring out the logistics of seating thirteen people for dinner at a table that only holds twelve. Happy holidays everyone!

Clementine Cake
adapted from Nigella Lawson

Serves 8

Like many of Nigella Lawson’s cakes, this one seems an incredibly bad idea as you stir it together. Seriously, who would think to boil whole clementines, mash them peel and all, and throw them into a cake that doesn’t even have flour? It works though, and your whole house will smell wonderfully of citrus as it bakes.

4 to 5 clementines (about 13 oz / 370 g total weight)
6 eggs
1 cup plus 2 tablespoons (225 g) sugar
2 1/3 cups (250 g) ground almonds
1 heaping teaspoon baking powder
Powdered (confectioner’s) sugar, for dusting

Put the clementines in a pot with cold water to cover, bring to the boil, and cook for 2 hours. [Check the pan regularly to ensure it doesn’t dry out.] Drain the clementines and, when cool, cut each clementine in half and remove the seeds. Then finely chop the skins, pith, and fruit in the processor (or by hand, of course).

Preheat the oven to 375°F (190°C). Butter and line an 8‑inch springform pan with parchment paper.

Beat the eggs. Add the sugar, almonds, and baking powder. Mix well, adding the chopped clementines. I don’t like using the processor for this, and frankly, you can’t balk at a little light stirring.

Pour the cake mixture into the prepared pan and bake for 1 hour, when a skewer will come out clean; you’ll probably have to cover the cake with foil after about 40 minutes to stop the top from burning. Remove from the oven and leave to cool, in the pan on a rack. When the cake is cold, you can take it out of the pan.


Affogato al Caffe

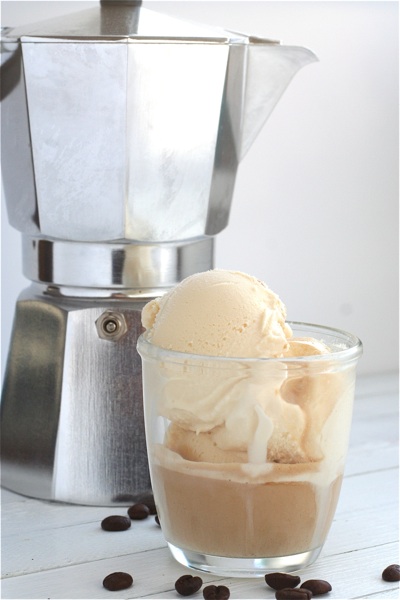
I was having dinner out with a friend awhile ago and after overdoing it with the starter and main course, none of the heavy desserts on the menu appealed to me that night. “You know what? I’m going to do something I’ve never done before. I’m going to go off menu!” I said, and asked the waitress for an affogato al caffe. They sold vanilla ice cream and they sold espresso, so it was just a matter of putting the two together in one bowl, like an ice cream sundae for grown-ups.

I was reminded of affogato al caffe (which means ‘drowned in coffee’ in Italian) when Café de Cuba sent me some of their Really Good Organic Coffee, decaf coffee and teas to try recently. This is one of those recipes where the quality of the ingredients really matters. Use the best vanilla ice cream you can find and use good, strong espresso (regular brewed coffee will not work here).

Affogato is good any time of year, but if you’ll be entertaining during the holidays, it’s an easy option for a dessert and pick-me-up after a big meal.

Affogato al Caffe

Serves 1

Put a few scoops of best-quality vanilla ice cream (though you could also use chocolate ice cream) in a bowl, sundae dish or cappuccino cup. Pour over a shot of freshly made espresso and serve immediately. You could also add a shot of amaretto or other liqueur to give it a little kick.