All posts by Kelly

Best Ever Banana Cake with Cream Cheese Frosting

No really. This is the best ever banana cake. I don’t even like banana cake and I’ve made this twice in two weeks. It was so tasty, so perfectly textured, so cream cheese frosting‑y, I barely had time to snap a picture of myself eating it before it was gone. And yes, I do need a manicure but if I have a spare hour these days, I’m more likely to make a cake (this cake!) than drag myself to the salon. In addition to being one of my new favorite cakes, this recipe wins points on procedure alone. Unlike any recipe I’ve seen before, this cake bakes slow and low followed by an immediate trip to the freezer to cool. I was dubious, but the method works wonderfully.
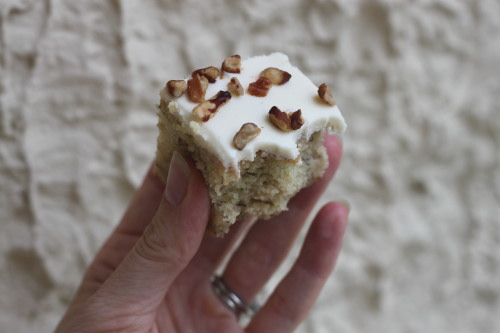
Best Ever Banana Cake with Cream Cheese Frosting
adapted from food.com

If you don’t have buttermilk on hand, you can make it by combining 1 1/2 cups of milk with 2 tablespoons of lemon juice. Stir the milk and lemon juice together and let sit 10 minutes before using.

Serves 12

Cake:
1 1/2 cups (350 ml) mashed ripe bananas (about 3 large)
2 teaspoons lemon juice
3 cups (360 g) flour
1 1/2 teaspoons baking soda
1/4 teaspoon salt
3/4 cup (170 g) butter, softened
2 cups (400 g) sugar
3 large eggs
2 teaspoons vanilla
1 1/2 cups (350 ml) buttermilk

Frosting:
1/2 cup (110 g) butter, softened
8 oz (225 g) cream cheese, softened
1 teaspoon vanilla
3 cups (360 ml) icing (confectioners) sugar
chopped toasted pecans, to garnish (optional)

Preheat oven to 275°F (140°C). Grease and flour a 9 x 13 pan.

In a small bowl, mix the mashed banana with the lemon juice; set aside.

In a medium bowl, mix the flour, baking soda and salt; set aside.

In a large bowl, cream the butter and sugar until light and fluffy. Beat in the eggs, one at a time, then stir in the vanilla.

Beat in the flour mixture alternately with the buttermilk, beginning and ending with flour. Stir in the banana mixture.

Pour the batter into the prepared pan and bake for 65–80 minutes or until toothpick inserted in the center comes out clean. You may have to check the cake a few times, as cooking times can vary greatly with this cake. Remove the cake from the oven and place it directly into the freezer for 60 minutes. This will make the cake very moist.

While the cake cools, make the frosting. Cream the butter and cream cheese until smooth. Beat in the vanilla. Add the icing sugar and beat on low speed until combined, then on high speed until the frosting is smooth. Spread the frosting on the cooled cake. Sprinkle chopped pecans over the frosting, if desired. Store in the refrigerator, covered.
Crunchy Pork Kimchi Burgers

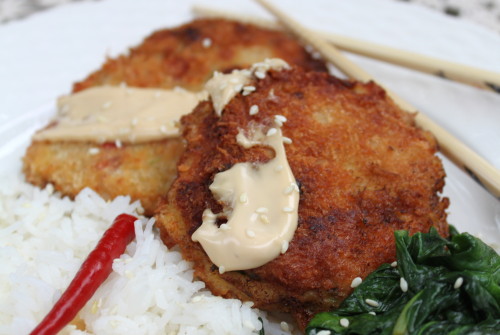
Last year I succumbed to a telemarketer begging me to buy a magazine subscription in support of a well-known charity. I’d like to tell you it was because I care deeply for the organization or felt pity for the poor saleswoman, but honestly, I just missed receiving a magazine with my name on it every month. After years of being a loyal subscriber to Gourmet (my idealistic college days), then Cooking Light (I put on weight working an office job in my early twenties) and, most recently, Cook’s Illustrated (the serious cooking began), I let the subscriptions expire four years ago when my first-born arrived. But no longer. My magazine days are here again. Unfortunately, I regretted last year’s selection of Food & Wine magazine. Besides this fantastic pork burger recipe and one other interesting salmon preparation, I didn’t find much inspiration in the magazine. Maybe I don’t drink enough wine to appreciate it. So, dear readers, tell me what periodical to order next. What cooking magazines do you love?

Crunchy Pork Kimchi Burgers
adapted from Food & Wine, May 2012

I used the last few precious tablespoons of my sister-in-law’s homemade kimchi for this recipe. Because the kimchi has a bit of kick to it, I made some of the burgers without the kimchi for the kids. Both versions tasted good but the kimchi really made the burger memorable.

Serves 4

1 tablespoon grated fresh ginger
1 large garlic clove, minced or grated
2 scallions, minced
1 lb (450 g) ground pork
3/4 cup (170 g) finely chopped kimchi
Kosher salt
All-purpose flour, for dusting
2 large eggs, beaten
1 1/2 cup (100 g) panko (Japanese bread crumbs), lightly crushed
Vegetable oil, for frying
12 oz (340 g) baby spinach
1/4 cup (60 ml) mayonnaise
1/2 teaspoon toasted sesame oil
1 tablespoon light soy sauce
Toasted sesame seeds, for garnish
Steamed rice

In a bowl, combine the ginger, garlic, scallions, pork and kimchi with 1 teaspoon of salt. Form the mixture into eight patties, about 1/2 inch thick. Dust the patties with flour and refrigerate for 10 minutes while you prep the other ingredients.

Put the eggs and panko in 2 shallow bowls. Dip the patties in the egg and then in the panko, pressing to help the crumbs adhere.

In a large skillet, heat 1/4 inch of vegetable oil. Depending on the size of your skillet, you will probably need to cook the patties in 2 batches. Add as many patties to the hot skillet as will fit and fry over moderate heat, turning, until golden and cooked through, 5 to 6 minutes. Drain on paper towels.

Pour off all but 1 tablespoon of the oil in the skillet. Add the spinach in batches, season with salt and cook over high heat until wilted, about 1 minute.

In a bowl, mix the mayonnaise, sesame oil and soy sauce. Mound the spinach on plates and top with the burgers. Top with the sauce and sprinkle with sesame seeds. Serve with steamed rice

Chicken Canzanese

After years of minimal sleep and constant hovering over infants and toddlers, I really appreciate the little things about having older kids. Things like talking with my husband over coffee in the morning (thank goodness for Saturday morning cartoons) or staying up late to watch a boring British mystery movie knowing the kids will sleep in past 7 a.m.  Now that both kids are officially out of diapers, feed themselves, and can talk (not necessarily without whining), a small amount of free (me!) time has even crept into my weekends. This Sunday, I had a chance to sit on the couch and watch a cooking show on television. I know this doesn’t seem like much of an event, but for any reader with young children, it’s momentous. Sam joined me on the couch, pretty unimpressed with the looks of the recipe until I explained that the chefs were cooking the chicken in broth. Sam immediately perked up at the mention of broth. The kid loves anything with broth in it. Weird, I know.

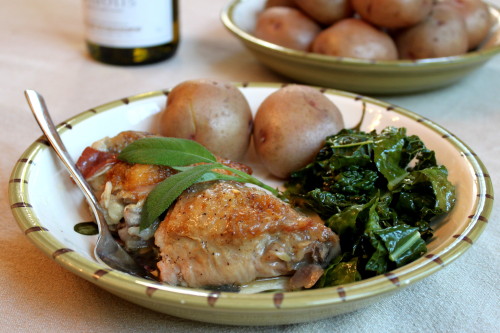
I had most of the ingredients in the house (and garden) to make this Italian-style braised chicken dish and what I didn’t have, I left out. My stripped down version of the recipe came out great. The chicken was tender, the skin still slightly crunchy, the sauce silky and rich, and the sage and lemon adding a nice spike of freshness. Definitely a keeper.

Italian Braised Chicken

Chicken Canzanese
adapted from America’s Test Kitchen

Serves 4 to 6

I served this initially with boiled red potatoes and sauteed kale. For leftovers the following night, I made polenta and peas instead. Though both meals were eaten and enjoyed, we slightly preferred the polenta and peas combination.

2 tablespoons olive oil
2 oz (60 g) prosciutto, cut into 1/4‑inch cubes or, if thinly sliced, 1/4‑inch strips
4 medium garlic cloves , sliced thin lengthwise
8 bone-in, skin-on chicken thighs (about 3 lbs/1.4 kg), trimmed of excess fat and skin
ground black pepper
2 teaspoons unbleached all-purpose flour
1 cup (240 ml) dry white wine
2 cups (475 ml) low-sodium chicken broth
1/8 teaspoon ground cloves
12 whole fresh sage leaves
2 bay leaves
1/2 teaspoon red pepper flakes
1 to 2 tablespoons fresh lemon juice
2 tablespoons unsalted butter

Adjust the oven rack to lower-middle position and heat the oven to 325°F (160°C). Heat 1 tablespoon of oil in a large heavy-bottomed ovensafe skillet over medium heat until shimmering. Add the prosciutto and cook, stirring frequently, until just starting to brown, about 3 minutes. Add the garlic slices and cook, stirring frequently, until the garlic is golden brown, 1–2 minutes. Using a slotted spoon, transfer the garlic and prosciutto to a small bowl and set aside. Do not rinse the pan.

Increase the heat to medium-high; add the remaining tablespoon of oil and heat until just smoking. Pat the chicken dry with paper towels and season it with ground black pepper. Add the chicken, skin side down, and cook it without moving until it is well browned, 5 to 8 minutes. Using tongs, turn the chicken and brown on the second side, about 5 minutes longer. Transfer the chicken to a large plate.

Remove all but 2 tablespoons of fat from the pan. Sprinkle the flour over the fat and cook, stirring constantly, for 1 minute. Slowly add the wine and broth; bring to a simmer, scraping the bottom of pan with a wooden spoon to loosen any browned bits. Cook until the liquid is slightly reduced, 3 minutes. Stir in the cloves, sage leaves, bay leaves, red pepper flakes, and reserved prosciutto and garlic. Nestle the chicken into the liquid, skin side up (skin should be above the surface of liquid so it stays crisp), and bake, uncovered, until the meat offers no resistance when poked with a fork but is not falling off bones, about 1 hour 15 minutes. Check the chicken after 15 minutes; broth should be barely bubbling. If bubbling vigorously, reduce the oven temperature to 300°F (150°C).

Using tongs, transfer the chicken to a serving platter and tent with foil. Remove and discard the sage leaves, cloves, and bay leaves. Place the skillet over high heat and bring the sauce to boil. Cook until the sauce is reduced to about 1 1/2 cups (350 ml), 2 to 5 minutes. Off the heat, stir in 1 tablespoon of the lemon juice and butter. Season to taste with salt and pepper. Taste the sauce again and add the remaining lemon juice if desired (I like a nice kick of citrus with chicken). Pour the sauce around the chicken and serve.

Baked Sweet Potatoes with West African-Style Peanut Sauce

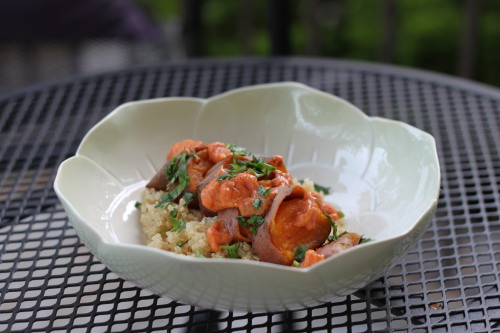
You haven’t seen it yet, but I make a pretty fabulous African influenced braised chicken dish. I adore the succulent melt-in-your pieces of chicken that are baked slow and low with a spicy, sweet peanut butter sauce and vegetables. Unfortunately, it’s so gosh darn good that I am always too hungry to take the time to photograph it properly. It is rather “rustic” with lots of shades of brown, which certainly doesn’t help its lens appeal. So tonight, instead of snapping a couple dozen more pictures of the poor peanut butter sauced chicken, I thought I’d experiment with a vegetarian spin on the dish. The bright orange sweet potatoes do look–if not exactly stunning–far better than the chicken, especially when served alongside a little cooked quinoa. It made for a lovely weeknight meal, though I couldn’t convince my almost-three year old to try the sauce, even with the promise of peanut butter inside.


Baked Sweet Potatoes with West African-Style Peanut Sauce
adapted from Cooking Light, October 2006

This recipe would make a nice light lunch. For a more robust dinner, serve alongside a piece of grilled fish or chicken with steamed vegetables or a green salad.

Serves 6 as a side dish, 3 as a main course

6 medium sweet potatoes (about 3 lbs/1.5 kg)
1 teaspoon canola oil
1/2 small onion, finely chopped
1 tablespoon grated peeled fresh ginger
2 garlic cloves, minced
1 1/2 teaspoons ground cumin
1 1/2 teaspoons ground coriander
1/8 teaspoon ground red pepper
3/4 cup (180 ml) water
8 oz (225 g) tomato sauce
1/3 cup (80 g) peanut butter
1 teaspoon sugar
1/2 teaspoon salt
chopped fresh cilantro
cooked quinoa or rice (optional)

Preheat oven to 375°F (190°C). Pierce the potatoes with a fork, and bake at 375° for 1 hour or until tender. Cool the potatoes slightly.

Heat the oil in a medium skillet over medium-low heat. Add the onion, ginger, and garlic; cook 3 minutes. Add the cumin, coriander, and pepper; cook 1 minute. Add 3/4 cup water and the next 4 ingredients (through salt), stirring until smooth; bring to a simmer. Cook 2 minutes or until thick. If the sauce becomes too thick, add a tablespoon or two of water.

If serving with quinoa or rice as a main course, gently cut the potatoes cross-wise into thick slices. Place the potatoes on the quinoa then top with the sauce and cilantro to taste. If serving the potatoes as a side dish, split the potatoes lengthwise, cutting to, but not through, the other side. Spoon about 1/4 cup sauce into each potato. Top each serving with a bit of cilantro.

Chicken and Kale Casserole

I know this casserole is not the prettiest thing you’ve ever seen on this blog, but sometimes the most homely looking food is the best-tasting food. And for goodness sake, it’s a casserole. No one expects it to be photogenic, right? Despite it’s ho hum appearance, this baked chicken and rice dish is one of my favorite concoctions. It tastes like the delicious church potluck dishes that I loved as a child but without the Velveeta cheese and frozen broccoli that I detest as an adult. Except for the handful of shredded cheese tucked gently into the rice mixture, it’s healthy — kale, chicken breast, and brown rice — and doesn’t depend on sodium-laden canned soup for its creaminess. Best of all, it makes for an easy weeknight dinner. You can make the casserole in advance, store it in the fridge overnight and simply throw it into the oven half an hour before mealtime. You don’t even have to come up with a side dish since the casserole covers your four basic food groups.

Chicken and Kale Casserole

This recipe is highly adaptable. Experiment with different types or quantities of meat, cheese, and veggies. Broccoli and cheddar in place of the kale and mozzarella is a great combination. Omit the chicken and it’s an easy vegetarian meal. You can also substitute cooked white rice or pasta for the brown rice, though the texture of the casserole will be softer.

Serves 4

1 tablespoon olive oil
1 small onion, or 1/2 large onion, diced
2 cloves garlic, minced
1 large bunch kale, tough stems removed and leaves chopped roughly
8 oz (225 g) crimini mushrooms, sliced
3 tablespoons (50 g) butter
3 tablespoons flour
1 1/2 cups (350 ml) milk
2 cups (200 g) cooked brown rice, small grain preferably
8 oz (225 g) cooked chicken breast, diced and if not already seasoned, sprinkled with salt, pepper, and paprika to taste
4 oz (100 g) mozzarella cheese, shredded
salt and freshly ground black pepper

Preheat the oven to 375°F (190°C). Grease a 2 quart casserole or a 11 in x 7 in baking dish.

Heat the olive oil in a large skillet over a medium-high heat. Add the onion and cook, stirring occasionally, for about 5 minutes, until the onion becomes translucent. Add the garlic and cook for about 1 minute, until fragrant. Stir in the kale and cook 1–2 minutes, until it starts to wilt. Stir in the mushrooms and cook 5 minutes more, until the mushrooms start to soften. Season with salt and pepper and remove the pan from the heat.

While the vegetables cook, make the cream sauce. First, melt the butter in a saucepan over a medium heat. Whisk in the flour and cook, stirring constantly. The mixture should bubble and cook for 1–2 minutes. Be careful not to burn the mixture or let it take on too much color. Slowly pour in the milk to the flour/butter mixture, whisking constantly. The mixture should thicken as it cooks. You may need to add a bit more milk if the mixture seems too thick. Add about 1/2 teaspoon of salt and freshly ground black pepper to the sauce. Let it simmer for about 1 minute. Remove the pan from the heat.

Gently stir in the rice and chicken to the vegetable mixture. Fold in the shredded cheese, then stir in the cream sauce. Taste and add more salt or pepper if needed. Pour the mixture into the greased casserole or baking dish and cover with a lid or aluminum foil. If serving the next day, cool the casserole, then refrigerate.

Bake for 20 minutes. Remove the lid and continue cooking for 10 minutes more, until bubbly and slightly golden around the edges.

Steak and Swiss Chard Tacos with Houston-style Green Salsa

Whenever people ask where I’m from, I always hesitate before answering. Although I spent my teenage years in Illinois, I lived my younger years in Tomball, Texas, a tiny town near Houston. Inevitably, I answer that I was “raised in Texas.” Growing up in Texas during your formative years definitely leaves a mark. The food, the weather, the people all have the indelible stamp of Texas on them. It took me a long time to get over my move to north. While I can appreciate the faster pace of my current hometown,  I still miss many, many things about Texas. The warm and generous people, amazing sunsets, never buying a winter coat, and jalapenos and sweet tea served with every meal.

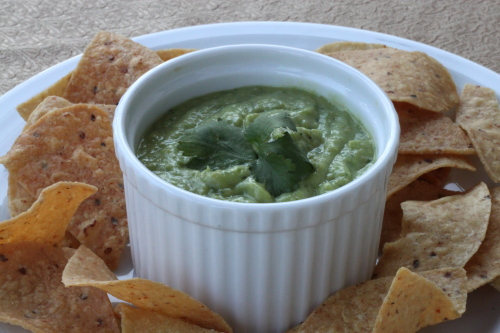
I am still, after all these years, a homesick Texan. I regularly follow Lisa Fain’s blog by the same name and was thrilled when Kristin sent me her cookbook. I spent the evening reading it–yes, reading it–with that bittersweet ache of nostalgia in my stomach. There is nothing quite like food to trigger memory. A certain conversation or taste or smell that you’ve forgotten for years can come roaring back to life with just the mention of the food that you were eating when it occurred. When I read Lisa’s green salsa recipe I knew I was going to be in for a long ride down memory lane. This salsa is one that I ate constantly growing up. It was (and probably still is) served alongside traditional red salsa at every Mexican restaurant in southeastern Texas. Alas, I never tasted it again after moving up north. Until now that is. I’ve made this salsa five times since Christmas Eve, where I served it as surprise for my Texas-born siblings. For me, that is an astounding amount of times to make the same recipe. It’s just that good. I can, and have, eaten it by the spoonfuls. It’s topped my carnitas, been served along side yellow rice and a roasted chicken, gone perfectly with tortilla chips, and accompanied tonight’s steak tacos.

Steak & Swiss Chard Tacos

Serves 6

2 steaks (preferably ribeye or flank steak, but sirloin will work in a pinch)
2 cloves garlic, minced
juice of 1 lime
1 teaspoon cumin
salt and pepper
1 bunch Swiss chard, tough stems chopped into 1/2 inch pieces and leaves roughly chopped
1 tablespoon olive oil
1 clove garlic, thinly sliced
12 corn or flour tortillas
toppings (shredded cheese, diced tomatoes, sour cream, avocado)

Spread the minced garlic evenly on top of the steaks. Sprinkle with the lime juice, cumin, and salt and pepper, to taste. Let the steaks sit for 20 minutes. If desired, steaks can sit for up to one hour in the fridge. Make the salsa while your steaks marinate.

While the steak marinates, heat the olive oil in a skillet over medium heat. Add the Swiss chard stems and sliced garlic and cook, stirring frequently for 2–3 minutes until the garlic turns golden. Add the Swiss chard leaves and continue cooking until the leaves are wilted and stems are just tender, another 5–10 minutes. Season the chard with salt and pepper to taste and set aside.

Preheat a large cast iron skillet or griddle over medium high heat. When hot, place the steaks into the pan and cook for 5–8 minutes until nicely seared on one side. Flip the steaks and continue cooking on the other side until cooked to your desired doneness. I like my beef medium rare so usually another 5 minutes will do the trick, depending on the thickness of the steak.  When done, remove the steaks from the pan and let them rest on a cutting board. After letting them rest for 5–10 minutes, thinly slice the steaks against the grain. Serve the steak with warmed tortillas, topped with the swiss chard, salsa and other accompaniments.

***

Houston-style Green Salsa
from The Homesick Texan Cookbook by Lisa Fain

Makes about 2 cups

3/4 lb (340 g) small tomatillos, husks removed or 1 x11 oz (x310 g) can of whole tomatillos, drained
1 avocado, peeled and pitted
1 or 2 serrano chiles, stems and seeds removed, roughly chopped
4 cloves garlic, chopped
1 tablespoon lime juice
1/4 cup (8 g) cilantro
salt, to taste

If using fresh tomatillos, on high heat, bring a pot of water to boiling and cook tomatillos until soft, about 5 minutes.

Add the tomatillos to a blender along with the avocado, serrano chiles, garlic, lime juice, and cilantro. Blend until smooth then add salt, to taste.

Chocolate Orange Marble Cake

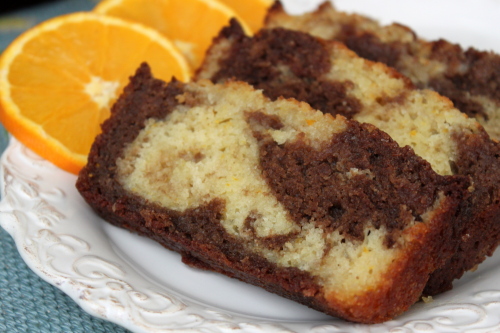
We’re eating citrus in our house like it’s going out of style–or at least out of season. Although February food can be rather bleak notwithstanding the plethora of root vegetables you can scrounge up, at least we can still find great oranges and grapefruit. I love the combination of chocolate and orange, especially in cake form. And of course I’m a sucker for a cake that is moist tender and without frosting (see for example maple yogurt pound cake, raspberry buttermilk cake, and lemon yogurt cake). This marble cake, which I usually bake as a loaf, maintains its moistness for days thanks to a post-bake drizzle of orange juice and sugar syrup. Make it now, before April rolls around and oranges become pithy and expensive.


Chocolate Orange Marble Cake
adapted from allrecipes.com

Serves 10

1 cup (225 g) butter, softened
1 1/4 cups (250 g) white sugar
3 eggs
2 teaspoons vanilla extract
1 cup (240 ml) plain or vanilla yogurt
1 3/4 cups (210 g) all-purpose flour
3/4 teaspoon baking soda
3/4 teaspoon baking powder
1/4 teaspoon salt
2 tablespoons grated orange zest
2 ounces (60 g) semisweet or bittersweet chocolate, melted [Note: I use a microwave for melting]
4 tablespoons orange juice

Preheat the oven to 350°F (180°C). Grease and flour a loaf pan or 10 inch tube pan.

In a large bowl, cream the butter with 1 cup (200 g) of the white sugar. Beat in the eggs, then the vanilla and the yogurt.

In another bowl, stir together the flour, baking soda, baking powder, and salt. Beat the flour mixture into the creamed ingredients. Turn 2/3 of the batter into another bowl. Add the orange zest to that bowl and the melted chocolate to the remaining batter. Alternately spoon the orange and chocolate batters into the greased and floured pan. Gently swirl through the two batters with a knife to create a marbled effect.

Bake for 45–50 minutes, until toothpick inserted in the center of the cake comes out clean. While the cake bakes, stir together the remaining 1/4 cup (50 g) sugar and the orange juice, making sure the sugar dissolves completely. As soon as the done cake is removed from the oven, pour the juice/sugar mixture over the still hot cake. Let the cake finish cooling on a rack before serving.

Chickpea Wraps with Celery, Dill and Mustard

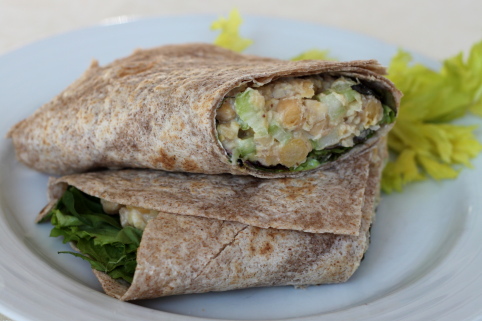
Lucky for me, my co-blogger Kristin keeps up on the cookbook scene. I rarely buy cookbooks (I think I’ve purchased maybe three in my lifetime) but Kristin always send me a good one for my birthday. This year, I was thrilled to receive Super Natural Every Day: Well-loved Recipes from My Natural Foods Kitchen by Heidi Swanson of 101 Cookbooks blogging fame. I pull regularly from her site for easy vegetarian recipes. I wasn’t aware she had a new cookbook until I opened Kristin’s package. What treat to try out some healthy dishes after weeks of December holiday food overload. I mean, I love Christmas cookies and Chanukah latkes, and a birthday cake or two goes down easy, but what really hit the spot after our New Year’s festivities were these savory chickpea wraps. The crisp celery, tangy mustard, and cool yogurt played off the tender chickpeas perfectly. The other recipes I’ve tried from the book have also been lovely, with the exception of one very terrible, nearly inedible chickpea stew. Note to Heidi (and fellow cookbook readers), I love saffron, yogurt, egg yolk and chickpeas–but not in soup form.


Chickpea Wraps with Celery, Dill and Mustard
adapted from Super Natural Every Day: Well-loved Recipes from My Natural Foods Kitchen by Heidi Swanson

For the bean-phobic, try substituting two cups of cooked, diced chicken breast for the chickpeas. I haven’t tried it yet but I’d bet good money this recipe makes a damn good chicken salad wrap.

Serves 4

3 cups (425 g) cooked chickpeas (garbanzo beans) or 2 x 15 oz/425 g cans chickpeas, rinsed and drained
1/3 cup (45 g) minced shallots
1/2 cup (60 g) chopped celery
1/2 teaspoon (or more to taste) dried dill or 2 tablespoons chopped fresh dill
1 1/2 tablespoons Dijon-style or stone-ground mustard
2/3 cup (155 g) plain yogurt
1/2 teaspoon sea salt
1 tablespoon fresh lemon juice, plus more if needed, and a bit of grated zest
4 pieces lavash flatbread or whole wheat tortillas (12 inch)
2 cups (30 g) mixed salad greens

In a large mixing bowl, whisk together the mustard, yogurt and salt. Spread about 2 tablespoons of the yogurt sauce across each piece of lavash.

Pulse 2/3 of the chickpeas in a food processor a few times, just enough to break them up. Transfer them to the mixing bowl with the remaining yogurt sauce, along with the remaining chickpeas, shallots, celery and dill. Gently toss to combine then add the lemon juice and zest and toss again. Taste and add more salt or lemon juice, if needed.

Sprinkle each piece of lavash with 1/4 of the mixed greens (the yogurt will help hold the greens in place), top each of the four wraps with 1/4 of the chickpea mixture. Fold or roll into a wrap and serve.