Category Archives: 30-minute meals

Steak and Swiss Chard Tacos with Houston-style Green Salsa

Whenever people ask where I’m from, I always hesitate before answering. Although I spent my teenage years in Illinois, I lived my younger years in Tomball, Texas, a tiny town near Houston. Inevitably, I answer that I was “raised in Texas.” Growing up in Texas during your formative years definitely leaves a mark. The food, the weather, the people all have the indelible stamp of Texas on them. It took me a long time to get over my move to north. While I can appreciate the faster pace of my current hometown,  I still miss many, many things about Texas. The warm and generous people, amazing sunsets, never buying a winter coat, and jalapenos and sweet tea served with every meal.

I am still, after all these years, a homesick Texan. I regularly follow Lisa Fain’s blog by the same name and was thrilled when Kristin sent me her cookbook. I spent the evening reading it–yes, reading it–with that bittersweet ache of nostalgia in my stomach. There is nothing quite like food to trigger memory. A certain conversation or taste or smell that you’ve forgotten for years can come roaring back to life with just the mention of the food that you were eating when it occurred. When I read Lisa’s green salsa recipe I knew I was going to be in for a long ride down memory lane. This salsa is one that I ate constantly growing up. It was (and probably still is) served alongside traditional red salsa at every Mexican restaurant in southeastern Texas. Alas, I never tasted it again after moving up north. Until now that is. I’ve made this salsa five times since Christmas Eve, where I served it as surprise for my Texas-born siblings. For me, that is an astounding amount of times to make the same recipe. It’s just that good. I can, and have, eaten it by the spoonfuls. It’s topped my carnitas, been served along side yellow rice and a roasted chicken, gone perfectly with tortilla chips, and accompanied tonight’s steak tacos.
Steak & Swiss Chard Tacos

Serves 6

2 steaks (preferably ribeye or flank steak, but sirloin will work in a pinch)
2 cloves garlic, minced
juice of 1 lime
1 teaspoon cumin
salt and pepper
1 bunch Swiss chard, tough stems chopped into 1/2 inch pieces and leaves roughly chopped
1 tablespoon olive oil
1 clove garlic, thinly sliced
12 corn or flour tortillas
toppings (shredded cheese, diced tomatoes, sour cream, avocado)

Spread the minced garlic evenly on top of the steaks. Sprinkle with the lime juice, cumin, and salt and pepper, to taste. Let the steaks sit for 20 minutes. If desired, steaks can sit for up to one hour in the fridge. Make the salsa while your steaks marinate.

While the steak marinates, heat the olive oil in a skillet over medium heat. Add the Swiss chard stems and sliced garlic and cook, stirring frequently for 2–3 minutes until the garlic turns golden. Add the Swiss chard leaves and continue cooking until the leaves are wilted and stems are just tender, another 5–10 minutes. Season the chard with salt and pepper to taste and set aside.

Preheat a large cast iron skillet or griddle over medium high heat. When hot, place the steaks into the pan and cook for 5–8 minutes until nicely seared on one side. Flip the steaks and continue cooking on the other side until cooked to your desired doneness. I like my beef medium rare so usually another 5 minutes will do the trick, depending on the thickness of the steak.  When done, remove the steaks from the pan and let them rest on a cutting board. After letting them rest for 5–10 minutes, thinly slice the steaks against the grain. Serve the steak with warmed tortillas, topped with the swiss chard, salsa and other accompaniments.

***

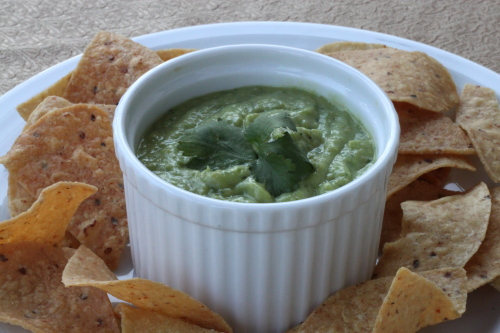
Houston-style Green Salsa
from The Homesick Texan Cookbook by Lisa Fain

Makes about 2 cups

3/4 lb (340 g) small tomatillos, husks removed or 1 x11 oz (x310 g) can of whole tomatillos, drained
1 avocado, peeled and pitted
1 or 2 serrano chiles, stems and seeds removed, roughly chopped
4 cloves garlic, chopped
1 tablespoon lime juice
1/4 cup (8 g) cilantro
salt, to taste

If using fresh tomatillos, on high heat, bring a pot of water to boiling and cook tomatillos until soft, about 5 minutes.

Add the tomatillos to a blender along with the avocado, serrano chiles, garlic, lime juice, and cilantro. Blend until smooth then add salt, to taste.

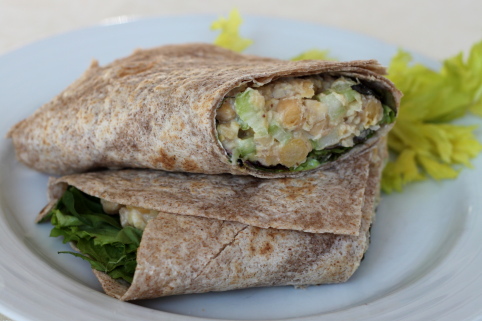
Chickpea Wraps with Celery, Dill and Mustard

Lucky for me, my co-blogger Kristin keeps up on the cookbook scene. I rarely buy cookbooks (I think I’ve purchased maybe three in my lifetime) but Kristin always send me a good one for my birthday. This year, I was thrilled to receive Super Natural Every Day: Well-loved Recipes from My Natural Foods Kitchen by Heidi Swanson of 101 Cookbooks blogging fame. I pull regularly from her site for easy vegetarian recipes. I wasn’t aware she had a new cookbook until I opened Kristin’s package. What treat to try out some healthy dishes after weeks of December holiday food overload. I mean, I love Christmas cookies and Chanukah latkes, and a birthday cake or two goes down easy, but what really hit the spot after our New Year’s festivities were these savory chickpea wraps. The crisp celery, tangy mustard, and cool yogurt played off the tender chickpeas perfectly. The other recipes I’ve tried from the book have also been lovely, with the exception of one very terrible, nearly inedible chickpea stew. Note to Heidi (and fellow cookbook readers), I love saffron, yogurt, egg yolk and chickpeas–but not in soup form.


Chickpea Wraps with Celery, Dill and Mustard
adapted from Super Natural Every Day: Well-loved Recipes from My Natural Foods Kitchen by Heidi Swanson

For the bean-phobic, try substituting two cups of cooked, diced chicken breast for the chickpeas. I haven’t tried it yet but I’d bet good money this recipe makes a damn good chicken salad wrap.

Serves 4

3 cups (425 g) cooked chickpeas (garbanzo beans) or 2 x 15 oz/425 g cans chickpeas, rinsed and drained
1/3 cup (45 g) minced shallots
1/2 cup (60 g) chopped celery
1/2 teaspoon (or more to taste) dried dill or 2 tablespoons chopped fresh dill
1 1/2 tablespoons Dijon-style or stone-ground mustard
2/3 cup (155 g) plain yogurt
1/2 teaspoon sea salt
1 tablespoon fresh lemon juice, plus more if needed, and a bit of grated zest
4 pieces lavash flatbread or whole wheat tortillas (12 inch)
2 cups (30 g) mixed salad greens

In a large mixing bowl, whisk together the mustard, yogurt and salt. Spread about 2 tablespoons of the yogurt sauce across each piece of lavash.

Pulse 2/3 of the chickpeas in a food processor a few times, just enough to break them up. Transfer them to the mixing bowl with the remaining yogurt sauce, along with the remaining chickpeas, shallots, celery and dill. Gently toss to combine then add the lemon juice and zest and toss again. Taste and add more salt or lemon juice, if needed.

Sprinkle each piece of lavash with 1/4 of the mixed greens (the yogurt will help hold the greens in place), top each of the four wraps with 1/4 of the chickpea mixture. Fold or roll into a wrap and serve.


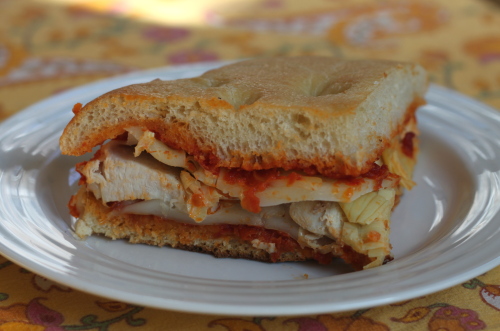
Oven Baked Chicken Focaccia Sandwich

My grandma’s neighbor is a baker and gives her leftover bread, which she sometimes passes down to me (lucky me!). This week I received two loaves of focaccia and decided to use one of them for a sandwich experiment. Not only was I looking for that perfect, toasted, crispy, savory bite, oozing with a little cheese, I wanted to see how much food I could clear out of my cupboard at the same time. I formulated and tested the following hypothesis: 1 jar of sun-dried tomato spread bought on sale a year ago + leftover chicken + excellent piece of goat’s milk mozzarella = hopefully something good enough to serve a guest. Luckily for my friend Denise who served as my test subject, the experiment succeeded. My high school chemistry teacher, or at least my home ec teacher, would be proud.

Oven Baked Chicken Focaccia Sandwich

A note for our American readers, this is a great way to use up your leftover Thanksgiving turkey, especially the white meat which tends to be a little bland for my taste.

Serves 4

1 loaf focaccia bread
7 oz (200 g) prepared sun-dried tomato spread or pesto
1/2 lb (225 g) boneless, skinless chicken or turkey breast, cooked and sliced
1/2 lb (225 g) mozzarella, sliced or shredded
4 oz artichoke hearts, roughly chopped

Preheat the oven to 400°F (200°C). Carefully cut the loaf of focaccia in half horizontally. Spread one half of  the sun-dried tomato spread or pesto onto the cut side of each piece of bread.

On the bottom (spread side up) of the soon-to-be sandwich layer half the cheese. Next, cover the cheese with the cooked chicken, seasoning the chicken to taste with salt and pepper. Sprinkle the artichoke pieces around the chicken then add a final layer of mozzarella. Top the sandwich with the other bread half, spread side down and push the sandwich together lightly.

Wrap the sandwich in aluminum foil and place it on a baking sheet. Bake the sandwich for 20 minutes or until the cheese just begins to melt and the bread is golden and toasty. Cut the sandwich into 4 wedges before serving.

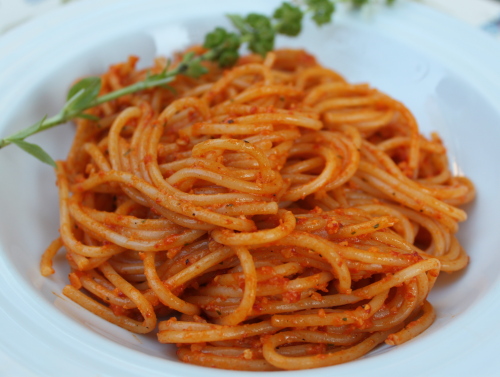
Spaghetti with Red Pepper-Toasted Almond Pesto

I pore over cookbooks in my 30s the way I once devoured fashion magazines in my teens. The pictures aren’t usually as interesting but the content is much more useful. Not that I don’t appreciate knowing when leopard print is in and heavy eyeliner is out, but style changes so much that it’s hard to keep up with. I prefer to spend my time thinking of something fabulous to cook than fabulous to wear. Luckily, I’m not alone. Much to my delight, I’ve noticed that most of my friends have food magazines or cookbooks stashed around the house. I found this recipe while hanging out with Leah (you may remember her rigatoni with pork and lemon ragu or tzatziki chicken with couscous and hummus). Maybe it’s because she also has a food blog, or maybe she was too nice to make fun of me, but she didn’t bat an eye when I asked her for pen and paper and transcribed this pantry staple-based recipe over a glass of beer. I guess this is adulthood.

Spaghetti with Red Pepper-Toasted Almond Pesto
adapted from The Best Simple Recipes by the editors of America’s Test Kitchen
Serves 4

My fridge is never without a bag of Trader Joe’s toasted, sliced almonds. They are perfect for throwing into a bowl of oatmeal, on top of brownies, or in a pasta dish like this one. The few extra cents I pay to buy them pre-toasted saves me toasting and cooling time (not to mention the aggravation of an extra pan to wash).

1 lb (450 g) spaghetti
1 cup (150 g) drained jarred roasted red peppers, patted dry (about 2 peppers)
1/3 cup (30 g) grated Parmesan cheese
1/4 cup (25 g) sliced or slivered almonds, toasted
1/4 cup (10 g) fresh basil
1 garlic clove, skin removed and quartered
1 teaspoon lemon juice
7 tablespoons extra virgin olive oil
sea salt and freshly ground black pepper

Cook the spaghetti al dente in a large pot of boiling, salted water according to package directions.

While the pasta cooks, process the red peppers, cheese, almonds, basil, garlic, and lemon juice in a food processor until smooth. With the motor running, slowly add the olive oil until it is incorporated. Season the pesto well with salt and pepper.

Drain the spaghetti, reserving 1/2 cup (125 ml) of cooking water. Return the spaghetti to the pot. Add the pesto to the spaghetti and toss to combine, adding reserved pasta water as needed. Season with salt and pepper and serve with additional grated Parmesan, if desired.

Bacon and Butterbean Chowder

A couple weeks ago I was at The Tannery in County Waterford having lunch with a few other bloggers and food writers to celebrate the launch of the Cook with Avonmore site, which features Tannery chef Paul Flynn as their first guest chef. On the menu that day there was a choice of crab crème brûlée or this bacon and butterbean chowder as a starter. I went for the crab not only because it’s The Tannery’s signature dish, but because I knew I had the recipe for the chowder in my press pack. What I didn’t know, though, was what a fantastic recipe it is. From just a few ordinary ingredients, this soup is more than the sum of its parts.

Paul Flynn says, “A chowder for me is something that’s really rich and comforting. It’s something that you eat in front of the fire or just after a lovely long walk and you’re cold and you want something hot and heart-warming to eat.” Serve this with some good crusty bread, a nice cheese and a glass of red wine — either with or without the long walk beforehand — and I’m willing to bet it will be one of the nicest meals you’ll make this autumn.

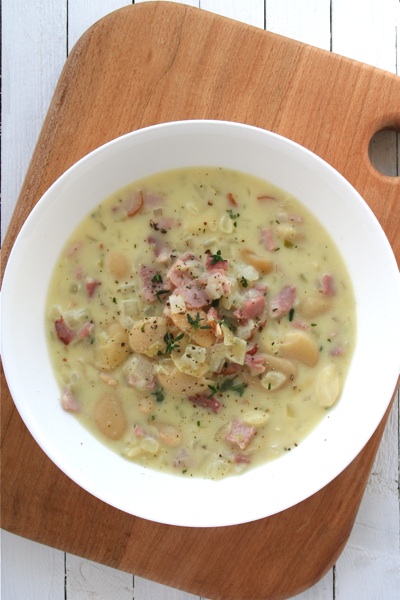
Bacon and Butterbean Chowder
adapted from Paul Flynn via cookwithavonmore.ie

Serves 2 as a main course or 4 as a starter

Paul Flynn says that “when you use beautiful ingredients like butter and cream, you’ve got to realize that if you put just enough in, it gives you that lovely, luxurious richness that you’re looking for, and that will really comfort you on a cold night”, but you can use a little less cream if you don’t want the chowder to be quite as rich. You can also use a handful of fresh parsley instead of thyme.

knob of butter
olive oil
1 large onion, finely chopped
pinch of salt
1 garlic clove, finely chopped
6 pieces of smoked bacon or dry cure streaky bacon, finely diced
1 tablespoon flour
2 teaspoons chopped fresh thyme leaves, plus extra to garnish (or 1/2 teaspoon dried thyme)
1 teaspoon Dijon mustard
freshly ground black pepper
2 cups (500 ml) chicken stock
1 x 14 oz (400 g) can of butterbeans, rinsed
1/2 cup (125 ml) cream
crusty bread, to serve

Melt the butter in a pot over a medium heat along with a splash of olive oil so the butter doesn’t burn. Add the onion and a pinch of salt to prevent the onion from colouring. As Paul Flynn says, “The real key to this is that what you do inside this pot with the onions will provide you with the whole base flavour for the soup. If you rush this, it’s not going to be right.” So turn the heat down a little to medium-low, put the lid on and “let the magic happen”. Cook the onion for about 10 minutes, until it’s translucent. Raise the heat back to medium, add in the garlic and cook for 1 minute more, then add in the bacon and cook for about 5 minutes (though note that the bacon won’t go crispy because of the juice from the onions). Sprinkle the flour over the onions and bacon and give it all a stir, then allow it to cook for 2 minutes. Add in the thyme and mustard and a generous grinding of black pepper, then pour in the stock. Bring to the boil, then reduce the heat to a simmer and add in the butterbeans. Continue to simmer the soup for a few minutes, until the beans are warmed through, then stir through the cream. Taste the soup and adjust the seasoning if you think it needs more salt, though be careful because the bacon and stock are already salty. Ladle the soup into bowls, garnish with some of the reserved thyme leaves and serve with crusty bread.

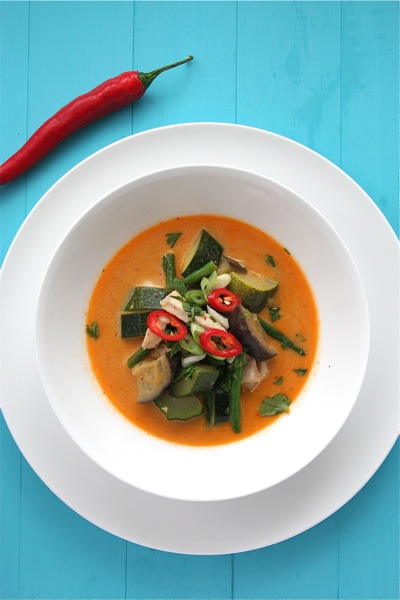
Thai Red Curry

I have an embarrassing confession to make. Despite living an hour’s drive away from Belfast for the past 12 years, the first time I visited the city was only this past March (I don’t count a couple trips to the Ikea off the motorway). But I tried to make up for lost time this summer with the Belfast Bred food tour, a Sunday trip to the Ulster Museum with the kids and an evening at the brand new Belfast Cookery School.

I love the fresh, bright flavors of Thai food, so I jumped at the chance to take a class with Kate Allen from the Thai-Tanic noodle bar using authentic ingredients. We made a tom yam soup and a Thai red curry, and even though we made our own curry paste from scratch, Kate admitted that they don’t even do that in her restaurant — they use a ready-made paste. I feel no shame, then, in doing the same at home for a quick weeknight supper.

The Belfast Cookery School is still running their Thai cooking classes, as well as classes on Italian food, dinner parties, fish and bread, if you live in Ireland and want to check it out. And if you’re looking for authentic Asian ingredients in Ireland, try Asia Market in Dublin or Asia Supermarket in Belfast.

Lazy Thai Red Curry

Serves 4

This recipe lends itself to a lot of variation. Try yellow or green curry paste if you don’t like red, use prawns instead of or in addition to the chicken, or leave out meat altogether to make a vegetarian version. The key to this recipe is having everything prepped and ready to go before you start cooking since it comes together quickly.

2 tablespoons ready-made Thai red curry paste (or more, to taste)
2 garlic cloves, finely chopped
1 x 14 oz (400 g) can of coconut milk
2 chicken breasts, sliced thinly into strips or into bite-sized pieces so they cook quickly
7 oz (200 g) green beans, cut into thirds
1 zucchini, cut into large dice
1 eggplant, cut into large dice
1 red chilli, deseeded and chopped, plus a few slices to garnish (optional)
juice and zest of 1 lime (or more, to taste)
2 tablespoons Thai fish sauce (or more, to taste)
1 teaspoon sugar
4 scallions, sliced thinly on the diagonal
chopped fresh cilantro and/or basil, to garnish
cooked jasmine or basmati rice, to serve

Heat a large pot over a medium heat. Add in the curry paste and allow it to cook for 1 or 2 minutes. Add in the garlic and cook for 1 minute more. Shake the can of coconut milk before you open it to distribute any solids, then pour it into the pot. Stir well to combine the coconut milk and the curry paste, then taste it and add more curry paste if you want it hotter.

Add in the chicken strips and bring to the boil. Reduce the heat to a fast simmer and cook for 10 minutes, until the chicken is cooked through. Add in the green beans, zucchini, eggplant, chilli (if using), lime zest and juice, Thai fish sauce and sugar. Cook for 5 to 10 minutes, or until the vegetables are cooked through. Taste and adjust the seasoning, adding more fish sauce if you think it needs more saltiness or more lime juice if it needs more zing. Ladle the curry into 4 bowls and sprinkle over the scallions, fresh cilantro and/or basil and the sliced chilli (if using). Serve with jasmine or basmati rice.

End-of-Summer Squash Sauté with Three Bean Salad

I love cooking at this time of the year. Vegetables and fruits are bountiful and at peak tastiness. It’s not too hot to use the stove top. And a week’s vacation at the end of August left me feeling (relatively) stress free at home and work. Not wanting to add any unnecessary work to my day, the dishes below provided a quick, tasty, and healthy meal and they take full advantage of the overabundant squash and beans from your or your neighbor’s backyard garden. This menu is light. If you want something more substantial for dinner or if you are cooking for guests, pick up a rotisserie chicken at the supermarket, cook up a little pasta to serve with the squash saute, or splurge on a trip to Kopp’s or your favorite ice cream store after dinner. What better way to celebrate the last few, long, warm nights of summer.

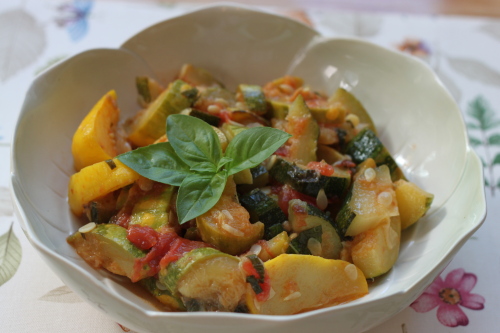
End-of-summer squash saute

End-of-Summer Squash Sauté

serves 4

2 or 3 medium summer squash (about 1 1/2 lbs / 680 g)
3 tablespoons olive oil
1 teaspoon kosher salt
1/2 teaspoon freshly ground black pepper
1/2 teaspoon garlic powder
1 large or 2 small tomatoes, peeled and coarsely chopped
3 tablespoons chopped fresh basil
freshly grated Parmesan cheese, for serving (optional)

Cut the squash in half lengthwise (or if the squash is very thick, cut it into quarters lengthwise), then dice into 1/2‑inch-thick pieces.

In a large saute pan with a lid, heat the olive oil over a medium-high heat until hot but not smoking. Add the squash and saute, stirring occasionally, for about 5 minutes, until it just begins to brown. Sprinkle the salt, pepper and garlic powder over the squash, then stir in the tomatoes. Cover and cook, stirring every few minutes, for 10 to 15 minutes longer, until the squash and tomato just begin to break down.

Remove the lid and continue to cook until your desired sauciness level. Stir in the basil and serve with grated Parmesan cheese, if desired. This dish tastes great over cooked pasta or rice or as a side dish.

***

Three Bean Salad
adapted from Molto Gusto: Easy Italian Cooking by Mario Batali

serves 6

1 tablespoon salt
1 lb (450 g) green beans [Note: smaller is better]
1 x 15 oz (425 g) can chickpeas, rinsed and drained
1 x 15 oz (425 g) white kidney beans (cannellini) or red kidney beans
1/4 cup (10 g) coarsely chopped fresh mint
1/2 cup (120 ml) Red Wine Vinaigrette (recipe below)
Maldon or other flaky sea salt and freshly ground black pepper

Bring four quarts of water to a boil in a large pot and add 1 tablespoon salt. Add the beans and blanch them until crisp-tender, about 3 minutes. Drain the beans in a colander and cool under cold running water; drain well.

Combine the green beans, chickpeas and kidney beans in a large bowl. Add the mint and toss. Add half the vinaigrette and toss gently again. Season with salt and pepper. Serve or, if possible, let stand at room temperature for 1 to 2 hours to bring out the flavors. Serve the salad with the remaining vinaigrette on the side.


Red Wine Vinaigrette

Makes 1 cup (250 ml)

1/4 cup (60 ml) good-quality red wine vinegar
1/4 cup (60 ml) sparkling water
1/2 cup (125 ml) extra virgin olive oil

Whisk the vinegar, water and olive oil together in a small bowl, or shake the ingredients together in a small, lidded jar, until well incorporated. The vinaigrette can be refrigerated for up to 5 days.

Gratin of Fish with Cheese, Tomatoes and Herbs

Back in December, a local DIY store had an unbeatable deal on greenhouses when they had them on sale for a little over €100, so we snapped one up. Granted, it’s as small and flimsy as you’d expect a €100 greenhouse to be, but it’s still standing, despite our reservations that it would all fall to pieces in the first strong wind. And it means that we’re finally able to grow tomatoes! But if I thought my husband was besotted with his potatoes last year, that was nothing compared to his love affair with the tomatoes. Any free minute he gets, he’s pottering around out in that greenhouse, checking on the cherry and San Marzano tomatoes before he leaves for work in the morning and then again as soon as he gets in the door at night to see how they’ve ripened during the day. I don’t think we’ll have a glut of them and will probably be eating them on their own with just a little salt, pepper and a drizzle of good olive oil, but if your garden is producing a lot of cherry tomatoes or if you can get them cheap at a farmers’ market, this is one of my favorite new dishes that I’ve made a few times now and is a good way to use them.

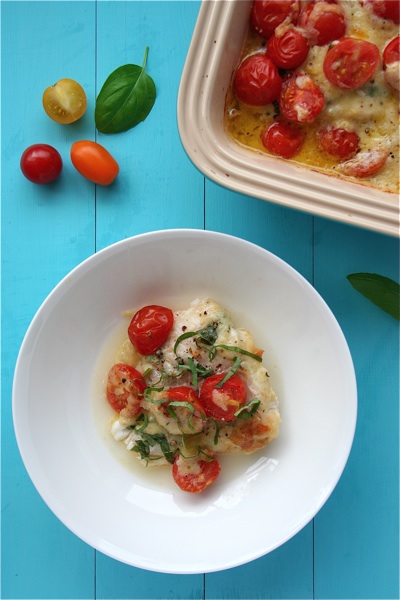
Gratin of Fish with Cheese, Tomatoes and Herbs
adapted from Rachel’s Favourite Food at Home by Rachel Allen

Serves 4

When you make this, you’ll probably start to think that the cheese and cream mixture isn’t enough to cover all the fish, but don’t worry, it will once it melts. Rachel Allen’s original recipe calls for flat fish, such as plaice or lemon sole, but I like the meatier texture of a firm white fish like hake or cod instead. If you can’t get one or the other of Gruyère or Swiss cheese (Emmental), just double the quantity of the cheese you can get. If you’re in Ireland, try using the Glebe Brethan farmhouse cheese instead of the Gruyère.

1 cup (100 g) grated Gruyère cheese
1 cup (100 g) grated Swiss cheese (Emmental cheese)
1 tablespoon Dijon mustard
5 tablespoons cream
salt and freshly ground black pepper
1 punnet (9 oz/250 g) cherry tomatoes
1 teaspoon chopped fresh thyme leaves or 2 tablespoons chopped fresh basil
1 1/2 lb (750 g) white fish fillets, such as hake or cod, skinned and deboned
green salad, to serve
boiled new potatoes, to serve

Preheat the oven to 350°F (180°C).

Place the grated cheeses, mustard and cream into a bowl and mix well. Season with salt and freshly ground black pepper and set aside.

Cut the cherry tomatoes in half and place into a bowl. Season with a little salt and add the herbs. Mix the ingredients well so that the cherry tomatoes are well seasoned.

Lay the fish in a gratin dish (or individual ovenproof dishes) in a single layer if you can. Dot the cheese mixture over the fish, then scatter the tomatoes and herbs on top. Transfer the fish to the oven and cook for 20 to 30 minutes (or 15 minutes for single portions), until the cheese is golden brown and the fish is cooked through.

To serve, place a portion of the fish on a plate and serve with a big green salad and some boiled new potatoes.