Spaghetti alla Puttanesca

Spaghetti alla puttanesca is a classic store cupboard staples recipe. Nicknamed “whore’s pasta,” Nigella Lawson writes that “the general consensus seems to be that this is the sort of dish cooked by slatterns who don’t go to market to get their ingredients fresh, but are happy to use stuff out of jars or tins.” Last week we spent five days in the west of Ireland in County Sligo, and coming home to an empty fridge after driving coast to coast (which, granted, only takes 3 hours from Sligo to Louth), I was still able to rustle this up from basics that I always have in the pantry along with a green salad from my garden. Whore’s pasta to the rescue!
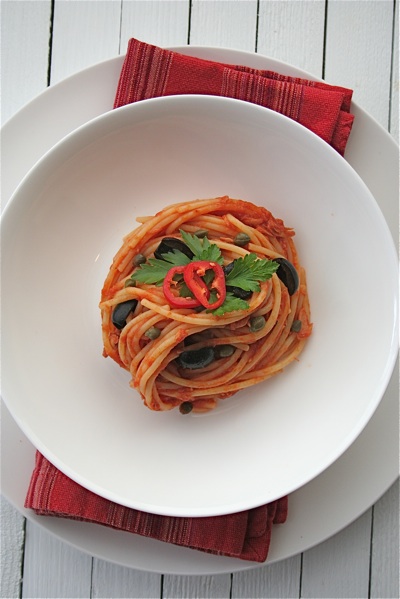
Spaghetti alla Puttanesca

Serves 4 to 6

1 1b 2 oz (500 g) spaghetti
olive oil
2 or 3 garlic cloves, chopped
1 or 2 fresh red chillies, finely chopped, or 1/2 teaspoon chilli flakes
1 x 1 oz (30 g) can of anchovy fillets, drained and chopped
1 x 8 oz (225 g) can of tuna, drained
2 tablespoons capers, drained
1 x 1 1/2 lb (700 g) jar of passata or 2 x 14 oz (400 g) cans of chopped tomatoes
salt and freshly ground black pepper
juice of 1 lemon (optional)
3/4 cup (100 g) stoned black olives, halved
a small bunch of fresh flat-leaf parsley, chopped
green salad, to serve
garlic bread, to serve

Cook the spaghetti in a large pot of boiling salted water according to the instructions on the packet.

Meanwhile, heat a large saucepan (one big enough to accommodate all the cooked pasta later) over a medium-low heat. Add a splash of olive oil, then add in the garlic, chillies and anchovies and cook for 1 or 2 minutes, until the anchovies have broken down and almost melted, but taking care not to let the garlic burn. Add in the tuna and capers, then stir in the passata or canned tomatoes. Season generously with salt and pepper, raise the heat to medium and allow to simmer while the pasta cooks.

Before draining the pasta, reserve a mugful of the cooking water. Add the drained pasta directly to the sauce and add in the lemon juice, the olives and most of the chopped parsley. Stir well to coat all the pasta with the sauce, adding in some (or all) of the reserved pasta cooking water if you want to loosen the sauce a bit. Divide the pasta between individual bowls or plates and scatter the remaining parsley on top to garnish. Serve with a green salad, garlic bread and a glass of wine.
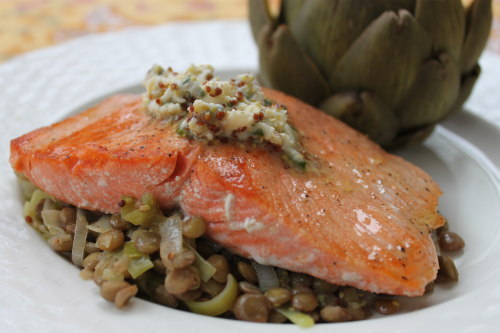
Salmon with Lentils and Mustard-Herb Butter

You may have noticed that Kristin and I cook salmon pretty regularly. Not only is salmon healthy, loaded with omega‑3 and other good stuff, but it’s easy to prepare and hard to mess up. Unlike some more delicate varieties of fish, salmon can take a few minutes of overcooking. It’s also less “fishy” tasting than most other seafood, so most kids won’t turn up their noses at it. This recipe is one of my family’s most recent favorites. It’s fancy enough to serve for guests, but a breeze to throw together, especially if you make the compound butter and lentils the night before. Steamed artichokes make an excellent side dish, especially if served with a bit of melted butter and lemon juice for dipping.

The picture doesn’t quite do this dish justice. I snapped the photo quickly before I called the kids to dinner. By the time everyone was seated, their sippy cups filled, and our napkins unfolded, the butter had melted beautifully, leaving the salmon with a lovely layer of herbs and mustard seeds.

Salmon with Lentils and Mustard Butter

Salmon with Lentils and Mustard-Herb Butter (Saumon aux Lentilles)
adapted from Gourmet, March 2008

For mustard-herb butter:
5 tablespoons unsalted butter, softened
1 tablespoon chopped chives
1 teaspoon chopped tarragon [I substituted 1/2 teaspoon dried tarragon]
2 teaspoons grainy mustard
2 teaspoons fresh lemon juice

For lentils:
1 cup French green lentils
4 cups water
2 medium leeks (white and pale green parts only)
1 tablespoon unsalted butter
1/2 to 1 tablespoon fresh lemon juice

For salmon:
4 (6‑ounce) pieces skinless salmon fillet
2 tablespoons unsalted butter

Make the mustard-herb butter:
Stir together all the ingredients with 1/4 teaspoon each of salt and pepper. [The mustard-herb butter can be made 1 day ahead and chilled, covered. Soften at room temperature before using (1 hour).]

Cook the lentils:
Bring the lentils, water, and 3/4 teaspoon salt to a boil in a heavy medium saucepan, then reduce heat and simmer, uncovered, until the lentils are just tender, 20 to 25 minutes. Remove from heat and let stand 5 minutes. Reserve 1/2 cup cooking liquid, then drain lentils. [The lentils can be cooked (but not drained) 1 day ahead and chilled in cooking liquid, covered (once cool).]

While the lentils cook, chop the leeks, then wash them. Cook the leeks in the butter in a heavy medium skillet over medium-low heat, stirring occasionally, until softened, 6 to 8 minutes.

Add the lentils with the reserved cooking liquid to the leeks along with 3 tablespoons mustard-herb butter and cook, stirring, until the lentils are heated through and the butter is melted. Add the lemon juice and salt and pepper to taste. Remove from heat and keep warm, covered.

Sauté the salmon while the leeks cook:
Pat the salmon dry and sprinkle with 1/2 teaspoon salt and 1/4 teaspoon pepper (total).

Heat the butter in a large nonstick skillet over medium-high heat until foam subsides, then sauté the salmon, turning once, until golden and just cooked through, 6 to 8 minutes total.

Serve the salmon, topped with the remaining mustard-herb butter, over lentils.

Beer Brats and German Potato Salad

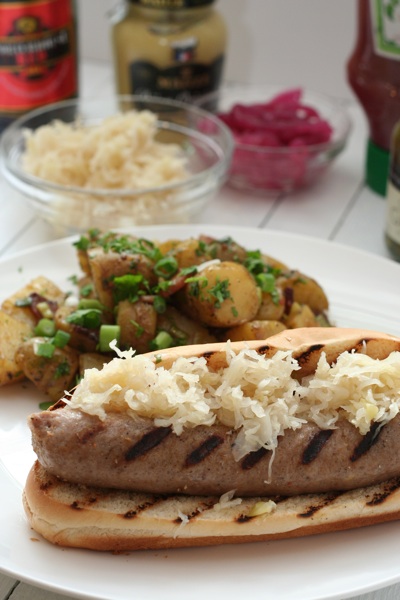
Soul food is usually associated with the South and things like okra, grits or chicken fried steak, but if Wisconsin could be said to have a soul food, it would be beer brats. A summer BBQ or tailgate party wouldn’t be complete without them and grilled bratwurst are sold at the student union at UW-Madison, where Kelly and I went to college. Living in Ireland, though, I can count the number of times I’ve had bratwurst on one hand, and each of those times they were made by the same man, the legendary Ed Hick. I’ve seen him a few times lately at the Sheridans and Bloom food festivals, so I snapped up a pack and lost no time making beer brats. And since I was already feeling nostalgic, I went ahead and made a German potato salad too, another summertime staple when I was growing up. Put the two together and add some sauerkraut, and it was enough to bring a homesick Midwesterner to tears.

Beer Brats

Serves 8 to 10

Like cooking with wine, you don’t want to use the cheapest beer here, but don’t use your nice microbrew either — just something good that you’d want to drink. The handy thing about cooking the bratwurst this way is that if you’re having a big BBQ and cooking for a crowd, you can grill the brats a bit ahead of time and put them back in the warm beer for a little while until you’re ready to serve them.

12 bratwurst (or more, depending on how many people you’re serving or how many sausages per person you want to serve)
1 large onion, peeled and halved
1 or 2 cans/bottles of beer (enough to cover the bratwurst)
toasted hot dog buns, to serve
sauerkraut, ketchup, mustard, pickle relish, fried onions, to serve

Prick each bratwurst a few times with a fork. Place them in a large pot or saucepan with the onion halves and cover with the beer. Bring to a boil, then reduce to a simmer and cook for 5 to 10 minutes, until the bratwurst are cooked through. Remove the brats from the beer and grill them on a hot BBQ for about 5 minutes, turning to make sure they’re golden brown on all sides. Serve on lightly toasted hot dog buns with toppings of your choice.

***

German Potato Salad
adapted from Martha Stewart Living

Serves 8 to 10

German potato salad is actually served warm, though any leftovers are also delicious cold.

4 lb (2 kg) baby potatoes
salt
1/2 cup (125 ml) cider vinegar
1 tablespoon sugar
1 lb (450 g) bacon, cut into 1/2‑inch pieces
1 bunch spring onions, white and light green parts only finely sliced
1 small bunch fresh flat-leaf parsley, chopped

Halve or quarter the potatoes, depending on how big they are (you want them to be in bite-sized pieces) and place in a large pot with enough water to cover them by several inches. Bring to a boil over a high heat, add a very generous pinch of salt and reduce to a gentle boil. Cook for 5 to 10 minutes, until the potatoes are tender when pierced with a knife, being careful not to overcook them (check them after 5 minutes).

While the potatoes cook, combine the vinegar, sugar and some salt in a small saucepan. Place over a medium heat, stirring occasionally, until the sugar dissolves.

Drain the potatoes into a colander, then transfer to a large mixing bowl. Drizzle with the hot vinegar mixture, gently stirring until all the potatoes are coated. Set aside.

Saute the bacon in a large skillet on a medium-low heat until browned and crispy. Remove with a slotted spoon and drain on paper towels.

Sprinkle the potatoes with the bacon, spring onions and chopped parsley. Stir to combine. Transfer to a serving bowl and serve immediately, while still warm.

Maple Yogurt Pound Cake with Berries

Was anyone else disappointed by the lackluster weather on the summer solstice? I can usually depend on June 21st (my half-birthday) for some decent weather. But sadly, this year I can count the number of warm, sunny days on one hand. Our CSA box did brighten my week though, full of tender greens, succulent strawberries and even a jug of maple syrup. The maple syrup was especially welcome. It’s hard to believe the amount of maple syrup our family goes through. We love it in yogurt, on oatmeal, and, of course, on waffles and other breakfast treats. I also bake with it whenever possible, preferring it to more processed sweeteners.

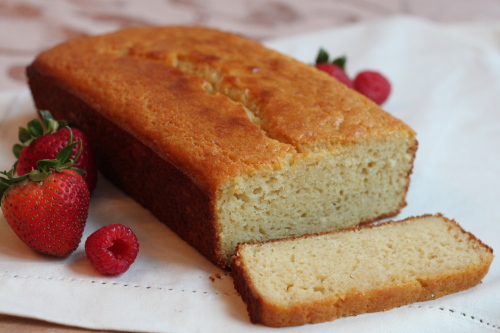
Though not every dessert recipe is suitable for maple syrup, this pound cake recipe is an ideal platform. I loved the subtle maple flavor in the batter. I can’t even begin to describe how good it smelled while baking, like pancakes and vanilla and freshly baked bread all at once. Using yogurt and oil instead of pound cake’s traditional butter base results in a lighter cake that stays lusciously moist for days — and won’t destroy your summer “I have to wear a bathing suit in public” diet. The pound cake is perfect for pairing with the season’s berries, sliced or slightly macerated. I also like this pound cake for breakfast, lightly toasted and spread with my friend Alex’s amazing homemade raspberry jam. Jam recipe forthcoming if I can ever talk her into sharing it.

Maple Yogurt Pound Cake with Berries
adapted from food52

Makes 1 loaf

For a healthier and more substantial loaf (pictured above), substitute 1/2 cup of whole wheat flour for 1/2 cup of the all-purpose flour. I prefer white whole-wheat flour or whole-wheat pastry flour for a lighter texture.

1/2 cup (120 ml) Grade B maple syrup
3/4 cup (180 ml) yogurt, preferably not non-fat
1/4 cup (50 g) sugar
3 eggs
1 teaspoon vanilla
1/2 teaspoon lemon zest
1 1/2 cups (180 g) all-purpose flour
2 teaspoons baking powder
1/4 teaspoon salt
1/2 cup (125 ml) oil [Note: I use canola]

Position the rack in the center of the oven and preheat to 350°F (180°C). Generously butter a 8 1/2 × 4 1/2 × 2 1/2‑inch metal loaf pan.

Combine the yogurt, syrup, sugar, eggs, vanilla and lemon zest. Stir or whisk to combine.

In a separate bowl, combine the flour, baking powder and salt. Add the dry ingredients to the wet ingredients and stir to incorporate. Add the oil and fold in gradually until the oil absorbs completely into the batter.

Pour the batter into the prepared loaf pan. Place the pan on a baking sheet in the oven and bake for about 50 minutes, until a tester inserted into the center comes out clean. Cool the cake in its pan on a rack for 5 minutes. Cut around the pan sides to loosen the cake, then turn out onto the rack. Turn the cake upright on the rack and cool completely.

Chicken in Vinegar (Poulet au Vinaigre)

I buy cookbooks for different reasons. Most of the time I buy them because I flipped through them in the store and wanted to make everything I saw, which is always a good sign. Sometimes I buy them because I’m a fan of the writer (I have a bookshelf that’s taken up solely with Nigella Lawson and Nigel Slater’s books). But other times I buy them because they’ll be a good reference book, the kind of book that you know will stand the test of time or point you in the right direction if you want the authentic version of a recipe. Larousse Gastronomique and The Silver Spoon are such books, and so is French Country Cooking by Michel and Albert Roux, which has now been reprinted.
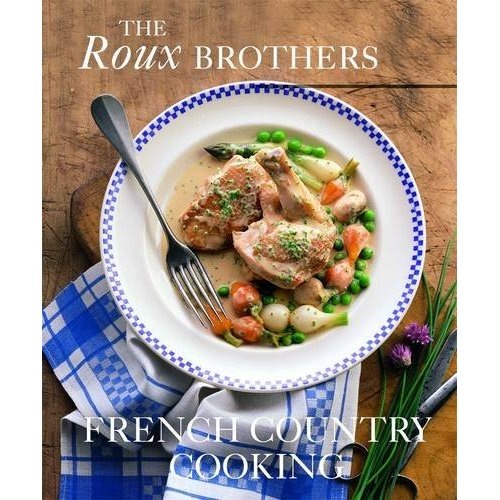
This book isn’t for the casual cook — it includes hard-core rustic dishes like Lyonnaise ox tripe, frogs’ legs and pig’s head soup and offal features prominently. Yet it also includes authentic recipes for classics like pissaladière, quiche Lorraine, salad niçoise, cassoulet and soupe au pistou as well as dishes that I hadn’t heard of but have bookmarked to try, such as fricassée of farmhouse chicken with baby vegetables or chickpeas with bacon and peppers. But this classic recipe for chicken in vinegar (poulet au vinaigre) is the one that called out the loudest to be tried first.

The book is divided into 12 regional chapters that each give an overview of the region’s culinary traditions and then presents 12 recipes from the region as well as a list of ingredients that are indigenous to the area. With the continuing interest in local foods, this kind of extra detail will appeal to those who want to know more about regional cooking and foods. As the authors say themselves in the introduction, “It is regional, homely cooking which manages to be both rustic and sophisticated at the same time.”

Chicken in Vinegar (Poulet au Vinaigre)
adapted from French Country Cooking by Michel and Albert Roux

Serves 4

In Gourmet magazine’s version of this recipe, they said the vinegary sharpness of this dish is “edgy and refreshing” — perfect for hot, sluggish summer weather when you want to wake up your taste buds. The headnote to the recipe explains that this easy, inexpensive dish originally comes from Lyon or Burgundy and that fresh pasta is the perfect accompaniment, but I like it with some good crusty bread to mop up the sauce instead and a green salad on the side.

1 x 2 lb 14 oz (1.3 kg) chicken, cut into 8 pieces (or just use chicken breasts/thighs)
4 tablespoons (60 g) butter
3 or 4 large shallots, finely sliced
1/2 cup (125 ml) red wine vinegar
1 bouquet garni (parsley, thyme, bay leaf)

For the sauce:
2 tablespoons (30 g) butter, softened
1 tablespoon flour
1/2 cup (125 ml) dry white wine
1/2 cup (125 ml) chicken stock
salt and freshly ground black pepper
1 tablespoon chopped fresh flat-leaf parsley

crusty bread, to serve
green salad, to serve

Heat the butter in a frying pan over a medium heat. Add the chicken pieces and fry on all sides for 7 to 8 minutes, until golden. Add the shallots and cook for 1 minute, then pour in the vinegar. Add in the bouquet garni, cover the pan and cook over a gentle heat for 10 minutes (or in the oven at 325°F/170°C), or until the chicken is cooked through. Remove the chicken from the pan and keep warm.

To make the sauce, mash the butter and flour together in a bowl with a fork until they’re well combined (this makes a beurre manié). Pour the white wine into the pan and reduce by one-third. Add the chicken stock and whisk in the beurre manié to bind the sauce. If it seems too thick, add a little more chicken stock. Season to taste with salt and pepper.

To serve, arrange the chicken pieces in a deep dish and pour over the hot sauce. Sprinkle with the freshly parsley and serve immediately with buttered pasta or crusty bread and a green salad.

Chicago Italian Beef Sandwiches

Growing up, there was always a jar of Dell’Alpe giardinera in the door of the fridge, as much of a staple in my house as ketchup and mustard and mayonnaise. But when my mom, stepdad and twin brothers moved from Illinois to Florida a few years ago, my stepdad was dismayed to realize that giardineria is apparently a regional food, popular with Chicago-area Midwesterners but impossible to find in Tampa. He now orders it in bulk online and even sent me a few jars from his stash earlier this year, cushioned in multiple layers of bubble wrap to survive the transatlantic trip. It’s good on all sorts of things, but it’s a must for Italian beef sandwiches.

When I got a review copy of Guy Fieri Food and saw this recipe for Chicago Italian beef sandwiches, I knew it would be one of those recipes that would make the book worth buying alone, and I wasn’t disappointed. But if that wasn’t enough, how could you not be tempted by recipes like Firecracker Wings, Bacon-wrapped Shrimp with Chipotle BBQ Sauce, Grilled Chicken Tortilla Soup with Tequila Crema, Grilled Romaine with Blue Cheese-Bacon Vinaigrette, Cajun Chicken Alfredo and Watermelon Pork Tacos? The flavors are as big and bold as Guy Fieri himself. What other celebrity chef has his tattoo artist do the illustrations for his cookbook or gets women’s lingerie thrown at them as if they were Tom Jones?
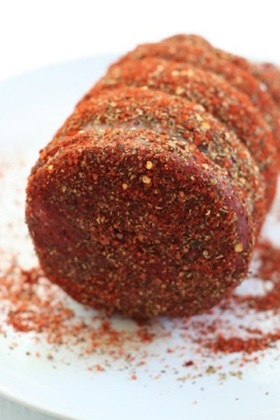
Guy Fieri says this should be the state sandwich of Illinois. This Illinois native agrees.

We’ve got a copy of Guy Fieri Food to give away! To enter, just leave a comment on this post. The giveaway is open to US residents only until Monday, 20 June and will close at midnight, when a winner will be randomly selected. Good luck!

Chicago Italian Beef Sandwiches
adapted from Guy Fieri Food by Guy Fieri

Serves 6 to 8

If you were to order an Italian beef sandwich in a restaurant, it would probably be served with some potato chips or french fries. For serving at home, though, I’d suggest a potato salad or coleslaw.

You could also try cooking this in the slow cooker for 6 to 8 hours on a medium heat, or until the meat shreds apart with a fork, which is how my mother always makes Italian beef. Guy Fieri suggests that if you have any leftovers, try using it on a homemade pizza with grated pepper Jack cheese and giardiniera.

For the spice mix:
3 tablespoons Italian seasoning
2 tablespoons fine sea salt
2 tablespoons freshly ground black pepper
1 tablespoon paprika
1 teaspoon cayenne pepper
1 teaspoon red chilli flakes

For the beef:
4 lb (1.8 kg) beef top round, with fat cap (I used a pot roast)
3 tablespoons canola oil
3 yellow onions, chopped
1 head of garlic, cloves peeled and chopped
1/2 cup (125 ml) red wine
3 tablespoons Worcestershire sauce
2 cups (500 ml) beef stock
2 bay leaves

To serve:
6 sourdough hero or hoagie rolls, or baguettes or ciabattas, split and toasted
giardiniera
jarred or roasted red bell peppers, sliced 1/4 inch thick

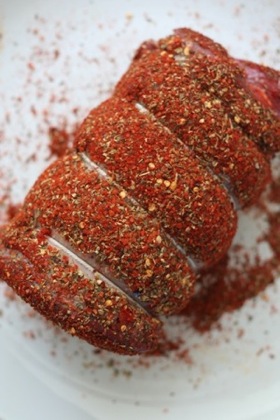
Combine all the ingredients for the spice mix. Rub the meat with the spice mix, cover tightly with cling film and refrigerate for 2 to 3 hours.

Preheat the oven to 275°F (140°C).

Place a Dutch oven or roasting pan over a high heat on the stovetop and add the oil. When it’s smoking, add the beef and cook for 15 minutes, turning the meat often, until it’s nicely browned on all sides. Add the onions and cook for 5 minutes, then add the garlic and cook for 1 minute more. Add the wine, Worcestershire, stock and bay leaves and scrape up all the brown bits on the bottom of the pan.

Transfer the pan to the oven and roast the meat for about 1 hour 30 minutes, uncovered, or until a thermometer inserted in the center of the meat reads 135°F (60°C). Remove the meat from the pan and set aside to let it cool. Cool the broth in the pan and remove the fat that rises to the top.

When the meat is cool, slice it very thin. Reheat the broth and add the meat back in.

To serve, place some meat on each roll, ladle some broth over the meat and top with the giardiniera vegetables and red peppers.

Scallop, Chorizo and Artichoke Paella

I’d like to think that if blogs had been around when Kelly and I went to high school and college together, we might have turned out like Cara Eisenpress and Phoebe Lapine, blogging our way through our first boyfriends, first jobs and first dinner parties as we learned how to cook along the way. We might have set up a blog like their popular Big Girls, Small Kitchen, landed ourselves a book deal and had the Barefoot Contessa write the foreword to it. If only, right? But failing all that, I wish someone had given me a cookbook like theirs, In the Small Kitchen, when I moved into my first apartment and started cooking for myself and my friends. It would have been a hell of a lot better than 1,001 Vegetarian Recipes.

The book is aimed at the twenty-something crowd just finding their feet in the kitchen, with chapters like ‘Cooking for One’, ‘Potlucking’, ‘Cocktail Parties’, ‘Dating and Food’ and ‘One Year Closer to Thirty’, but there’s plenty here to inspire complete beginners and more well-seasoned cooks alike. Also bookmarked to try are Provencal baked chicken, chipotle hummus, black bean dip, coconut peanut sauce, spiked lemonade and pumpkin cake with chai cream. With graduation season upon us, In the Small Kitchen would make the perfect gift for students heading off to college or moving out into their own place, or for any new cook who’s just starting to learn their way around the kitchen.

Scallop, Chorizo and Artichoke Paella
adapted from In the Small Kitchen by Cara Eisenpress and Phoebe Lapine

Serves 8

I made a special trip to the fishmonger to get scallops, only to be told that they didn’t have any because of the recent bad weather (typical!). After some quick thinking, I decided to substitute 1 lb (450 g) of prawns instead. I simply skipped the first step and added the prawns into the paella at the very end of the cooking time, letting the heat of the rice quickly cook them right before serving. This dish reminded me of one of our family favorites, oven-baked risotto with sausages and tomato, and was just as much of a hit with the kids.

2 to 3 tablespoons olive oil
1 lb (450 g) scallops
1 lb (450 g) chorizo, cut diagonally into 1 1/2‑inch pieces
1 large onion, diced
4 cloves garlic, minced
8 to 10 scallions, white and green parts chopped separately
2 cups (360 g) Arborio rice
1/2 cup (125 ml) dry white wine or vermouth
1 x 15 oz (400 g) can of crushed tomatoes
1 x 9 oz (250 g) package frozen artichoke hearts, or jarred or canned artichoke hearts (rinsed and drained if using jarred or canned)
2 teaspoons smoked paprika
1 teaspoon salt
3 to 4 cups chicken stock
lemon wedges, for garnish

In a large cast iron skillet or a Dutch oven, heat 2 tablespoons of the olive oil over a medium-high heat until the oil is shiny and just about to smoke. While the oil is heating, quickly pat the scallops dry and remove and discard the tough side muscles. Sear the scallops in batches in the hot oil until browned and crusty on both sides, about 2 minutes per side. [Check out this post from The BA Daily blog about how to perfectly sear scallops.]

Transfer the scallops to a plate. Add the chorizo to the skillet and brown it, turning on all sides, for 2 to 5 minutes. Remove the chorizo with a slotted spoon and set aside.

Reduce the heat to medium and saute the onion in the remaining oil until translucent, scraping up any drippings in the skillet. Add the garlic and the white part of the chopped scallions and cook for another 2 minutes. Add the rice and stir to coat it in the onion mixture, allowing it to get covered in the oil and begin to toast, which should take about 3 minutes. Add the wine and cook for 2 to 3 minutes, until the liquid has reduced by nearly half. Use your spoon or spatula to help deglaze the pan and lift up any caramelized bits.

Stir in the tomatoes and their juices, artichokes, paprika and salt. Return the chorizo to the skillet and add enough stock to submerge the rice mixture. Bring the liquid to a boil, then reduce the heat to medium-low and simmer for 25 to 30 minutes, until the rice is cooked through, all the liquid has been absorbed and the rice is beginning to become crusty around the edges.

Using the back of your spoon, make indents in the top of the rice and arrange the scallops in them. Pour the scallop juices over the skillet and cook until all the liquid has been absorbed. Garnish with the chopped scallion greens and lemon wedges. Serve warm, straight from the skillet.

Double Chocolate Loaf with Peanut Butter Cream Cheese Spread

Every time my husband and I play the lotto (which is hardly ever), we convince ourselves we’re going to win it. We usually only buy a ticket when the jackpot is huge after rolling over a few times, but we don’t let the decreased odds stand in the way of our daydreaming. We’ll pay off our student loans! We’ll build an extension on our house! Hell, we’ll knock down the house and just build a bigger and better one! You get the idea.

Well, I might not have won the lotto, but I did get a visit from the Fairy Hobmother after entering the contest over at Eat Like a Girl’s blog. And while I didn’t get a big ticket prize like a new food processor, I did get an Amazon gift certificate, which is always a well-received present for this professional bookworm. I promptly put it to good use on a few cookbooks from my wish list, one of which was Baked Explorations: Classic American Desserts Reinvented. I can’t wait to make Mississippi Mud Pie, New York Style Crumb Cake, Quick Skillet Snack Cake, Burnt Sugar Bundt Cake with Caramel Rum Frosting, Heartland Turtle Bars, Buckeyes … the list goes on and on (and on). But first up was this Double Chocolate Loaf with Peanut Butter Cream Cheese Spread.
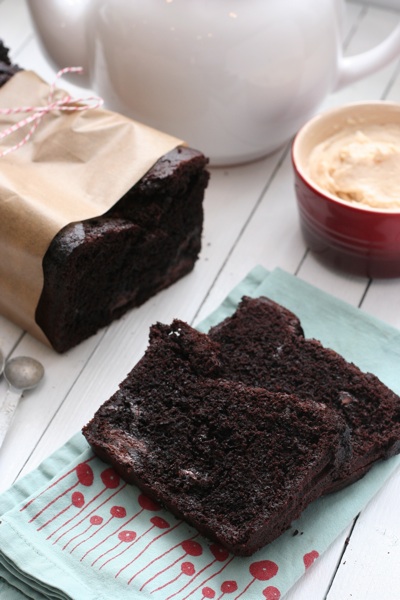
Double Chocolate Loaf with Peanut Butter Cream Cheese Spread
adapted from Baked Explorations: Classic American Desserts Reinvented by Matt Lewis and Renato Poliafito

Makes one 9 x 5‑inch loaf

The authors suggest slicing this and eating it plain, or toasting it and spreading with a bit of butter, cream cheese or, of course, this peanut butter cream cheese spread. They also say this loaf is wonderful with coffee and the morning newspaper. Chocolate cake for breakfast? I like their style.

For the loaf:
3/4 cup (120 g) firmly packed dark brown sugar
1 1/2 cups (180 g) flour
1 cup (120 g) dark unsweetened cocoa powder, sifted (I used Green & Blacks)
3/4 cup (150 g) granulated sugar
1 1/2 teaspoons baking soda
3/4 teaspoon baking powder
1 teaspoon salt
2 eggs
1 egg yolk
3/4 cup (180 ml) buttermilk
1/2 cup (125 ml) vegetable oil
1 teaspoon vanilla extract
8 oz (225 g) good-quality dark chocolate, coarsely chopped

For the peanut butter cream cheese spread:
5 oz (140 g) cream cheese, softened
2 tablespoons creamy peanut butter
1/3 cup (75 g) sugar

Preheat the oven to 350°F (180°C) and position the rack in the center of the oven. Butter a 9 x 5‑inch loaf pan, dust it with flour and knock out the excess flour.

Place the brown sugar in the bowl of a standing mixer fitted with the paddle attachment. Press out any lumps with the back of a large spoon. Add the flour, cocoa, granulated sugar, baking soda, baking powder and salt. Scrape down the sides and bottom of the bowl.

In a separate bowl, whisk the eggs and egg yolk until blended, then add the buttermilk, oil and vanilla and whisk until combined.

Turn the mixer to low and slowly pour the wet ingredients into the dry ingredients, mixing until just combined (don’t overmix!). Stir in the dark chocolate chunks by hand.

Pour the batter into the prepared loaf tin and bake for 1 hour to 1 hour 10 minutes, or until a tester inserted in the center of the loaf comes out clean. Let the cake cool in the pan for 15 minutes, then turn it out onto a wire rack to cool completely.

Meanwhile, to make the peanut butter spread, beat the cream cheese and peanut butter together in a bowl with an electric mixer until smooth. Add the sugar and beat until incorporated. If you aren’t using the spread immediately, place it in a ramekin, tightly cover it with cling film and it will keep in the fridge for up to 3 days.

Serve the loaf plain or toasted, topped with the peanut butter spread. The loaf will keep in an airtight container or wrapped tightly at room temperature for up to 3 days.

A Cooking Blog