Category Archives: Beef

Unstuffed Sweet and Sour Cabbage and Cranberry Oatmeal White Chocolate Chunk Cookies

Cranberry oatmeal white chocolate cookies are one of my favorite cookies. They’re buttery, not too sweet, and stay softer than your average chocolate chip cookie. The dried cranberries in the cookies tie in nicely with the dried cranberries in this unstuffed version of stuffed cabbage. Stuffed cabbage (cabbage rolls) is one of those dishes that my mother-in-law makes better than I do and that always takes longer to put together than expected.  In other words, I usually just wait for her to make it instead of making it myself. This recipe is nearly as good as my mother-in-law’s and takes less time to prepare, perfect for when I’m craving stuffed cabbage but don’t want to invite myself over for dinner.

Unstuffed Sweet-and-Sour Cabbage
adapted from Gourmet, November 2008

Serves 4

1 medium head green cabbage, quartered lengthwise and cored
2/3 cup (160 ml) reduced-sodium chicken broth
3 garlic cloves, thinly sliced, divided
1 large onion, thinly sliced
1 tablespoon olive oil
1 lb (450 g) ground beef chuck
2 lb (900 g) plum tomatoes, peeled (or 1 x 28-oz/780‑g can whole tomatoes in juice)
1/3 cup (40 g) dried cranberries
3 tablespoons red wine vinegar
1 tablespoon packed dark brown sugar
steamed rice, to serve

Place the cabbage in a deep 12-inch heavy skillet with the broth, 1 garlic clove (sliced), and a rounded 1/4 teaspoon salt. Bring to a simmer over a medium heat, then cook, covered, turning the cabbage occasionally until it’s very tender, about 45 minutes. (Add more broth or water if necessary.)

Meanwhile, cook the onion and remaining garlic in the oil in a heavy medium pot over a medium heat, stirring occasionally, until golden, about 8 minutes. Increase the heat to medium-high and stir in the ground beef along with 1/2 teaspoon each of salt and pepper. Cook, stirring and breaking up lumps with a wooden spoon, until the beef is no longer pink, about 3 minutes.

Stir in the tomatoes, cranberries, vinegar, and brown sugar and simmer, uncovered, stirring occasionally and breaking up the tomatoes with a spoon, until slightly thickened, about 30 minutes. Season with salt.

Pour the sauce into the skillet with the cabbage and simmer, uncovered, for 5 minutes. Serve with rice.

***

Cranberry Oatmeal White Chocolate Chunk Cookies

Cranberry Oatmeal White Chocolate Chunk Cookies
adapted from a recipe on the back of a Craisins bag

Makes about 30 cookies

2/3 cup (150 g) butter or margarine, softened
2/3 cup (120 g) brown sugar
2 large eggs
1 1/2 cups (120 g) old-fashioned oats
1 1/2 cups (180 g) flour
1 teaspoon baking soda
1/2 teaspoon salt
4 oz (110 g) dried cranberries
3/4 cup (150 g) white chocolate chunks or chips
1/2 cup (50 g) toasted pecans (optional)

Preheat the oven to 375°F (190°C).

Using an electric mixer, beat the butter or margarine and sugar together in a medium mixing bowl until light and fluffy. Add the eggs, mixing well. Combine the oats, flour, baking soda and salt in a separate mixing bowl. Add to the butter mixture in several additions, mixing well after each addition. Stir in the dried cranberries, white chocolate chunks and nuts, if using.

Drop by rounded teaspoonfuls onto ungreased cookie sheets. Bake for 10 to 11 minutes, or until golden brown. Cool on a wire rack.

Steak Fajitas with Pico de Gallo

In Milwaukee, you can find dozens of restaurants that serve fajitas, but it’s hard to find great fajitas. Maybe my expectations are too high after a childhood of eating Tex-Mex on a regular basis — in Texas, I should add. In my experience, fajitas are only as good as their ingredients. The meat is especially important, and a charcoal grill is essential. I think this is why so many restaurant fajitas fail — cheap meat and lack of charcoal flavor. There are a few things that made last night’s fajitas good. I made the pico de gallo with tomatoes and onions fresh from Rare Earth Farm. Reuben grilled the Sulzer’s rib-eye steaks to a perfect medium rare on our Weber grill. And last but not least, Whole Foods had fresh baked-in-store whole wheat tortillas in stock. How could we go wrong?

Steak Fajitas

Serves 4 to 6

2 rib-eye steaks
salt and freshly ground black pepper
juice of 1 lime
2 onions (red and/or white)
2 bell peppers (any color)
1 tablespoon olive oil
toppings: pico de gallo, avocado, Monterey jack or cheddar cheese, salsa, sour cream

Season the steaks generously with salt and pepper and marinate in the lime juice in a shallow dish. Prepare the grill with charcoal banked to one side (you’ll need direct and indirect heat for this meal).

While the grill heats up and the steaks marinate, peel and slice the onion into thin half moons (about 1/4 cm thick). Cut the bell pepper into 1/2‑cm-wide strips. Place the vegetables onto aluminum foil (preferably heavy-duty foil). You’ll need enough foil to completely wrap up the vegetables, about 18 inches or so. Drizzle the vegetables with olive oil and season with salt and pepper. Crimp together the foil over the vegetables, starting with the short sides, then folding over the long sides. You’ll end up with a rectangular-shaped packet. The foil should be secure enough to remain closed throughout the grilling process.

When the grill is hot, place the foil packet of vegetables on the grill and cook over indirect heat for about 10 minutes (cooking time will vary depending on the size of the vegetable slices and the heat of the grill). If the vegetables aren’t tender, reseal the foil packet and cook for a few more minutes. Once tender, transfer the vegetables to a serving dish.

The steak can be cooked at the same time as the vegetables. Grill over a medium-high heat until desired doneness. Remove the steaks from the grill and allow to rest for 5 minutes. While the meat rests, heat the tortillas on the grill for a few seconds on each side. After the meat has rested, slice it into thin strips against the grain of the meat.

To assemble the fajitas, place some sliced meat on a tortilla and top with onions, peppers, and other toppings (pico de gallo, avocado, cheese, salsa, and/or sour cream), al gusto, to taste.

***

Pico de Gallo

Makes about 3 cups (720 ml)

1 medium white onion, minced
3 large vine-ripened tomatoes, diced small
1 or 2 jalapenos, minced
1 clove garlic, minced
juice of 1 lime (or 1 tablespoon white vinegar)
1 teaspoon salt
1/4 teaspoon freshly ground black pepper
3 tablespoons chopped cilantro

Rinse the onion in a colander under cold water for about 30 seconds. This will sweeten the onion and keep it crispy. Mix the onion and remaining ingredients in a medium bowl. Serve with tortilla chips or as an accompaniment to any Mexican meal.

Late-summer Roast Beef Dinner and French Apple Tart

Nigella Lawson’s How to Eat: The Pleasures and Principles of Good Food is one of the bibles of modern-day cookbooks. It’s also one of the first cookbooks I bought in Ireland, and has taught me how to make things I’d never even heard of before moving abroad, like Yorkshire pudding and trifle. It also spells out the makings of something else that was completely foreign to me: a proper Sunday lunch. Nigella Lawson writes about it for four straight pages in How to Eat, but what sums it up rather romantically is this: “Sunday lunch … is about solidity, the family, the home.”

Sunday lunch is an institution in a lot of families, but it took me a long time to come around to its charms, especially since I’m the one doing all the cooking that goes into a big Sunday lunch, not my mother. In my case, I like to have our big meal as a late lunch at the weekends now simply because my kids are in better moods at that time of day, which not only means they’re more likely to eat what I put in front of them, but makes for a more pleasant dinner for all of us. Plus now that my daughter needs a packed lunch every day for school, a roast does double duty as Sunday’s dinner and Monday’s sandwich.

Strictly speaking, this menu isn’t a traditional Sunday lunch — there’s no roast potatoes, or the vegetables like carrots, parsnips or broccoli that you’d usually expect. But one of the things I love about How to Eat is that it contains lots of ready-to-go menus, not just stand-alone recipes, and this is Nigella’s late-summer roast beef menu from the “Weekend Lunch” chapter (though I made the French apple tart instead of the Yorkshire pudding with syrup and cream she calls for, and I also prefer Bon Appétit’s one-pot version of the cannellini beans with garlic and sage for being easier and more straightforward than Nigella’s recipe). After holding out all month, it’s finally time to embrace autumn, and this dinner seemed like a good compromise.

It’s National Organic Week in Ireland! Click here for a listing of events throughout the country.

Cold Roast Fillet of Beef 
from How to Eat by Nigella Lawson

Serves 8

fillet of beef — allow about 7 oz (200 g) per person
olive oil

Allow the beef to come to room temperature before you cook it (otherwise the cooking times here won’t be correct).

Preheat the oven to 480°F (250°C). If it’s possible to switch off the fan in your oven, do so in order to reduce evaporation (75% of lean meat is water, so fan ovens can make even good cuts of meat dry and tough).

Place the fillet in an ovenproof dish or roasting tray. Rub the beef all over with olive oil. (Nigella advises using a rosemary-infused oil for this menu, but plain olive oil works just fine too.)

Cook the beef for 15 minutes at the very high heat, then reduce the oven to 350°F (180°C). Cook the beef for 15 minutes per 18 oz (500 g) for rare; 18 minutes per 18 oz (500 g) for medium; and 25 minutes per 18 oz (500 g) for well done.

After the meat has had its advised cooking time, test it: either press it (if it feels soft it’s rare, bouncy it’s medium, hard it’s well-done) or pierce it with a knife to see. Always let any meat rest out of the oven for at least 10 minutes before carving.

If you’re cooking the beef ahead of time, take it out of the fridge 2 hours before you want to eat it. It should be cold, but not chilled. Or you could cook the fillet early enough in the day to simply allow it to cool to room temperature by the time you want to eat.

***

Rosemary and Anchovy Mayonnaise

1 cup (240 ml) mayonnaise
8 anchovy fillets in oil, drained and diced
1 sprig rosemary, finely chopped
1 tablespoon lemon juice
salt and freshly ground black pepper

Combine all the ingredients, mixing well. Chill until ready to serve. Serve alongside the beef. (This is also great to make sandwiches with the beef leftovers.)

***

Cannellini Beans with Garlic and Sage 
from Bon Appétit, October 2009

Makes about 6 cups

1 lb (450 g) dried cannellini beans
8 cups (2 liters) room-temperature water
2 tablespoons olive oil
1 large head of garlic, unpeeled, top 1/2 inch cut off to expose cloves
1 large sprig of fresh sage
1/4 teaspoon whole black peppercorns
1 teaspoon coarse kosher salt
extra virgin olive oil (for drizzling)

Place the beans in a large bowl. Cover with cold water (at least 6 cups/1 1/2 liters) and soak overnight.

Drain the beans and place in a heavy, large pot. Add the 8 cups (2 liters) of room-temperature water, olive oil, garlic, sage, and black peppercorns. Bring to a simmer over a medium-high heat. Reduce the heat to medium-low and simmer, uncovered, for 1 1/2 hours, stirring occasionally. Mix in the coarse salt. Continue to simmer until the beans are tender, adding more water if needed to keep beans covered, about 30 minutes longer. Cool the beans in the cooking liquid for 1 hour.

Using a slotted spoon, transfer the beans to a serving bowl, reserving the bean cooking liquid, if desired, but discarding the garlic, sage, and peppercorns. Season the beans to taste with pepper and more coarse salt. Drizzle with extra virgin olive oil and serve.

***

Tomato Salad
from How to Eat by Nigella Lawson

For this salad, simply slice some tomatoes (the best and ripest you can find) and arrange them on a plate. Sprinkle with salt, pepper and sugar (only if you think they need it, and even so, just a pinch), as well as some finely chopped spring onions or chives, a drop or two of balsamic or red wine vinegar, and a drizzle of extra virgin olive oil.

***
french apple tart

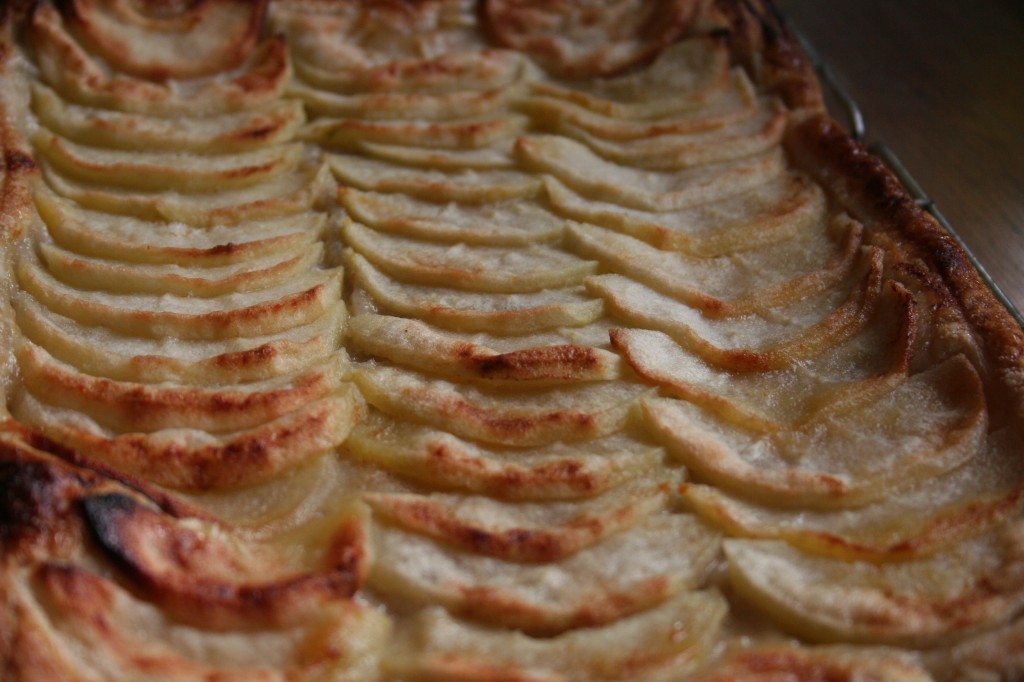
French Apple Tart (or Tarte Fine Aux Pommes, as Nigella Lawson calls it)
adapted from Barefoot Contessa Back to Basics by Ina Garten and Nigella Express by Nigella Lawson

Serves 4 to 6

This is mostly Nigella’s recipe, but the apricot jam and Calvados brushed on top is Ina’s touch from her version. The tart will still be delicious if you don’t add the jam mixture though. I pulled this together in 10 minutes, so it would also be a quick weeknight treat.

1 sheet shop-bought ready-rolled puff pastry, defrosted if frozen
2 large Granny Smith apples
2 tablespoons sugar
2 tablespoons (30 g) cold unsalted butter, small diced
1/4 cup (60 ml) apricot jam
2 tablespoons Calvados, rum, or water

Preheat the oven to 400°F (200°C). Line a sheet pan with parchment paper.

Lay the sheet of puff pastry on the lined baking sheet. Using the tip of a sharp knife, mark a 1/2‑inch border all the way around the edge of the rectangle. You need to score the lines on the pastry rather than cut all the way through it. This will allow a frame to rise above the apple filling. Refrigerate the dough while you prepare the apples.

Peel the apples and core them, then cut them in half. Slice the apples into 1/4‑inch-thick slices. Working from the inside edge, place the apple slices, closely overlapping, within the border of the pastry frame. Create neat lines of apple slices until the pastry is covered. Sprinkle with the sugar and dot with the butter.

Bake for 20 to 25 minutes, until the pastry is browned and the edges of the apples start to brown. Rotate the pan once during cooking. If the pastry puffs up in one area, cut a little slit with a knife to let the air out. And don’t worry if the apple juices burn in the pan, the tart will be fine. When the tart’s done, gently heat the apricot jam together with the Calvados, rum, or water and brush the apples and the pastry completely with the jam mixture. Loosen the tart with a spatula so it doesn’t stick to the paper. Allow to cool and serve warm or at room temperature, cut into squares or slices.

Swedish Meatballs, Parsley Egg Noodles, and Corn on the Cob

My one and only chef friend, Christian, works at Tre Kronor, which was recently featured on the Food Network’s Diners, Drive-ins and Dives. Though the Swedish meatballs highlighted on the show looked good, I think my own version would hold their own against them.

I’ve been tweaking this meatball recipe since college. The cookbook it came from was originally bought by my study-abroad friend, Annie, as a gift for the host family that she was staying with in Oaxaca, Mexico. Let’s just say that her relationship with the family wasn’t very positive. Examples? Well, their idea of vegetarian cooking was beans for every meal — breakfast, lunch, and dinner. Her shower was a cement stall adjoining her motel-like bedroom. And worst of all, a very friendly  male “cousin” attempted to corner her alone at every opportunity. Instead of dragging the cookbook back home to Madison, she gave it to me. The original recipe has no gravy but I’m a gravy fan, especially with good egg noodles. If you don’t feel like making up the gravy or if you can’t find good semi-condensed mushroom soup (I use Amy’s organic brand), these meatballs are great on their own.

For the corn, simply husk your corn and drop it into a large pot of boiling salted water. If fresh, the corn will need only 2 to 3 minutes to cook. Cook all your corn at once, even if you won’t eat it all at one meal. Corn flavor decreases and starch increases as it sits, so it’s best to cook it as soon after it’s picked as possible. Looking for ideas on what to do with leftover corn? Check out tomorrow’s post for a great corn, tomato, and feta salad recipe.

Swedish Meatballs

Swedish Meatballs
adapted from From Wisconsin: More Than a Cookbook by Laurie & Debra Gluesing

Serves 6

5 tablespoons butter, divided
1/2 cup (about 90 g) finely minced onion
1 egg
1/2 cup (120 ml) milk
1/2 cup (about 60 g) bread crumbs
1 teaspoon salt
2 teaspoons sugar
1/2 teaspoon allspice
1/2 teaspoon nutmeg
1 lb (450 g) ground beef
3/4 cup (175 ml) water
8 oz (225 g) crimini or white mushrooms, sliced
1 x 14-oz (400‑g) can of semi-condensed cream of mushroom soup (half a can of Campbell’s cream of mushroom soup can be used in lieu of semi-condensed soup but the flavor won’t be as good)
1 cup (240 ml) milk

Melt 2 tablespoons of the butter in a large skillet. Add the onion and saute until golden. Remove the onions from the pan.

While the onions cook, beat the egg in a mixing bowl, then stir in the milk and bread crumbs. Set aside for 5 minutes.

Combine the bread crumb mixture with the onion, salt, sugar, allspice and nutmeg. Stir in the beef and blend well. Shape into 1 1/2‑inch balls and brown on all sides in the remaining 2 tablespoons of butter. Pour the water into the skillet and simmer for 15 minutes.

While the meatballs cook, saute the mushrooms in a separate skillet with the remaining tablespoon of butter until tender, about 6 to 7 minutes.

Remove the meatballs from the pan. Whisk the soup and milk into the pan with the meat drippings until well combined and smooth. Heat just to boiling, then reduce the heat and simmer for 5 minutes. Add the cooked mushrooms and meatballs to the gravy. Serve with egg noodles.

***

Parsley Egg Noodles

Serves 6

1 lb (450 g) egg noodles
4 tablespoons butter, melted
1 cup (30 g) fresh parsley, chopped

salt and freshly ground black pepper

Cook the noodles according to package directions. Drain and toss with the butter, parsley, and salt and pepper to taste.

Drunken Stir-fried Beef with Green Beans, Cucumber Salad, and Chocolate-covered Coconut Macaroons

I subscribed to Cooking Light for years after I graduated college. Looking back, I’m not exactly sure why I continued my subscription. I rarely remade any recipes that I tried with a couple of exceptions, one being this Drunken Stir-fried Beef with Green Beans. I make this dish often, though it’s best in August, when the green beans, tomatoes, and basil are in abundance. Besides being tasty, this dish also reminds me of my son’s first real meal. When he was about 10 months old, after months of trying to get him to eat baby food, I decided to give him a bite of the flank steak in this dish. He devoured it and from then on we stopped trying to convince him to eat baby food and served him whatever we were eating.

Enough about the stir-fried beef. The real highlight of this meal was dessert. I’ve been craving these chocolate-covered coconut macaroons all summer and finally had a chance to make them. “Wow” is all I can say. Truly, truly, a fantastic cookie. And you can freeze them, too, for future decadent nibbles.

Drunken Stir-fried Beef with Green Beans

adapted from Cooking Light

1/2 teaspoon kosher salt
5 garlic cloves, minced
1 minced Serrano chili (or 1 teaspoon sambal)
2 teaspoons grated fresh ginger
zest and juice of 1 lime
1 tablespoon canola or peanut oil
1 lb (450 g)  flank steak, trimmed and cut into 1/4‑inch strips
1 lb (450 g) 1‑inch diagonally cut green beans
1 carton halved cherry tomatoes
1 tablespoon sugar
3 tablespoons Thai fish sauce
1 teaspoon cider vinegar
1 cup Thai basil leaves

Combine the salt and minced garlic in a mortar and pestle, and pound to form a paste. Add the chili, ginger, and lime zest, one at a time, until each ingredient is incorporated into the paste.

To prepare the stir-fry, heat the oil in a wok or large nonstick skillet over a medium-high heat. Add the paste, and stir-fry for 30 seconds (fumes may cause eyes and throat to burn slightly). Add the beef and stir-fry for 2 minutes. Add the beans and stir-fry for 4 to 5 minutes, until the beans are almost tender. Add the tomatoes, sugar, fish sauce, vinegar and lime juice. Stir-fry for 1 minute or until the beef reaches your desired degree of doneness. Stir in the basil. Serve with rice.

***

Simple Cucumber Salad

Serves 4

2 tablespoons soy sauce
2 tablespoons rice wine vinegar
2 teaspoons sesame oil
pinch of sugar
pinch of red pepper flakes
2 cucumbers, peeled and thinly sliced (1/8 inch thick)

Mix the first 5 ingredients until the sugar is dissolved. Toss with the cucumber slices. Chill for up to 2 hours, mixing occasionally.

***

Macaroon II

Chocolate-covered Coconut Macaroons
from Orangette

Makes 12 to 15 cookies

3 cups (250 g) lightly packed sweetened shredded coconut
3/4 cup (150 g) granulated sugar
3/4 cup (150 ml) egg whites (about 5 large)
1 1/2 teaspoon pure vanilla extract
1/4 teaspoon almond extract
8 oz (225 g) bittersweet or semisweet chocolate, finely chopped
3/4 cup (150 ml) heavy cream

Place the coconut, sugar and egg whites in a large, heavy saucepan, and stir to combine well. Cook over a medium-low heat, stirring regularly, for about 10 to 12 minutes, until the mixture is pasty but not dry. (The uncooked mixture will look sort of granular at first, then creamy as it heats, and then it will slowly get drier and drier. You want to stop cooking when it no longer looks creamy but is still quite gluey and sticky, not dry.) Remove from the heat. Mix in the vanilla and almond extracts. Spread out the coconut mixture on a large baking sheet. Refrigerate until cold, about 30 minutes.

Preheat the oven to 300°F (150°C). Line another baking sheet with parchment paper or a Silpat baking mat. Using a ¼‑cup measuring scoop, scoop and pack the coconut mixture into domes, and place them on the baking sheet. You should wind up with about a dozen. Bake the macaroons until golden, about 30 minutes. Transfer to a rack and cool.

Set the cookies on a rack over a rimmed baking sheet. Place the chopped chocolate in a medium bowl. Heat the heavy cream in a small saucepan until it is very hot and steamy (not boiling), remove from the heat, and pour it over the chocolate. Whisk until the mixture is smooth and the chocolate is thoroughly melted. Spoon the glaze over the macaroons, covering them almost completely and allowing the chocolate to drip down the sides. (You will have leftover glaze, which can be refrigerated or frozen.) Refrigerate the macaroons until the glaze sets, at least 2 hours. Transfer the macaroons to an airtight container, and refrigerate or freeze.

Beef and Bean Tostadas and Tossed Salad with Tangy Avocado Dressing

The problem: It’s hot. I’m tired. I have a two year old that “needs dinna momma.” The solution: Tostadas. Fast, fresh, fun, and infinitely variable, tostadas are on regular rotation in my dinner arsenal. I usually make vegetarian tostadas (sin carne) but had a taste for something a bit richer tonight.

Beef and Bean Tostadas

Serves 4

1 lb (450 g) ground beef
1 large clove garlic, minced
1 shallot, minced
1/2 teaspoon ground cumin
1 teaspoon chilli powder
1/2 teaspoon salt
1 teaspoon tomato paste
3 tablespoons water
8 tostada shells
1 x 15 oz (425 g) can refried beans, heated
about 1 1/2 cups (110 g) shredded cheddar or Monterey Jack cheese

suggested toppings: avocado, salsa, shredded lettuce, diced tomato, sour cream or whole milk yogurt, sliced jalapenos, sliced black olives

In a large skillet, brown the beef over a medium heat. Stir in the garlic, shallot, and spices. Cook for 2 to 3 minutes, until the garlic just begins to turn golden and the spices become fragrant. Stir in the tomato paste and water. Cook for about 5 minutes, stirring occasionally.

To assemble each tostada, spread a thin layer of refried beans on a tostada shell. Top with cheese, then beef. Add whatever additional toppings you like. I personally like all of the toppings listed but rarely have them all in the house at the same time.

***

This creamy avocado dressing tastes best with heartier greens and vegetables such as chopped romaine and radishes. If serving with more delicate greens (like in the photo), thin the dressing with a few additional tablespoons of water.

Tangy Avocado Dressing

Tangy Avocado Dressing
adapted from Mexican Everyday by Rick Bayless

Serves 8

1/4 cup (60 ml) vegetable oil
1/4 (60 ml) olive oil
3 tablespoons fresh lime juice
1 clove garlic, minced
1/2 cup (120 ml) mayonnaise
1 teaspoon Worcestershire sauce
1 avocado
1/2 cup (10 g) cilantro leaves, chopped
2 green onions, chopped (white and green parts)
3/4 teaspoon salt
3 teaspoons cold water

Add all the ingredients to a food processor or blender. Process until smooth. Season with salt and pepper to taste and serve.

Beef Kofta Kabobs, Tzatziki, Tabouli Salad, and Vegetables in Foil

This menu is best suited for a weekend or other day off work as you will need to start the kofta and tabouli a few hours before serving. I love to make this on a Sunday and then have leftover tabouli salad for lunch the next day with pita. A food processor will cut down on the prep time immensely, especially for chopping the parsley. A special thanks to my aunt-in-law, Holly Fortier, for her fabulous tabouli salad recipe. It has become one of our favorite dishes.

Beef Kofta Kebabs
adapted from Food Network Kitchens Cookbook

Serves 4

4 cloves garlic
1 tablespoon kosher salt, plus a pinch
1 lb (450 g) ground beef chuck or lamb
3 tablespoons grated onion
3 tablespoons chopped fresh flat-leaf parsley
1 tablespoon ground coriander
1 teaspoon ground cumin
1/2 teaspoon ground cinnamon
1/2 teaspoon ground allspice
1/4 teaspoon cayenne pepper
1/4 teaspoon ground ginger
freshly ground black pepper
olive oil, for brushing the grill

Smash the garlic cloves, sprinkle with a generous pinch of salt, and, with the flat side of a large knife, mash and smear the mixture to a coarse paste (or crush in a mortar and pestle). Mix the paste and the remaining 1 tablespoon salt with the meat, onion, parsley, and spices.

Divide the meat mixture into 6 rough balls. Mold each piece around the pointed end of a skewer (if you use wooden ones, soak them in water for 15 minutes before threading them), making a 6‑inch oval kebab that comes to a point just covering the tip of the skewer. Lay the skewers on the pan, cover, and refrigerate for at least 30 minutes and up to 12 hours.

Heat a grill pan over a medium heat or prepare a grill. Brush the pan lightly with olive oil. Working in batches, grill the kebabs, turning occasionally, until brown all over and just cooked through, about 6 minutes. Transfer to a serving platter and serve with tzatziki and pita.

***

Tzatziki

Makes about 2 1/2 cups (600 ml)

4 cups (960 ml) plain yogurt (whole milk preferably) or 2 cups(480 ml) Greek-style yogurt
1 medium cucumber, peeled, halved, and seeded
1 clove garlic
1 tablespoon extra-virgin olive oil
1 tablespoon white vinegar
1 teaspoon sugar
1 teaspoon kosher salt
freshly ground black pepper, to taste

If using regular yogurt, line a colander with cheesecloth. Put the yogurt in it, set it over a bowl, and refrigerate for at least 1 hour. Discard the expressed liquid and put the yogurt in the bowl. This will create a Greek-style yogurt.

Grate the cucumber on the large holes of a box grater into another bowl. Using a rasp or other fine grater, grate the garlic into the cucumber. Alternatively, make a paste of the garlic by smashing the garlic, sprinkling with a generous pinch of salt, and, with the flat side of a large knife, mashing the mixture to a coarse paste (or crush in a mortar and pestle). Stir the cucumber, garlic, olive oil, vinegar, sugar, salt and pepper into the yogurt. Refrigerate for at least 1/2 hour before serving.

***

Holly’s Tabouli

Serves 8

1 cup (190 g) bulghar wheat
1 1/2 cups (360 ml) boiling water
1 1/2 teaspoon salt
1/4 cup (60 ml) fresh lemon and/or lime juice
1 teaspoon crushed, fresh garlic
1/2 cup (20 g) chopped scallions (include greens)
1/4 cup (60 ml) good olive oil
1 cup, packed (20 g) freshly chopped parsley
freshly ground black pepper
2 medium tomatoes, chopped
1 14 oz (400 g) can garbanzo beans, drained
feta cheese, crumbled, for garnish, about 1/2 cup (60 g)
Kalamata olives, for garnish, about 1/2 cup (225 g)

Combine the bulghar, boiling water, and salt in a large bowl. Cover and let stand for 20 minutes or until the bulghar is chewable and the water is mostly absorbed.

Add the lemon juice, garlic, scallions, olive oil, parsley, and black pepper and mix thoroughly. Refrigerate for 2 to 3 hours.

Just before serving, add the tomatoes and garbanzo beans. Garnish with feta and black olives.

***

Vegetables in Foil

Serves 6

We throw vegetables on the grill all summer long in foil packets. It’s quick and cleaning up is a breeze. Feel free to experiment with other vegetables. Mushrooms are an especially nice addition.

1 zucchini
1 summer squash
1 onion
1 bell pepper (red, yellow, or orange)
olive oil
sea salt
freshly ground black pepper

Preheat the outdoor grill.

Cut the zucchini and summer squash lengthwise then slice into half moons (about 1/2 centimeter thick). Peel and slice the onion into thin half moons (about 1/4 centimeter thick). Cut the bell pepper into 1/2 centimeter-wide strips. Place the vegetables onto aluminum foil (preferably heavy-duty foil). You will need enough foil to completely wrap up the vegetables, about 18 inches or so.

Drizzle the vegetables with olive oil and season with salt and pepper. Crimp together the foil over the vegetables, starting with the short sides then folding over the long sides. You will end up with a rectangular-shaped packet. The foil should be secure enough to remain closed throughout the grilling process.

Place the foil packet on the grill and cook over indirect heat for about 10 minutes (cooking time will vary depending on the size of the vegetable slices and the heat of the grill). If vegetables are not tender, reclose the foil packet and cook for a few more minutes.

Thai Crumbled Beef in Lettuce Wraps with Cucumber Carrot Salad and Mango Fool

I don’t know what tempted me to try making something with nam pla for the first time — a sauce made from fermented fish doesn’t exactly get your mouth watering. But now if I see a recipe that calls for it, especially when combined with lime juice, chances are good that I’m going to make it. If you’ve never had it before, do try it. (If you’re still not convinced, check out what this couple has to say about fish sauce.) The flavors in this menu are cool, crisp and perfect for summer.

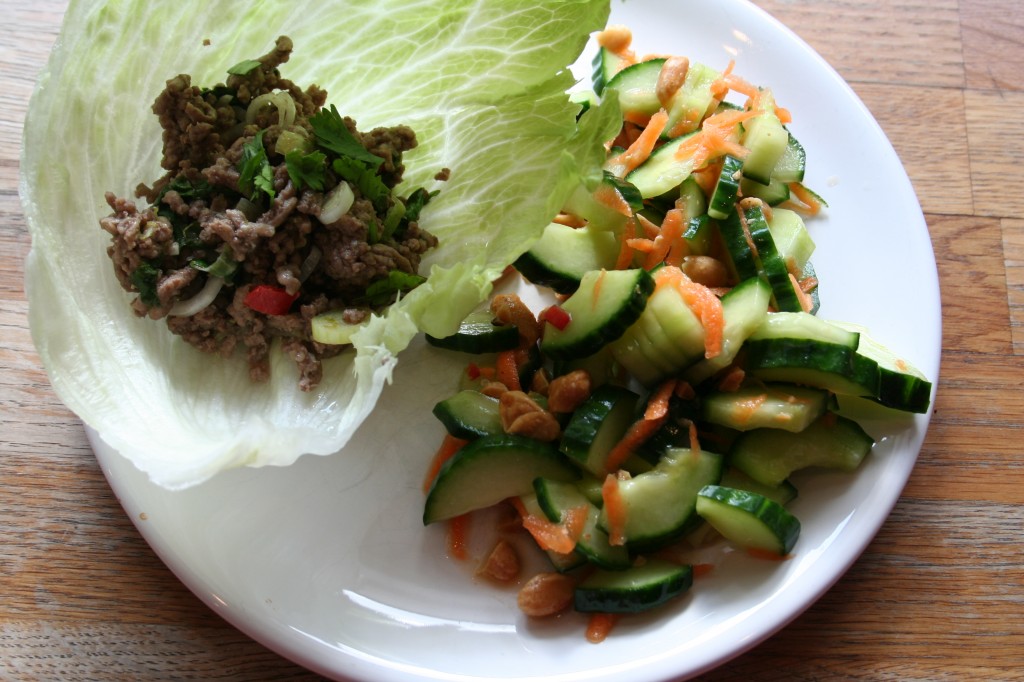
Thai Crumbled Beef in Lettuce Wraps
from Forever Summer by Nigella Lawson

Serves 6 as an appetizer or 2 to 3 as a main course

If you want to perk the lettuce leaves up a little, making sure they curve into appropriate cups for later, leave them in a sinkful of very cold water while you cook the minced beef, then make sure you drain them well before piling them up on a plate.

1 teaspoon vegetable oil
2 chilies, finely chopped
13 oz (375 g) beef mince
1 scant tablespoon Thai fish sauce (nam pla)
4 green onions, dark green bits removed, finely chopped
zest and juice of 1 lime
3–4 tablespoons chopped fresh cilantro
1 iceberg lettuce, leaves broken off

Heat the oil in a non-stick frying pan on medium heat. Add the finely chopped chillies and cook for a couple of minutes, stirring occasionally, taking care not to let the chillies burn.

Add the beef, turn up the heat and, breaking up the mince with a wooden spoon or fork, cook for 3 or 4 minutes, until no trace of pink remains. Add the fish sauce and, still stirring, cook till the liquid has evaporated. Off the heat, stir in the spring onions, lime zest and juice and most of the cilantro. Turn into a bowl and sprinkle over the remaining cilantro just before serving. (Note: If your meat is very fatty, strain it into a serving bowl with a slotted spoon.)

Arrange the iceberg lettuce leaves on another plate — they should sit one on top of another easily enough — and let people serve themselves at the table, filling the leaves with spoonfuls of the meat and wrapping it in the lettuce like you would with a burrito.

***

beef wraps with cucumber carrot salad

Cucumber Carrot Salad
adapted from Gourmet, June 1994

Serves 6

The salad can be made up to 4 hours ahead and kept chilled and covered, but the cucumber will wilt and give off liquid.

2 tablespoons fresh lime juice
1 1/2 tablespoons Thai fish sauce (nam pla)
1 tablespoon sugar
1 chili, or to taste, seeded and minced
2 cucumbers, deseeded
1 carrot, coarsely grated
1/4 cup peanuts, chopped

In a bowl, stir together the lime juice, fish sauce, sugar, and chili until the sugar is dissolved.

Thinly slice the cucumbers (a food processor makes short work of this) and add to the chili mixture along with the grated carrot and peanuts. Toss the salad well.

***

Mango Fool
adapted from Gourmet, April 2000

Serves 6

The Gourmet recipe says that canned mangoes are excellent in this dessert if ripe fresh ones are unavailable. Use a drained (1 lb 14 oz/850 g) can of mango slices in syrup. If the canned fruits you buy are Alphonso mangoes (their favorite variety of mango), add an additional 1/2 cup (120 ml) cream. If you don’t want to bother putting the purée through a sieve, it won’t suffer for not having a perfectly smooth texture. I think you could also get away with not adding the gelatin, which would make this more of a traditional fool recipe of just sweetened fruit and whipped cream, though the gelatin elevates this into more of a mousse.

1 1/4 teaspoons unflavored gelatin
1 1/2 tablespoons fresh lime juice
3 large very ripe mangoes, flesh coarsely chopped (4 cups)
1/4 cup sugar (55 g), or to taste depending on sweetness of mangoes
3/4 cup (180 ml) heavy cream

Sprinkle the gelatin over the juice in a small heatproof cup and let it stand 1 minute to soften. Purée the mangoes with the sugar in a blender until very smooth and force through a sieve into a large bowl.

Melt the softened gelatin in the cup in a pan of simmering water or in a microwave and stir into the purée. Beat the cream with an electric mixer until it just holds stiff peaks and gently fold into the purée.

Transfer the purée into 6 ramekins, small glasses, etc., or 1 large serving dish. Chill the fool, covered, for at least 8 hours.