Tag Archives: Appetizers

Chicken Cakes with Teriyaki Sauce

I vowed to post more recipes in 2013 and, like so many other New Year’s resolutions, find myself failing miserably by the end of January. Despite my blog negligence, I have been cooking up a storm. I now realize that the prospect of free time on the weekends thrills me because I know I will have time to spend a few hours on my feet in front of the stove, my desire to stand around and stir pots all afternoon the result of working a desk job, I guess!

Though these delicious chicken cakes aren’t the best thing I’ve made this month, they were cooked during our sunniest (most photo friendly) weather. I love the rich umami taste of these succulent little meat cakes and the fact that the homemade teriyaki glaze cooks in the pan along with the chicken, requiring no separate sticky pot to wash later. Though we all enjoyed them, Anabelle scarfed hers down fastest with a nod of approval and an it-tastes-like-sausage compliment. If you know my kids, no bigger praise can they bestow on food.
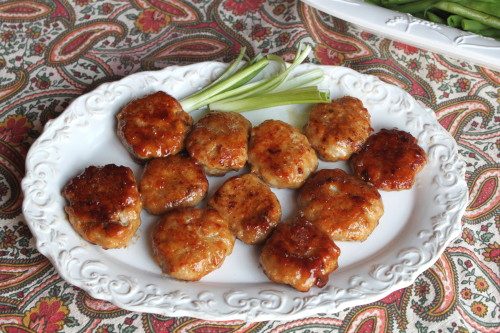
Chicken Cakes with Teriyaki Sauce
adapted from The Cookbook Junkie’s adaption from Around The World in 450 Recipes by Sarah Ainley (editor)

I paired this Japanese inspired dish with a cucumber salad and string beans. A side of rice would also be nice, but don’t expect to have extra sauce to flavor it. The teriyaki “sauce” is really a glaze. These would make awesome appetizers.

makes 1 dozen

For the chicken cakes:
1 lb (450 g) ground chicken
1 large egg [optional, I forgot to add the egg and my cakes turned out just fine]
1/2 small onion, grated
1 ½ teaspoons sugar
1 ½ teaspoons soy sauce
Cornstarch or tapioca starch, for coating
2–3 scallions, cut in half, white/light green ends shredded and green parts chopped
2 tablespoons vegetable, canola, or sunflower oil

For the teriyaki sauce:
2 tablespoons sake or dry white wine
2 tablespoons sugar
2 tablespoons mirin
2 tablespoons soy sauce

Mix the ground chicken with the egg, grated onion, sugar and soy sauce until the ingredients are thoroughly combined and well bound, about 2 minutes. The mixture will be quite sticky, which makes for good texture. Shape the mixture into 12 small, flat, round cakes and dust them lightly all over with cornstarch. Since the mixture is very sticky, I found it easiest to coat my fingers in cornstarch then drop the semi-formed cake into the cornstarch. Once it was covered in cornstarch I was able to properly form it.

Soak the white/light green part of the scallions in ice water for 5 minutes and drain well.  The ends should curl slightly.

Heat the oil in a frying pan. Place the chicken cakes in a single layer, and cook over medium heat for 3 minutes. Turn the cakes over and cook for 3 minutes longer, until cooked through.

Mix the ingredients for the sauce and pour it into the pan. Turn the chicken cakes occasionally until they are evenly glazed. Move or gently shake the pan  to prevent the sauce from burning.

Arrange the chicken cakes on a plate and top with the scallions. Serve immediately.
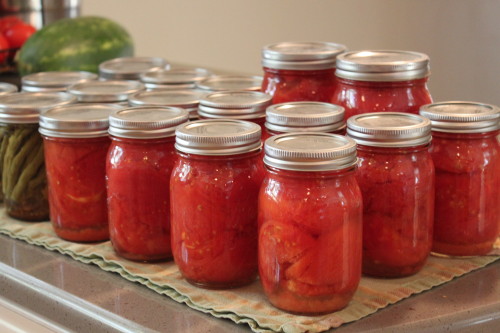
 

Canning Tomatoes and Pickled Green Beans

In celebration of our three year blogging anniversary (congratulations to us!) I’m making an exception to our normal dinner menu/recipe format in order to encourage you all to try canning or preserving during this produce-abundant time of year. Over the last few years, really since having kids, I’ve been trying to move towards more local, sustainable, organic and less processed foods. Canning and preserving makes this goal more attainable, especially in Wisconsin, which has easy access to farms but a short growing season. After reading Barbara Kingsolver’s Animal, Vegetable, Miracle and having Kristin walk me through canning a batch of homemade pickles, I am now a canning addict. Home preserved food is cheaper and better tasting than store bought and nothing beats the feeling of opening your pantry and seeing rows of gorgeous food lined up and ready for the long winter ahead. Food that you made!

If you think canning is difficult and time consuming, think again. Putting up a batch of pickles takes less than 2 hours and hardly any prep, especially after you’ve done it a few times and figure out little tricks like putting up the canning water to boil before doing anything else. I put on a good album and do my canning after my children go to bed. I find it relaxing and fun. Last week, my friends and I tried canning tomatoes for the first time, throwing a little canning party complete with hired babysitter. Although novices with tomatoes, we cranked out 15 jars in three hours at cost of about $1 per jar.  We also did a quick double batch (8 jars) of dilly beans. Not too bad for a Sunday morning’s work.


Canned Tomatoes (Packed in Water)

from Ball Complete Book of Home Preserving, recipe available here

There are many wonderful canning websites with detailed instructions and pictures on how to prepare your jars, lids and other canning set up information. I like the canning tips at pickyourown.org and the photos and instructions for tomato canning at Food in Jars. Beginners should also check out the videos and instructions here.

2–1/2 to 3–1/2 lb (1 to 1.5 kg) ripe tomatoes (about 7 to 10 medium) per quart
Water
Citric acid or bottled lemon juice
Salt, optional
Glass preserving jars with lids and bands

Prepare boiling water canner. Heat jars and lids in simmering water until ready for use. Do not boil. Set bands aside. [NOTE: I sometimes do this step in my dishwasher, running the washer on “high temp” and then keeping the jars inside and hot until ready to fill.]

Wash the tomatoes. Dip them in boiling water 30 to 60 seconds. Immediately dip in ice water. Slip off the skins. Trim away any green areas and cut out the core. Leave the tomatoes whole or cut into halves or quarters.

Prepare the tomatoes according to raw or hot pack recipe below.

Add ½ teaspoon citric acid or 2 tablespoons bottled lemon juice to each hot quart jar. Add ¼ teaspoon citric acid or 1 tablespoon bottled lemon juice to each hot pint jar.

Pack tomatoes into hot jars according to raw or hot pack recipe. Add 1 teaspoon salt to each quart jar, 1/2 teaspoon to each pint jar, if desired. Remove air bubbles in the jars with a spoon or, my preference, a large chopstick. Wipe each rim. Center a hot lid on each jar. Apply a band to each jar and adjust until the fit is fingertip tight.

Process the filled jars in a boiling water canner 40 minutes for pints and 45 minutes for quarts, adjusting for altitude. Remove the jars and cool. Check lids for seal after 24 hours [NOTE: we heard the beautiful “pop” of the seal in about 3 hours]. The lid should not flex up and down when the center is pressed.

Raw Pack –
1.) Pack the tomatoes into hot jars leaving 1/2 inch headspace.
2.) Ladle hot water over tomatoes leaving 1/2 inch headspace. Add 1 teaspoon salt to each quart jar, 1/2 teaspoon to each pint jar, if desired.

Hot Pack –
1.) Place the tomatoes in a large saucepot. Add water to cover. Bring to a boil and boil gently 5 minutes, stirring to prevent sticking.
2.) Pack the hot tomatoes into hot jars leaving 1/2 inch headspace.
3.) Ladle hot cooking liquid over tomatoes leaving 1/2 inch headspace. Add 1 teaspoon salt to each quart jar, 1/2 teaspoon to each pint jar, if desired.

***

Pickled Green Beans (aka Dilly Beans)

from Food in Jars

2 lbs (900 g) green beans, trimmed to fit your jars
1 teaspoon cayenne pepper (more or less depending on your spice preference)
4 teaspoons dill seed (not dill weed)
4 cloves garlic
2 1/2 cups (600 ml) white vinegar (5%)
2 1/2 cups (600 ml) water
1/4 cup (50 g) pickling salt (use a bit more if you’ve only got kosher)

Prep your canning pot by inserting a rack to keep your jars off the bottom of the pot, place pint jars in (wide-mouth pints work best here. A 12 ounce jelly jar is also nice, as it’s a bit taller than a standard pint and makes for less trimming) and fill it with water. Bring to a boil to sterilize while you prepare the rest of your ingredients.

Wash and trim your beans so that they fit in your jar. If you have particularly long beans, your best bet is to cut them in half, although by doing so, you do lose the visual appeal of having all the beans standing at attending.

Combine vinegar, water and salt in a medium saucepan and bring to a boil. While it’s heating up, pack your beans into the jars, leaving 1/2 inch headspace (distance between the tops of the beans and the rim of the jar). To each jar, add 1/4 teaspoon cayenne pepper, 1 clove of garlic and 1 teaspoon dill seeds.

Pour the boiling brine over the beans, making sure to leave that 1/2 inch headspace. Use a plastic knife to remove air bubbles from jar by running it around the interior of the jar. Wipe the rims and apply the lids (which have been sitting in a small saucepan of water at a mere simmer for at least ten minutes in order to soften the sealing compound) and rings.

Process for 5 minutes in a boiling water bath (remember that you don’t start timing until the pot has come to a roiling boil).


Steak and Swiss Chard Tacos with Houston-style Green Salsa

Whenever people ask where I’m from, I always hesitate before answering. Although I spent my teenage years in Illinois, I lived my younger years in Tomball, Texas, a tiny town near Houston. Inevitably, I answer that I was “raised in Texas.” Growing up in Texas during your formative years definitely leaves a mark. The food, the weather, the people all have the indelible stamp of Texas on them. It took me a long time to get over my move to north. While I can appreciate the faster pace of my current hometown,  I still miss many, many things about Texas. The warm and generous people, amazing sunsets, never buying a winter coat, and jalapenos and sweet tea served with every meal.

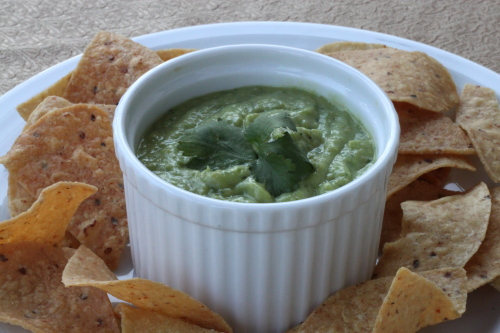
I am still, after all these years, a homesick Texan. I regularly follow Lisa Fain’s blog by the same name and was thrilled when Kristin sent me her cookbook. I spent the evening reading it–yes, reading it–with that bittersweet ache of nostalgia in my stomach. There is nothing quite like food to trigger memory. A certain conversation or taste or smell that you’ve forgotten for years can come roaring back to life with just the mention of the food that you were eating when it occurred. When I read Lisa’s green salsa recipe I knew I was going to be in for a long ride down memory lane. This salsa is one that I ate constantly growing up. It was (and probably still is) served alongside traditional red salsa at every Mexican restaurant in southeastern Texas. Alas, I never tasted it again after moving up north. Until now that is. I’ve made this salsa five times since Christmas Eve, where I served it as surprise for my Texas-born siblings. For me, that is an astounding amount of times to make the same recipe. It’s just that good. I can, and have, eaten it by the spoonfuls. It’s topped my carnitas, been served along side yellow rice and a roasted chicken, gone perfectly with tortilla chips, and accompanied tonight’s steak tacos.

Steak & Swiss Chard Tacos

Serves 6

2 steaks (preferably ribeye or flank steak, but sirloin will work in a pinch)
2 cloves garlic, minced
juice of 1 lime
1 teaspoon cumin
salt and pepper
1 bunch Swiss chard, tough stems chopped into 1/2 inch pieces and leaves roughly chopped
1 tablespoon olive oil
1 clove garlic, thinly sliced
12 corn or flour tortillas
toppings (shredded cheese, diced tomatoes, sour cream, avocado)

Spread the minced garlic evenly on top of the steaks. Sprinkle with the lime juice, cumin, and salt and pepper, to taste. Let the steaks sit for 20 minutes. If desired, steaks can sit for up to one hour in the fridge. Make the salsa while your steaks marinate.

While the steak marinates, heat the olive oil in a skillet over medium heat. Add the Swiss chard stems and sliced garlic and cook, stirring frequently for 2–3 minutes until the garlic turns golden. Add the Swiss chard leaves and continue cooking until the leaves are wilted and stems are just tender, another 5–10 minutes. Season the chard with salt and pepper to taste and set aside.

Preheat a large cast iron skillet or griddle over medium high heat. When hot, place the steaks into the pan and cook for 5–8 minutes until nicely seared on one side. Flip the steaks and continue cooking on the other side until cooked to your desired doneness. I like my beef medium rare so usually another 5 minutes will do the trick, depending on the thickness of the steak.  When done, remove the steaks from the pan and let them rest on a cutting board. After letting them rest for 5–10 minutes, thinly slice the steaks against the grain. Serve the steak with warmed tortillas, topped with the swiss chard, salsa and other accompaniments.

***

Houston-style Green Salsa
from The Homesick Texan Cookbook by Lisa Fain

Makes about 2 cups

3/4 lb (340 g) small tomatillos, husks removed or 1 x11 oz (x310 g) can of whole tomatillos, drained
1 avocado, peeled and pitted
1 or 2 serrano chiles, stems and seeds removed, roughly chopped
4 cloves garlic, chopped
1 tablespoon lime juice
1/4 cup (8 g) cilantro
salt, to taste

If using fresh tomatillos, on high heat, bring a pot of water to boiling and cook tomatillos until soft, about 5 minutes.

Add the tomatillos to a blender along with the avocado, serrano chiles, garlic, lime juice, and cilantro. Blend until smooth then add salt, to taste.

Cheddar Chicken Salad and Farro with Cucumber

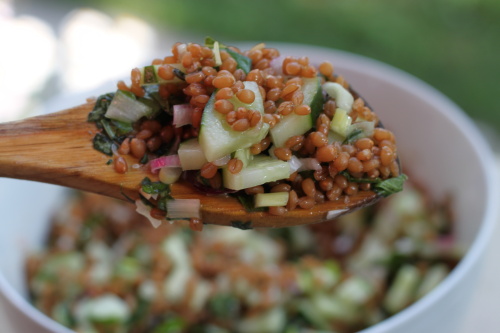
There are a million ways to make chicken salad, but my mom’s recipe makes a knock-your-socks-off, can’t-go-wrong sandwich, especially when served on a buttery croissant. It’s perfect to take to baby showers, wedding showers, work lunches, picnic lunches, or any other place where you aren’t sure how picky the eaters are going to be. Everyone enjoys it. Pair it with this fresh and fabulously textured farro salad or, if you don’t feel like babysitting a pot of simmering farro or wheat berries but want an equally healthy and tasty side dish, try some roasted chickpea snacks. The Good Bean sent me a few complimentary packets of their pre-packaged version and we all loved them, especially my husband. I plan to pack them in lunches and throw them in my purse for snack emergencies.

Cheddar Chicken Salad

Makes a dozen cocktail sandwiches (or 6 full-size sandwiches)

3 cooked chicken breast halves (boneless, skinless), diced
1/2 cup (125 ml) mayonnaise or Miracle Whip
4 oz (100 g) chopped pitted black olives
1/2 cup (50 g) shredded cheddar cheese
1/2 green bell pepper, chopped fine
1/2 small onion, chopped fine
small croissants or cocktail rolls (about 1 dozen)

Gently mix all the ingredients together except the rolls (obviously). Fill the rolls and serve. If not serving immediately, chill the salad for up to 24 hours or filled rolls for up to 2 hours in the fridge, covered.

***

Farro with Cucumber
adapted from Molto Gusto: Easy Italian Cooking by Mario Batali

Serves 6

As much as I love this recipe and Molto Gusto: Easy Italian Cooking, the cookbook it came from (currently on its third renewal from my local library), it doesn’t taste great as leftovers. Try to eat it within 24 hours of preparing it unless you like seriously chewy grains.

8 oz (225 g) farro or wheat berries, picked over and rinsed
1 lb (450 g) cucumbers, cut into 1/4‑inch dice
1 medium red onion, cut into 1/4‑inch dice
1 red finger chile or serrano chile, cut into tiny dice
1/3 cup (10 g) packed fresh basil leaves, thinly sliced (chiffonade)
1/2 cup (125 ml) red wine vinaigrette (below)
Maldon or other flaky sea salt

Combine the farro and water to cover by 2 inches in a large saucepan and bring to a simmer, skimming off the foam. Reduce the heat to a bare simmer and cook until the farro is just tender, about 25 minutes if using pearled farro, about 1 1/2 hours if using wholegrain farro (or wheat berries).

Drain the farro and transfer to a large bowl. Add the cucumbers, onion, chile and basil, mixing well. Add the vinaigrette, tossing well. Season well with salt and serve, or let stand at room temperature for 1 hour to bring out the flavors.

Red Wine Vinaigrette

Makes 1 cup (250 ml)

1/2 cup (125 ml) extra virgin olive oil
1/4 cup (60 ml) good-quality red wine vinegar
1/4 cup (60 ml) sparkling water

Whisk the oil, vinegar and water together in a small bowl, or shake the ingredients together in a small, lidded jar, until well incorporated. The vinaigrette can be refrigerated for up to 5 days.

Split Pea Fritters with Indian Spiced Cauliflower and Potatoes

While I won’t hesitate to drop $20 on a quality chunk of dark chocolate or stinky cheese, I have a hard time passing up a good bargain. Cooking at home keeps our family’s food costs low, a fact I learned as a poor college kid developing a meal repertoire of bean burritos, fried rice, and other filling but frugal foods. Stocking up on pantry staples when they are on sale is another great cost-cutting measure. I tell you all this as way of explaining why I decided to buy 10 pounds of dried split peas during a recent shopping trip. How could I pass them up? Organic, healthy, and less than a dollar a pound. Only during the drive home did I realize that I have only used split peas in split pea soup, a soup I like but don’t particularly love. Luckily, my trusted and now worn How To Cook Everything provided an interesting alternative to split pea soup with these  fritters.

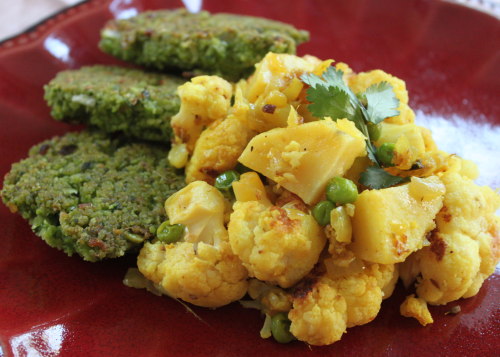
We like the split pea fritters even more than falafel, a similar but chickpea-based fritter. If you’ve ever made falafel, you know the “batter” consistency should resemble wet sand. I think they cook best in a shallow pool of hot oil. I like them served piping hot with a cool creamy sauce like lemon-cumin yogurt sauce or even a simple raita. Delicately spiced roasted cauliflower and potatoes round out the meal nicely.

Indian-Style Split Pea Fritters
adapted from How To Cook Everything: Simple Recipes for Great Food by Mark Bittman

Makes 4 to 8 appetizer servings or 2 to 4 main dish servings

1 cup (200 g) yellow or green split peas, washed and picked over
peanut or other oil as needed
1 jalapeño or other hot chile (fresh or dried), stemmed, seeded and minced, or to taste
1 1/2‑inch piece ginger, peeled and roughly chopped
1 clove garlic, minced or grated
1/2 onion, peeled and roughly chopped
1/2 cup (15 g) cilantro (some stems are OK)
1 teaspoon ground coriander
1 teaspoon ground cumin
1/2 teaspoon ground fenugreek
1/2 onion, minced
salt and freshly ground black pepper
1 to 2 tablespoons flour, if necessary
lime or lemon wedges (optional)

Soak the split peas in water to cover for at least 3 hours. Drain but leave them wet.

Place the oil, about 1/2 inch deep, in a large, deep saucepan. Instead of pan frying, you can also deep fry these in more oil (at least 3 inches deep). Heat the oil over a medium-high heat to about 365°F to 375°F.

Place the drained peas in the container of a food processor with the chile, ginger, garlic, 1/2 onion, cilantro, coriander, cumin, and fenugreek. Process until the mixture is a coarse puree — not perfectly smooth, but with no whole peas remaining. Add a couple tablespoons of water to the mixture if necessary to help the machine work. Stir in the minced onion and salt and pepper. The mixture should be fairly loose; add a little water if it is quite thick or 1 to 2 tablespoons of flour if it’s soupy. Taste and adjust the seasoning if necessary.

Drop the mixture by heaping tablespoons into the oil, but don’t crowd the pan. Cook the fritters for 2 to 3 minutes on each side or until lightly browned and crisp. Drain on paper towels. Repeat with the remaining mixture, adding (and heating) more oil to the pan if necessary. Serve the fritters hot or at room temperature with lime or lemon wedges, if desired.

***

Indian Spiced Cauliflower and Potatoes
adapted from Gourmet, February 2004

Serves 4

1 small head cauliflower, cut into 3/4‑inch-wide florets
1 lb (450 g) Yukon Gold potatoes, peeled and cut into 1/2‑inch cubes
5 tablespoons vegetable oil
1/2 teaspoon cumin seeds
3/4 teaspoon salt, divided
1 medium onion, finely chopped
2 garlic cloves, finely chopped
1 fresh jalapeño, omitting seeds for less spiciness
2 teaspoons minced peeled fresh ginger
1 teaspoon ground cumin
1/2 teaspoon ground coriander
1/2 teaspoon turmeric
1/4 teaspoon cayenne
1/2 cup (125 ml) water

Put the oven rack in the upper third of the oven and place a shallow baking pan on the rack. Preheat the oven to 475°F (240°C).

Toss the cauliflower and potatoes together in a bowl with 3 tablespoons oil, cumin seeds, and 1/4 teaspoon salt. Spread in the hot baking pan and roast, stirring occasionally, for about 20 minutes, until the cauliflower is tender and browned in spots and the potatoes are just tender.

While the vegetables are roasting, cook the onion, garlic, jalapeño, and ginger in the remaining 2 tablespoons of oil in a 12-inch heavy skillet over a moderate heat, stirring frequently, for 8 to 10 minutes, until very soft and beginning to turn golden. Add the ground cumin, coriander, turmeric, cayenne, and remaining 1/2 teaspoon salt and cook, stirring constantly, for 2 minutes. Stir in the water, scraping up any brown bits from the bottom of skillet, then stir in the roasted vegetables. Cook, covered, stirring occasionally, for 5 minutes.

Chipotle Lime Grilled Chicken Thighs with Pico de Gallo

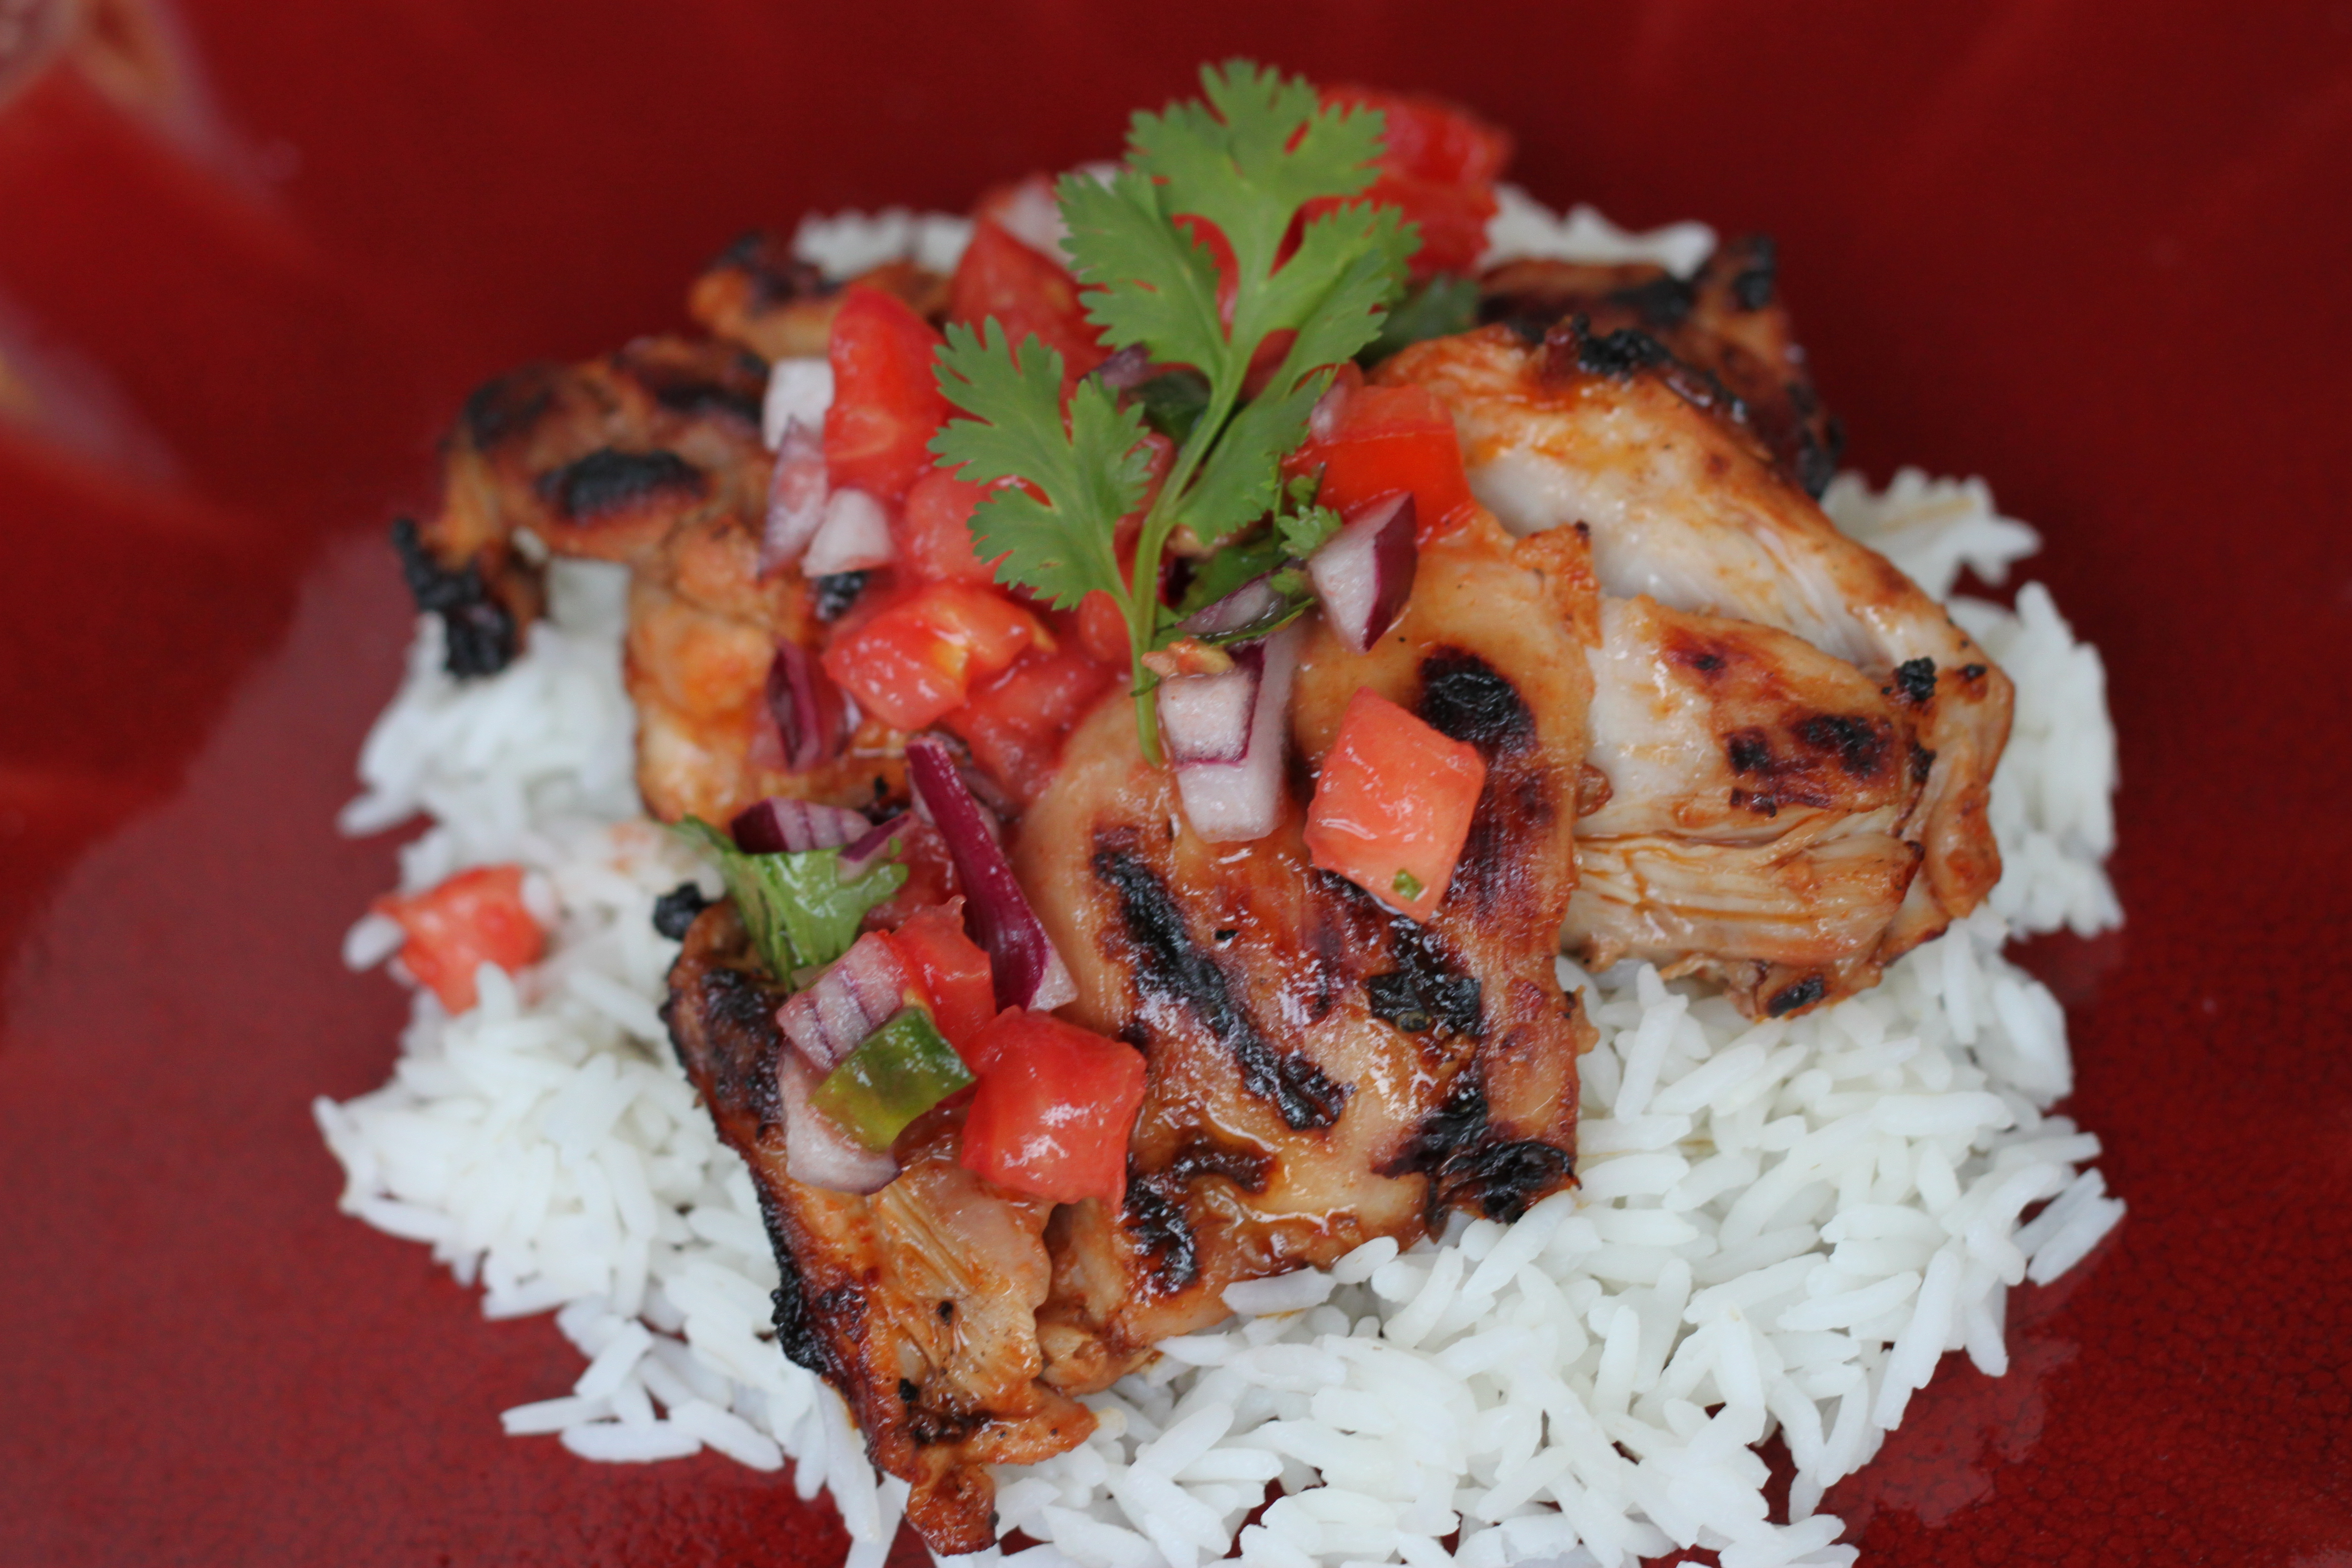
As much as I hate to see it go, summer is on its way out. Our bathing suits and beach towels are washed and stored. Jackets and jeans have come out of hiding. Apples are reappearing in our CSA box. And sadly, we harvested the last of our backyard tomatoes. I love tomatoes. I love them enough to avoid eating them out of season when they are pithy, tasteless and generally useless. So to honor the last of our tomatoes, I paired them with our backyard’s real bounty — serrano chilies. The tomatoes and chilies in the pico de gallo provide a nice acidity and heat for the savory grilled chicken thighs. It even livened up the plain white rice I served with it.

Another note on peppers — we grew a bumper crop of hot (really hot) ones this year thanks to a new sunny garden bed and good weather. We obviously couldn’t eat a basket of hot peppers each week, so I made up a huge jar of homemade pickled serranos and jalapenos. If anyone else is looking for a way to preserve their own peppers, check out this fabulous recipe from David Lebovitz for pickled jalapenos. Delicious, easy, and perfect for topping nachos.

Chipotle Lime Grilled Chicken Thighs 
adapted from Gourmet, June 2006

Serves 4 to 6

1/4 cup (60 ml) fresh lime juice
1/4 cup (60 ml) olive oil
2 canned chipotles in adobo, minced
1 teaspoon salt
6 to 8 large skinless boneless chicken thighs
1 tablespoon honey

Prepare your grill for cooking over direct heat with medium-hot charcoal (moderate heat for gas).

While the coals are lighting, stir together the lime juice, oil, minced chipotle, and salt in a liquid-measuring cup. Put the chicken in a large sealable bag and add 1/3 cup (80 ml) marinade (reserve the remainder in a cup). Seal the bag, forcing out excess air, and marinate the chicken at room temperature for about 15 minutes. Stir the honey into the remaining marinade until dissolved to make a sauce.

Grill the chicken (discarding the marinade in the bag) on a lightly oiled grill rack, covered only if using a gas grill, turning the chicken over occasionally and moving it to avoid flare-ups if necessary, until just cooked through, 8 to 10 minutes total.

Brush both sides of the chicken with some of the reserved sauce, then continue to grill, turning over once, until lightly browned, about 1 minute more. Serve the chicken drizzled with remaining sauce and topped with pico de gallo, if desired.

***

Pico de Gallo

Makes about 2 cups (480 ml)

1/2 onion (white or red), minced
2 large, ripe tomatoes, diced small
1 jalapeno or serrano chili, minced (remove seeds before mincing to lessen heat)
juice of 1/2 lime
handful of chopped cilantro
1/2 teaspoon salt
1/4 teaspoon pepper

Place the onion in a colander and rinse under cold water, then drain. Gently mix together all of the ingredients, including the onion, in a medium bowl. Taste and add more lime juice, salt and/or pepper, if necessary. Serve with tortilla chips or as a topping to meat, fish, or poultry.

Smoked Salmon Pizza

It’s no secret that I like to serve appetizers as dinner when I can get away with it. Some starters easily morph into the role of main course, such as spring rolls with pork meatballs and shrimp won tons in soup, while other appetizers aren’t really up to the task. I vividly remember the night that I served Reuben seven-layer taco dip and corn chips for dinner. Needless to say, I ended up eating a lot of taco dip by myself that evening.

I’m pretty positive this “pizza” is intended as a first course, but like most parents, I don’t do “courses” with the kids and I really wanted to try this recipe. Paired with vine-ripened tomatoes from our backyard, the pizza alone was plenty for the three (and a half) of us. Admittedly, it’s probably more of a brunch than dinner, reminiscent of a good bagel but lighter and with better textures, especially with the addition of sliced tomatoes.

Smoked Salmon Pizza
adapted from Wolfgang Puck

Makes 1 pizza

8 oz (225 g) prepared (unbaked) pizza dough (white or whole wheat)
1 tablespoon olive oil
1/4 large or 1/2 small red onion, sliced thinly
1/2 cup (120 ml) sour cream
1 teaspoon dried dill (or 1 tablespoon chopped fresh dill)
1 tablespoon chopped red onion
1 1/2 teaspoons lemon juice
5 oz (140 g) thinly sliced smoked salmon
1 large or 2 small tomatoes, sliced thinly (optional)

Preheat the oven to 500°F (260°C).

On a lightly floured surface, roll the dough out into a 10-inch round. The thinner the dough, the crispier the crust when baked. Transfer the dough to a baking sheet and brush the dough with olive oil. Scatter the sliced onion over the top of the dough and bake until the crust is golden brown, about 7 to 10 minutes, depending on the thickness of the dough. Let the baked crust cool for 5 minutes.

While the crust bakes, mix together the sour cream, dill, chopped red onion, and lemon juice.

After the crust cools, spread the sour cream mixture over the top of the crust to within an inch of the edge. Arrange the salmon to cover the surface entirely. Use a pizza wheel to slice the pizza into 6 pieces. If using tomato, top each piece of pizza with 1 or two tomato slices. Serve immediately.

Tzatziki Chicken with Couscous and Hummus

I really wanted to name this post Two Dip Dinner, but I couldn’t risk setting a clever title precedent. Regardless, that’s the unofficial title in my house for this kid-friendly fare. A special thank you to our friend Leah for this menu inspiration. Kristin and I have been lucky to be friends with Leah for nearly 20 years. She’s been kind enough to share some of her favorite recipes with us so we can share them with you.

Tzatziki Chicken with Couscous and Hummus
adapted from Leah’s recipe

Serves 4

1 1/2 lb (680 g) boneless skinless chicken thighs or breasts (thighs preferred)
1 teaspoon white vinegar
1/2 teaspoon sugar
1 package plain whole wheat or regular couscous (about 6 oz/170 g)
2 to 3 cups (475 to 700 ml) chicken broth or water (check couscous package for exact amount)
2 to 4 scallions
2 tablespoons olive oil

for the tzatziki sauce:
2 small cucumbers, peeled and grated, divided
2 teaspoons coarse salt, divided
2 cups plain whole milk yogurt, divided
2 small garlic cloves, minced, divided
2 teaspoons fresh lemon juice, divided
1 teaspoon dried dill, divided

You’ll be making two separate preparations out of the tzatziki sauce ingredients: a marinade and a dipping sauce. For the marinade, put half of all the sauce ingredients into a food processor and pulse until blended and runny. Pour the marinade over the chicken in a Ziploc bag or lidded container. Seal the bag or cover and marinate the chicken for up to 24 hours.

For the dipping sauce, after grating the cucumber, put it into a paper towel and squeeze dry. Stir the grated cucumber into the remaining half of the tzatziki sauce ingredients in a small bowl. Do not put this part in a food processor. Stir in the vinegar and sugar. Refrigerate for 15 minutes before serving (though the longer it can sit in the fridge to let the flavors develop, the better).

After the chicken has marinated, preheat an outdoor grill or stove-top grill pan. Lightly grease the grill. Remove any excess marinade from the chicken and place the chicken pieces onto the hot grill. Discard the marinade. Cook the chicken for 8 to 12 minutes on each side, depending on the thickness; thighs will need more time than breasts.

While the chicken cooks, make the couscous according to package directions, using the amount of chicken broth or water recommended. Fluff the couscous after it cooks and fold in the scallions and olive oil.

Serve the chicken with with couscous, tzatziki sauce, and hummus.

***

Hummus

1 small garlic clove, minced
3 tablespoons fresh lemon juice
2 tablespoons water
1 x 14-oz (400‑g) can chickpeas, drained and rinsed
3 tablespoons tahini
1 teaspoon salt
2 tablespoons olive oil

Put all the ingredients into a food processor and puree until smooth.