Banana, Cherry and White Chocolate Cupcakes

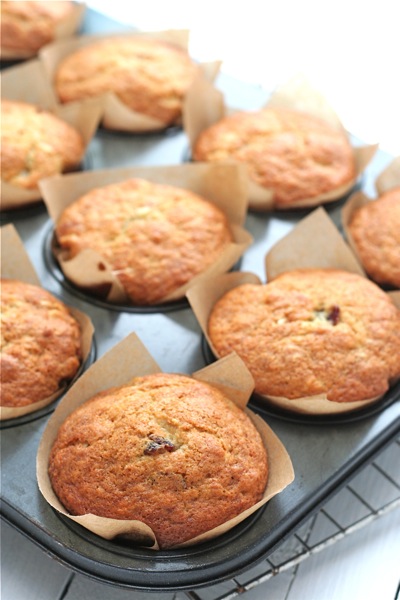
I’ve hit on the perfect play date treat with these banana, cherry and white chocolate cupcakes. Unusually for a cupcake these days, they’re not smothered with any frosting, so they’re not messy to eat and don’t make for sticky fingers. Plus they don’t have too much sugar in them, relying on the bananas for sweetness instead, and I always feel like any treat with fruit keeps it on the right side of indulgence. Friends, you’ve had fair warning now — next time you invite me and my kids over, I’ll be bringing a batch of these.

Banana, Cherry and White Chocolate Cupcakes
adapted from How to Be a Domestic Goddess by Nigella Lawson

Makes 12 cupcakes

1/2 cup + 1 tablespoon (125 g) unsalted butter
1 cup (200 g) sugar
1 teaspoon vanilla extract
3 ripe bananas, mashed
1/4 cup (60 ml) sour cream or natural yogurt
2 large eggs, beaten
2 1/2 cups (300 g) plain flour
1 teaspoon baking soda
1/2 teaspoon baking powder
1/3 cup (40 g) dried cherries, chopped (you could substitute dried cranberries or even raisins)
1/4 cup (50 g) white chocolate, chopped, or use chips or buttons

Preheat the oven to 350°F (180°C). Line a muffin tin with paper or silicone cases.

Melt the butter in a saucepan big enough to eventually hold all the batter. Off the heat, add the sugar, vanilla and mashed bananas. Stir in the sour cream or yogurt and the eggs and beat to mix with a wooden spoon. Sift in the flour, baking soda and baking powder, then fold in the cherries and chocolate. Mix until everything is just blended (don’t overmix!), then divide the mixture between the 12 muffin cases. Cook for 20 minutes, until golden and springy on top and a tester comes out clean. Remove the cupcakes in their papers to a wire rack and leave till cool.

Steak and Swiss Chard Tacos with Houston-style Green Salsa

Whenever people ask where I’m from, I always hesitate before answering. Although I spent my teenage years in Illinois, I lived my younger years in Tomball, Texas, a tiny town near Houston. Inevitably, I answer that I was “raised in Texas.” Growing up in Texas during your formative years definitely leaves a mark. The food, the weather, the people all have the indelible stamp of Texas on them. It took me a long time to get over my move to north. While I can appreciate the faster pace of my current hometown,  I still miss many, many things about Texas. The warm and generous people, amazing sunsets, never buying a winter coat, and jalapenos and sweet tea served with every meal.

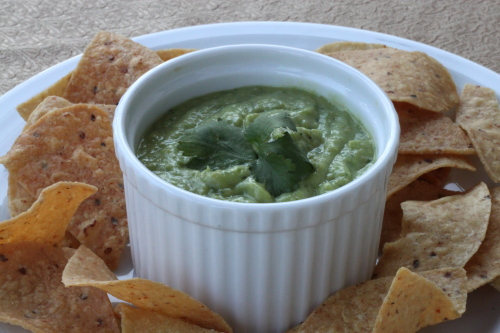
I am still, after all these years, a homesick Texan. I regularly follow Lisa Fain’s blog by the same name and was thrilled when Kristin sent me her cookbook. I spent the evening reading it–yes, reading it–with that bittersweet ache of nostalgia in my stomach. There is nothing quite like food to trigger memory. A certain conversation or taste or smell that you’ve forgotten for years can come roaring back to life with just the mention of the food that you were eating when it occurred. When I read Lisa’s green salsa recipe I knew I was going to be in for a long ride down memory lane. This salsa is one that I ate constantly growing up. It was (and probably still is) served alongside traditional red salsa at every Mexican restaurant in southeastern Texas. Alas, I never tasted it again after moving up north. Until now that is. I’ve made this salsa five times since Christmas Eve, where I served it as surprise for my Texas-born siblings. For me, that is an astounding amount of times to make the same recipe. It’s just that good. I can, and have, eaten it by the spoonfuls. It’s topped my carnitas, been served along side yellow rice and a roasted chicken, gone perfectly with tortilla chips, and accompanied tonight’s steak tacos.

Steak & Swiss Chard Tacos

Serves 6

2 steaks (preferably ribeye or flank steak, but sirloin will work in a pinch)
2 cloves garlic, minced
juice of 1 lime
1 teaspoon cumin
salt and pepper
1 bunch Swiss chard, tough stems chopped into 1/2 inch pieces and leaves roughly chopped
1 tablespoon olive oil
1 clove garlic, thinly sliced
12 corn or flour tortillas
toppings (shredded cheese, diced tomatoes, sour cream, avocado)

Spread the minced garlic evenly on top of the steaks. Sprinkle with the lime juice, cumin, and salt and pepper, to taste. Let the steaks sit for 20 minutes. If desired, steaks can sit for up to one hour in the fridge. Make the salsa while your steaks marinate.

While the steak marinates, heat the olive oil in a skillet over medium heat. Add the Swiss chard stems and sliced garlic and cook, stirring frequently for 2–3 minutes until the garlic turns golden. Add the Swiss chard leaves and continue cooking until the leaves are wilted and stems are just tender, another 5–10 minutes. Season the chard with salt and pepper to taste and set aside.

Preheat a large cast iron skillet or griddle over medium high heat. When hot, place the steaks into the pan and cook for 5–8 minutes until nicely seared on one side. Flip the steaks and continue cooking on the other side until cooked to your desired doneness. I like my beef medium rare so usually another 5 minutes will do the trick, depending on the thickness of the steak.  When done, remove the steaks from the pan and let them rest on a cutting board. After letting them rest for 5–10 minutes, thinly slice the steaks against the grain. Serve the steak with warmed tortillas, topped with the swiss chard, salsa and other accompaniments.

***

Houston-style Green Salsa
from The Homesick Texan Cookbook by Lisa Fain

Makes about 2 cups

3/4 lb (340 g) small tomatillos, husks removed or 1 x11 oz (x310 g) can of whole tomatillos, drained
1 avocado, peeled and pitted
1 or 2 serrano chiles, stems and seeds removed, roughly chopped
4 cloves garlic, chopped
1 tablespoon lime juice
1/4 cup (8 g) cilantro
salt, to taste

If using fresh tomatillos, on high heat, bring a pot of water to boiling and cook tomatillos until soft, about 5 minutes.

Add the tomatillos to a blender along with the avocado, serrano chiles, garlic, lime juice, and cilantro. Blend until smooth then add salt, to taste.

Homemade Chicken Soup

It’s been a tough winter in my house, with bad colds, bad backs, the flu, food poisoning and fevers, topped off by my 3‑year-old getting chickenpox last month. It had been going around his daycare since Christmas, so I had already resigned myself to the fact that he was going to get it; the only surprise was that it took so long. I’ve lost count of the number of pots of homemade chicken soup I’ve made this season, coaxing one or another of us back to health and an appetite.

Chicken soup is one of those things everyone should know how to make. You shouldn’t be able to leave school without knowing how to at least make a roast chicken, chicken soup, an omelette and pasta (don’t laugh — I know someone who didn’t even know how to cook pasta in their early twenties). This recipe is for making stock and soup from scratch, but if you’ve roasted a chicken, you should always make stock with the carcass to extract every last bit of value and goodness from it. It will keep in the freezer for three months, ready for those times when a bowl of homemade chicken soup and a hug is the only thing that will do.

Homemade Chicken Soup

Serves 4

Most chicken noodle soups use wide egg noodles, but I like to use macaroni because it’s easier to scoop up with a spoon, especially for children. If you’re not feeling the best to begin with, you want the act of eating your soup to be as undemanding as possible.

If you’re feeling very organized, prep the soup vegetables when you make the stock and add the carrot peelings, celery leaves and onion and garlic skins to the stock pot. For a stock with an incredible golden color, use a corn-fed chicken. Using my 5 1/2 quart (5.3 liter) Le Creuset pot, I get 3 pints (1.5 liters) of stock.

for the stock:
1 large whole chicken
3 carrots, scrubbed well but unpeeled and cut in half
3 celery stalks, cut in half (leaves included)
1 onion, unpeeled and quartered through the root end
1 head of garlic, cut in half around its middle to expose all the cloves
10 peppercorns
2 bay leaves
1 bunch of parsley
1 tablespoon salt

for the soup:
olive oil
3 carrots, peeled and finely diced
2 celery stalks, cut in half lengthwise and finely chopped
1 onion, finely chopped
salt and freshly ground black pepper
2 or 3 garlic cloves, finely chopped
a few handfuls of cooked, shredded chicken
3 pints (1.5 liters) chicken stock
7 oz (200 g) macaroni (use more if you want a more substantial soup with less broth)
a handful of fresh flat-leaf parsley, chopped
crusty bread, to serve

To make the stock, place the chicken in a large stockpot, one roomy enough to hold it and all the vegetables plus plenty of water. Add in all the remaining stock ingredients, then pour over enough cold water to cover the chicken. Cover the pot and bring it to a boil, then reduce it to a steady simmer and let it bubble away, covered, for 90 minutes to ensure the chicken gets fully cooked. Partially uncover the pot and continue to let it simmer for a further 30 to 60 minutes to let the stock reduce a bit and get a more concentrated flavor. Don’t be tempted to let the stock boil for more than 3 hours max or the texture of the chicken will get too mushy.

Carefully remove the chicken from the pot onto a plate and allow it to cool enough that you can shred it. Strain the stock through a sieve into a large bowl, pressing on the vegetables with the back of a spoon to get as much liquid as possible out of them, then discard them. If you’re making the stock ahead (or only making stock and not soup), cover the bowl with cling film and put it in the fridge overnight to allow the fat to congeal on the top, then skim it off. Otherwise, don’t worry about it — in fact, it’s said that the flu-fighting properties of chicken soup are in the fat anyway.

Once the chicken is cool enough to handle, discard the skin and bones and any other unsavory bits. Dice or shred the remaining chicken. You’ll only need half of it for the soup, so save the rest for adding to pasta, stir-fries, salads, lentils, risotto, chicken salad sandwiches — you get the idea.

To make the soup, place a pot over a medium-low heat and add a tablespoon or so of olive oil. When the oil is warm, add in the carrots, celery and onion along with a pinch of salt (to keep the onion from browning) and some pepper and cook for 10 to 15 minutes, until the vegetables have softened but not colored. Add in the garlic and cook for 1 minute more. Add the chicken and stock and bring to the boil, then reduce to a lively simmer and add in the pasta. Cook for 10 or 15 minutes, until the pasta is cooked through. Add in the parsley at the last minute and ladle the soup into bowls. Pass around plenty of crusty bread to mop up every last drop of nourishing stock. Serve steaming hot and feel better soon.


Chocolate Orange Marble Cake

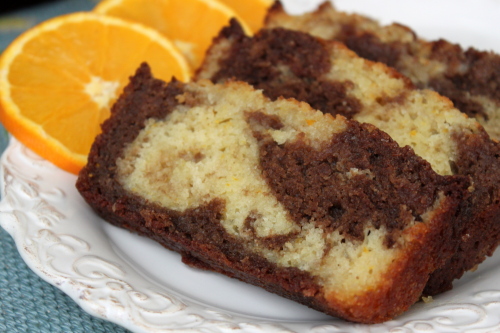
We’re eating citrus in our house like it’s going out of style–or at least out of season. Although February food can be rather bleak notwithstanding the plethora of root vegetables you can scrounge up, at least we can still find great oranges and grapefruit. I love the combination of chocolate and orange, especially in cake form. And of course I’m a sucker for a cake that is moist tender and without frosting (see for example maple yogurt pound cake, raspberry buttermilk cake, and lemon yogurt cake). This marble cake, which I usually bake as a loaf, maintains its moistness for days thanks to a post-bake drizzle of orange juice and sugar syrup. Make it now, before April rolls around and oranges become pithy and expensive.


Chocolate Orange Marble Cake
adapted from allrecipes.com

Serves 10

1 cup (225 g) butter, softened
1 1/4 cups (250 g) white sugar
3 eggs
2 teaspoons vanilla extract
1 cup (240 ml) plain or vanilla yogurt
1 3/4 cups (210 g) all-purpose flour
3/4 teaspoon baking soda
3/4 teaspoon baking powder
1/4 teaspoon salt
2 tablespoons grated orange zest
2 ounces (60 g) semisweet or bittersweet chocolate, melted [Note: I use a microwave for melting]
4 tablespoons orange juice

Preheat the oven to 350°F (180°C). Grease and flour a loaf pan or 10 inch tube pan.

In a large bowl, cream the butter with 1 cup (200 g) of the white sugar. Beat in the eggs, then the vanilla and the yogurt.

In another bowl, stir together the flour, baking soda, baking powder, and salt. Beat the flour mixture into the creamed ingredients. Turn 2/3 of the batter into another bowl. Add the orange zest to that bowl and the melted chocolate to the remaining batter. Alternately spoon the orange and chocolate batters into the greased and floured pan. Gently swirl through the two batters with a knife to create a marbled effect.

Bake for 45–50 minutes, until toothpick inserted in the center of the cake comes out clean. While the cake bakes, stir together the remaining 1/4 cup (50 g) sugar and the orange juice, making sure the sugar dissolves completely. As soon as the done cake is removed from the oven, pour the juice/sugar mixture over the still hot cake. Let the cake finish cooling on a rack before serving.

Slow Cooker Barbacoa Beef

You think you’re busy now? I sometimes find myself thinking on days when I’m feeling frazzled by the ceaseless demands of two young kids. Wait till they’re old enough to want to be doing things after school and on weekends. I imagine future weekday afternoons and Saturday mornings spent ferrying them around to sports or music or friends’ houses, when no doubt I’ll look back at this time and laugh at how easy I actually had it. We’ve taken our first steps down this road recently after my daughter started swimming lessons in the new year, which means we don’t get home till late on Tuesdays now. Landing in the door with homework still to be done and two tired, hungry kids clamoring to be fed, I’ve been keeping an eye out even more than usual for recipes that I can get on the table quickly on Tuesday nights. So far I’ve made stew the night before that I could just come home and reheat and ditto for a big pot of spaghetti Bolognese, but I’ve also been relying on my slow cooker a lot again.

I’d never heard of barbacoa beef before spying this recipe on The Kitchn, where it was presented as Superbowl party food to feed a crowd. The tangy flavors of the lime and vinegar sounded like just to thing to perk up dulled winter taste buds, not to mention the smoky chipotles. It’s a new favorite in my repertoire of slow cooker recipes and a lifesaver on a busy day.

Slow Cooker Barbacoa Beef
adapted from The Kitchn

Makes enough for 30 tacos

Dinner doesn’t get much easier than when it’s made in a slow cooker, but this makes more than enough for two dinners if you want to have the same thing all over again as leftovers on a second night for an even easier time of it. Otherwise freeze half of it for another time. Instead of using the beef as a taco filling, you could also pile it onto nachos. In Ireland, you can get tinned chipotle chiles from my friend Lily’s online shop. I found this recipe had plenty of flavor as it is, but you could try adding oregano, cumin, ground cloves, smoked paprika or even a teaspoon of espresso powder if you want to spice it up a little more.

4 chipotle peppers (from a can), finely chopped, plus all the adobo sauce they sit in
1 red onion, roughly chopped
1 head of garlic, peeled and cloves smashed
1 bunch cilantro, chopped
5 dry bay leaves
1 tablespoon salt
4 to 6 cups (1 to 1.5 litres) beef or chicken stock
1/2 cup (125 ml) cider vinegar
juice of 4 limes
5 to 7 lb (2.2 to 3.2 kg) beef brisket or stewing beef

to serve:
flour or corn tortillas
cherry tomatoes, quartered, or salsa
1 or 2 red onions, thinly sliced, or a few thinly sliced scallions
chopped fresh cilantro
lime wedges

Place all the ingredients except for the beef directly into your slow cooker and stir them around until they’re fairly well combined. Add in the beef and put on the lid. Cook on low for 6 to 8 hours, until the meat is cooked through and can be shredded easily when pulled with a fork.

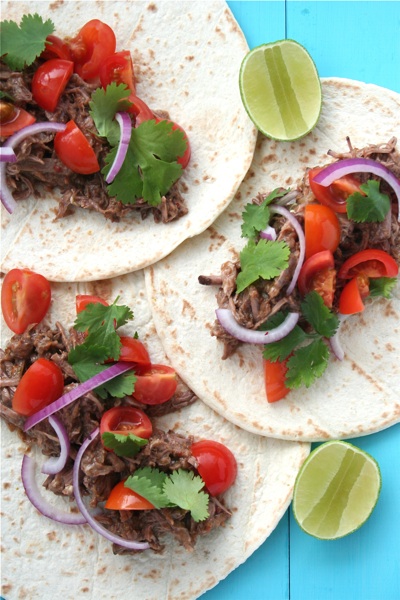
When it’s done, remove the meat from the slow cooker and place it on a rimmed baking sheet or in a large bowl, then use two forks to shred the meat. Place the shredded beef in a large serving bowl and pour over a few ladlefuls of the cooking liquid (you want the meat to be moist but not drowning in the liquid). Serve in tortillas topped with quartered cherry tomatoes or salsa, onion slices, fresh cilantro and an extra squeeze of lime juice.

Chickpea Wraps with Celery, Dill and Mustard

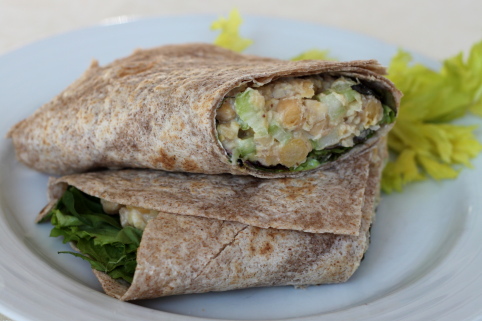
Lucky for me, my co-blogger Kristin keeps up on the cookbook scene. I rarely buy cookbooks (I think I’ve purchased maybe three in my lifetime) but Kristin always send me a good one for my birthday. This year, I was thrilled to receive Super Natural Every Day: Well-loved Recipes from My Natural Foods Kitchen by Heidi Swanson of 101 Cookbooks blogging fame. I pull regularly from her site for easy vegetarian recipes. I wasn’t aware she had a new cookbook until I opened Kristin’s package. What treat to try out some healthy dishes after weeks of December holiday food overload. I mean, I love Christmas cookies and Chanukah latkes, and a birthday cake or two goes down easy, but what really hit the spot after our New Year’s festivities were these savory chickpea wraps. The crisp celery, tangy mustard, and cool yogurt played off the tender chickpeas perfectly. The other recipes I’ve tried from the book have also been lovely, with the exception of one very terrible, nearly inedible chickpea stew. Note to Heidi (and fellow cookbook readers), I love saffron, yogurt, egg yolk and chickpeas–but not in soup form.


Chickpea Wraps with Celery, Dill and Mustard
adapted from Super Natural Every Day: Well-loved Recipes from My Natural Foods Kitchen by Heidi Swanson

For the bean-phobic, try substituting two cups of cooked, diced chicken breast for the chickpeas. I haven’t tried it yet but I’d bet good money this recipe makes a damn good chicken salad wrap.

Serves 4

3 cups (425 g) cooked chickpeas (garbanzo beans) or 2 x 15 oz/425 g cans chickpeas, rinsed and drained
1/3 cup (45 g) minced shallots
1/2 cup (60 g) chopped celery
1/2 teaspoon (or more to taste) dried dill or 2 tablespoons chopped fresh dill
1 1/2 tablespoons Dijon-style or stone-ground mustard
2/3 cup (155 g) plain yogurt
1/2 teaspoon sea salt
1 tablespoon fresh lemon juice, plus more if needed, and a bit of grated zest
4 pieces lavash flatbread or whole wheat tortillas (12 inch)
2 cups (30 g) mixed salad greens

In a large mixing bowl, whisk together the mustard, yogurt and salt. Spread about 2 tablespoons of the yogurt sauce across each piece of lavash.

Pulse 2/3 of the chickpeas in a food processor a few times, just enough to break them up. Transfer them to the mixing bowl with the remaining yogurt sauce, along with the remaining chickpeas, shallots, celery and dill. Gently toss to combine then add the lemon juice and zest and toss again. Taste and add more salt or lemon juice, if needed.

Sprinkle each piece of lavash with 1/4 of the mixed greens (the yogurt will help hold the greens in place), top each of the four wraps with 1/4 of the chickpea mixture. Fold or roll into a wrap and serve.


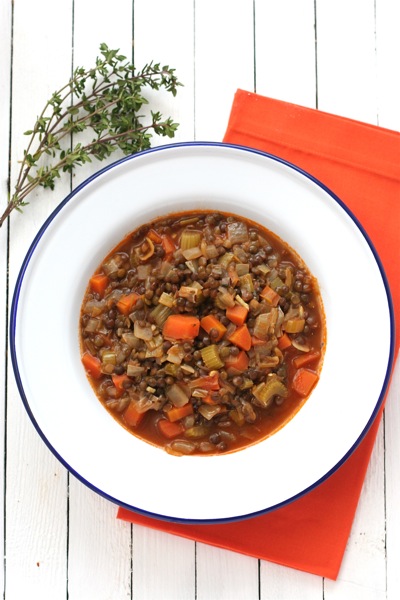
Lentil Vegetable Soup

I was in a pub in County Cork on New Year’s Eve 10 years ago when the euro was introduced in 2002. We were staying with some friends whose parents had a holiday home in Schull, and I remember there was a German woman sitting in the corner of the pub smoking a pipe. After midnight, when we paid for our pints with Irish pounds, our change was handed back in euros, the notes starch-crisp and the coins shiny, fresh from the mint. It was the middle of the Celtic Tiger and everything was still possible. A decade later, with a wallet full of coins circulated from all over the European Union, no one seems to know what will happen now. Will the euro still be around by New Year’s Eve 2012? Will I be lugging around those old heavy Irish punts instead?

I’m just like everyone else I know these days — worried about money, a little scared about the future and nervous at what the coming year might bring. I’ve stopped reading the papers (again), put off by all the doom and gloom and financial crises I don’t understand. Instead, I retreat to my kitchen and make soup. This time of year calls for a big pot of lentil vegetable soup, in the spirit of the Italian tradition of eating lentils in the new year, when their coin-like shape becomes symbolic of wealth and luck. Who couldn’t use a little of that these days? I’ll take it wherever I can get it and eating some lentils is as good a place as any to start. That, and a lotto ticket.


Wishing all our readers a happy, healthy and (hopefully!) prosperous new year!

The Barefoot Contessa’s Lentil Vegetable Soup
adapted from The Barefoot Contessa Cookbook by Ina Garten

Serves 8 to 10

This makes a lot of soup, but I make a full batch anyway and freeze half of it for another time. Otherwise, just halve the recipe if you don’t want to make quite so much. If you’ve got a Parmesan rind hanging around (I always save them for soups and pasta sauces), add it to the soup along with the stock for an extra umami hit.

1 lb (450 g) French green lentils
3 large yellow onions, chopped
2 leeks, white part only, chopped
1 tablespoon minced garlic (3 cloves)
olive oil
salt and freshly ground black pepper
1 tablespoon minced fresh thyme leaves or 1 teaspoon dried
1 teaspoon ground cumin
8 celery stalked, chopped
4 to 6 carrots, chopped
3 quarts (3 liters) vegetable stock (or use chicken stock if you’re not worried about keeping it vegetarian)
3 tablespoons tomato paste
2 tablespoons red wine or red wine vinegar
freshly grated Parmesan cheese, to serve

In a large bowl, cover the lentils with boiling water and allow to sit for 15 minutes. Drain.

In a large stockpot on medium heat, saute the onions, leeks, and garlic with the olive oil, salt, pepper, thyme, and cumin for 20 minutes, until the vegetables are translucent and tender. Add the celery and carrots and saute for 10 more minutes. Add the stock, tomato paste, and lentils. If you have a Parmesan rind hanging around, add that in too. Cover and bring to a boil. Reduce the heat and simmer uncovered for 1 hour, until the lentils are cooked through. Check the seasonings. Add the red wine and serve hot, drizzled with olive oil and sprinkled with grated Parmesan.

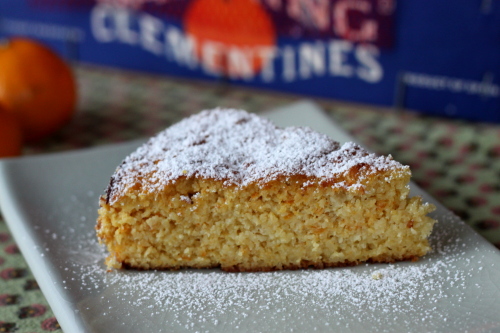
Nigella Lawson’s Clementine Cake

I wasn’t planning to post this week (birthdays, holidays, children, my excuses could go on forever), but this cake is so quick, easy, and different, I had to share. In case any of you need a holiday dessert you can make the ahead of time, this is the cake for you. It’s texture and flavor become more complex on day two, though eating it warm out of the oven might be delicious also. This cake alone might save my sanity this season. I made it last weekend for lunch with my cousin. It’s not too sweet so I’m taking another one to work for my birthday breakfast treat tomorrow. And then I’ll make it again on Friday night to serve with Christmas dinner on Saturday. Speaking of which, I’m cutting this post short  so I can get back to figuring out the logistics of seating thirteen people for dinner at a table that only holds twelve. Happy holidays everyone!

Clementine Cake
adapted from Nigella Lawson

Serves 8

Like many of Nigella Lawson’s cakes, this one seems an incredibly bad idea as you stir it together. Seriously, who would think to boil whole clementines, mash them peel and all, and throw them into a cake that doesn’t even have flour? It works though, and your whole house will smell wonderfully of citrus as it bakes.

4 to 5 clementines (about 13 oz / 370 g total weight)
6 eggs
1 cup plus 2 tablespoons (225 g) sugar
2 1/3 cups (250 g) ground almonds
1 heaping teaspoon baking powder
Powdered (confectioner’s) sugar, for dusting

Put the clementines in a pot with cold water to cover, bring to the boil, and cook for 2 hours. [Check the pan regularly to ensure it doesn’t dry out.] Drain the clementines and, when cool, cut each clementine in half and remove the seeds. Then finely chop the skins, pith, and fruit in the processor (or by hand, of course).

Preheat the oven to 375°F (190°C). Butter and line an 8‑inch springform pan with parchment paper.

Beat the eggs. Add the sugar, almonds, and baking powder. Mix well, adding the chopped clementines. I don’t like using the processor for this, and frankly, you can’t balk at a little light stirring.

Pour the cake mixture into the prepared pan and bake for 1 hour, when a skewer will come out clean; you’ll probably have to cover the cake with foil after about 40 minutes to stop the top from burning. Remove from the oven and leave to cool, in the pan on a rack. When the cake is cold, you can take it out of the pan.


A Cooking Blog